1/72 Focke Wulf Fw-190F-8 w. BV 246 Hagelkorn - Me/ Fw Group Build

Ad: This forum contains affiliate links to products on Amazon and eBay. More information in Terms and rules

jjp_nl

Staff Sergeant
845
3
Apr 13, 2011
Username: jjp_nl
Name: Jelmer
Category: Intermediate (changed from Beginner suggested by zhe jury)
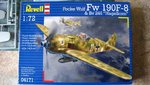
Model: Fw 190F-8/A-8
Scale: 1:72
Manufacturer: Revell
Aftermarket add-ons: bits and pieces (incl. decals) from the spares box, some 1/72 extradecal swastika's, vacu-form clearpart(s) and turned brass set FW-190 guns.

Well, a bit of a situation developed with my Bf 110. While I feel I'm well underway with fixing it, it still is not quite to my satisfaction. Long story short….it was a bit of show stopper for me. Ofcourse I could soldier on and try to finish it for the sake of finishing it in time, but I feel the kit is too wonderful and expensive to risk it ending up in the garbage can.

Solution…..start a new kit, something a bit more simple to get back into the swing of things you could say, as working on the 110 was beginning to get frustrating, rather then fun. Enter the Revell 1/72 Focke Wulf 190F-8 (perhaps turned A-8 if I feel like it)

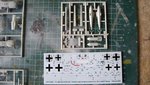
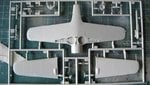
From what I've read it's a good kit in terms details and accuracy. I don't intend to do loads of research or make every rivet count on this one. Just a straight forward build for fun. One modification I perhaps will do is to dig up some sprues of the Revell Fw-190A8/R-11 kit I attempted a few years back. The basic kits are the same and the decal-sheet of the A8 kit is still complete, so basically 4 versions to choose from, however the Hagelkorn test aircraft perhaps would be the most interesting choice. The A8 kit does however also offer a version I kinda like with radar equipment of sorts for night operations

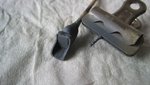
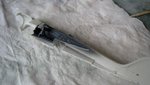
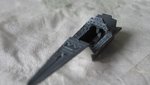
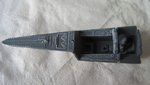
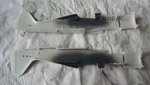
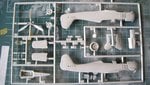
A few pics to get this build started.

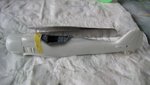
EDIT: Some aftermarket additions I decided upon later on.
 

Attachments

  • 02 - sprue 01.JPG
    02 - sprue 01.JPG
    81.9 KB · Views: 221
  • 01 - box.JPG
    01 - box.JPG
    89.2 KB · Views: 222
  • 04 - sprue 03.JPG
    04 - sprue 03.JPG
    86.4 KB · Views: 228
  • 03 - sprue 02.JPG
    03 - sprue 02.JPG
    73.4 KB · Views: 220
Last edited:
Me too, and it's often a good idea to have a 'rest' from a kit which has caused problems (said he, thinking of his Buccaneer !!).

:lol: Have you even touched that? I have one in my stash that I've been afraid of touching.

I did this with a Stuka as well Jelmer. Should be good! A Nachtjäger would be neat, don't see those often. 8)
 
Nice choice Jelmer. I have the same kit (in night fighter version) in my stash. Just remember you still got two full months till the end of this GB, so still plenty of time to return to the Bf 110 if you feel like it.
 
Nice choice Jelmer. I have the same kit (in night fighter version) in my stash. Just remember you still got two full months till the end of this GB, so still plenty of time to return to the Bf 110 if you feel like it.

True Imalko, we'll see what'll happens with the 110 and if I manage to finish it in time, just don't feel like it right now, so it would be a recipe for disaster if I continue it at all cost at the moment.
 
I may suggest, Jelmer, subject to agreement by the other judges, that we bump you up from "Beginner". Based on what I've seen of your work so far, in my opinion, your at least at intermediate level.

A good choice for a "rest" build. Hope you're more successful that I am in sticking to the OOB, minimal research intent!

Terry, My CF-5A from the Cold War GB is also lurking in the shadows somewhere, waiting to be resumed. I stopped when confronted with the prospect of having to make the scratch built resin peanut tanks.
 
I did think about the category to put it in, but I reasoned the category I put my build in was based on the kit difficulty rather then the skill of of the modeler...but if, without too much chest pounding intended, indeed the skills of the one building it determine the category it be placed in, then 'intermediate' would probably be better. Either one of the judges let me know if they agree with what Crimea_River suggests and I'll edit my SP.

I too hope to stick to the OOB principle this time, but we'll see what will happen. I think I've settled on the nightfighter variant BTW (at least keeping a bit of a nocturnal link with the project shelved for the moment) Although, if this Fw-190 is coming along nicely I'll perhaps return to NJG.1 with an a/c in 1/72
 
Last edited:
Jelmer I see you've changed to intermediate - that's good. It's intended to reflect the skill level of the builder, not the simplicity of the kit.
 
Nice choice of kit Jelmer, I bought the same not long ago!

No problem with taking a rest on the 110 - sometimes better to put things aside and tackle them later with a fresh perspective. (I do same with my paintings)
 
It's a pretty decent kit all in all, although the molds do seem to be showing signs of wear and tear as there's quite a bit of flash and mold lines to clean up. Be aware that the fit of the wings is only so so on this kit. I did a thing or two on the kit already and the wings required plastic strip to be put in the join on both side to get a halfway decent fit. I hope to do an update on this one soon. It's just that real life cought up with me lately and needed some serious attention the past week or so. In addition, the weather has been too great to be sitting indoors sniffing glue all the time. In addition I've been having one of those 'can't get a single piece of plactic glued neatly aligned to another' periods, but I getting through that with a Revell Heinkel 177 and (for a change) a Revell F-16 (very neat kit BTW) in the works.

Despite the wing issues it a lovely kit. It's been released in various versions and I really like what Revell did with it in terms of 'special' options. The Hagelkorn glidebomb, an all-weather/night fighter like version with FuG radio direction finding equipment and I believe a third version has also been release in the past.
 
Last edited:
Good advice there Jelmer, thanks!

Yep, it's a multi-release kit alright. I bought the 'F-8 with Bv 246' when it was first released in about '97 (it was an 'A-8 with Bv 246' then), since revised in name and markings, but sadly no outer bomb racks or bombs for a real F-8...(bought the 'new' release not long ago).
Also have a stash of their A-8/R11 kits, still the most common version available. (Anyone needing radar antennas, let me know! :) )
 
a tad overdue perhaps (due to very busy weeks prior to the summer-vacation), but today I finally had a few hours of 'me-time' to spare...so at long last I can make a start with this one.

As one might expect...construction starts with the interior. I cut the parts involved is this step from the sprues, and cleaned them up, which was rather nessecary as time appears to be catching up with the molds of this Revell FW-190 series of kits. Leading to some flash and minor distorions here and there. The cleaned up parts do show what a wonderful job Revell did engineering this kit. Lot of wonderful subtle details present.I rubbed the parts down with a cottonbud dipped in rubbing-alcohol and went in with some grey to spray the basic interior parts.

Last, but not least....the upper cowl part with two MG's was installed on top of the front fuselage.

Even though the kit has lots of details present on the side-consoles and dashboard, little can be seen of this once the fuselage is closed and a clearpart is installed on top. Spending two weeks or so detailing the interior didn't seem to make a whole lot of sence (gonna save that for a Hase 1/48 kit still sitting in the stash), so I just pulled a quick drybrush through the office and surrounding details and left it at that.

Once this had sufficiently dried I went on to close up the fuselage. Office tub was installed in one side of the fuselage and then the other fuselage part was glued in place. Stick and seat have been left out intentionally for now as the office can be more easily protected from paint/filler spills with no seat and delicate stick part installed. The stick and seat are yet to be detailed a bit more.

Well...that's it for now, but having finally made some sort of start with this one will hopefully keep me working on this kit the coming days and weeks.

Jelmer
 

Attachments

  • 08 - stick + seat.JPG
    08 - stick + seat.JPG
    66.6 KB · Views: 172
  • 09 - office in fuselage.JPG
    09 - office in fuselage.JPG
    59.9 KB · Views: 164
  • 05 - office 01.JPG
    05 - office 01.JPG
    49 KB · Views: 158
  • 06 - office 02.JPG
    06 - office 02.JPG
    53.3 KB · Views: 155
  • 07 - fuselage halves.JPG
    07 - fuselage halves.JPG
    72.9 KB · Views: 175
  • 10 - fuselage closed up.JPG
    10 - fuselage closed up.JPG
    56.8 KB · Views: 163

Users who are viewing this thread

Back