Brewster Buffalo Netherlands, Flaps-Help

Ad: This forum contains affiliate links to products on Amazon and eBay. More information in Terms and rules

Rogi

Master Sergeant
2,293
36
Aug 1, 2011
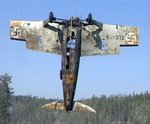
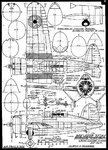
I'll post some more info in a bit, but I have a simple question, does anyone have a clear view photo of a Netherlands Brewster Buffalo with its' landing flaps down? I'm stumped on the instructions for one of the Eduard photo etched flaps and I'd rather be sure before cutting apart the wing (which needs to be severly edited if I follow the instructions on the Eduard photo etch card, a lot more than I might be willing to do to the wing)

So I thought of checking here before I performed some surgery on the plane.


Thanks

Igor
 
Hi Crimea,

heres the main issue, I've browsed through the album and found a couple flap down pics (not a lot around 3-4) but here is my main issue as highlighted by these pics. In the instructions it says to shave off both top and bottom wing's flaps and then install the eduard counterpart (the eduard replacement ones look a bit thin, but that isnt that huge a issue with me, some pics of the dutch buffs have the flaps looking a bit thinner)

DSCN3300.jpg


now I beleive it is the right decision to shave off the top and bottom flaps in the model (before glueing both wing halfs together), but if I do, this is what might create a problem there is a banna looking thing (I have no idea what the item in question is used for on the wing maybe to position the flaps when they change?but i highlighted it in red) which intersects the flaps (in blue) if I want to install "landing Flaps" do I have to shave off both the banana thing and readjust it accordingly on the wing? That banana looking thing I can't find on any reference photos of Buffalos in Dutch service with flaps down. So I need some help more on that thing that all else :S.

flap1.png
 
you are looking for a Brewster B-339C or B-339D Picture is an E but is for the structural part the same. The banana thing is the cover for the Mg ans is not to be shaved

.
Clipboard02.jpg
 
Oh ok, Thank you for the pic :D 
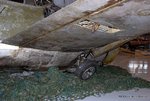
now I know not to touch the top half of the wing and just cut out the other bottom wing for the flap, on the Eduard diagram it confused me, I thought you need to cut off both halfs of the wings before joining them.
 
Those are split flaps as opposed to plain flaps. The Spitfire had the same type. The upper surface of the wing stays where it is and the flap hinges into the airstream from the bottom only.
 
Here's a couple of pics of the Bruiser I'm doing for the Unofficial GB showing more of the arrangement. Looks like a simple piano type hinge on the flap?!

Hope it helps.
 

Attachments

  • flaps.jpg
    flaps.jpg
    28 KB · Views: 683
  • flaps 2.jpg
    flaps 2.jpg
    199.3 KB · Views: 405
  • w3view.jpg
    w3view.jpg
    169.8 KB · Views: 422
Last edited:
The pic posted by Snautzer is one of very (and I mean VERY) few that show the flaps down on a Buffalo. A pilot who left his flaps down while taxying back after landing would get in serious trouble because of the risk that the flaps might get damaged by debris thrown back by the propellor. It's highly unlikely you'd see the flaps down on a Buffalo unless it was undergoing maintenance and there would be lots of open panels etc.
 
Last edited:
In the instructions it says to shave off both top and bottom wing's flaps and then install the eduard counterpart (the eduard replacement ones look a bit thin, but that isnt that huge a issue with me, some pics of the dutch buffs have the flaps looking a bit thinner)

DSCN3300.jpg


now I beleive it is the right decision to shave off the top and bottom flaps in the model (before glueing both wing halfs together)....


I think the Eduard instruction is OK. Just you has misconstrued the diagram. It clearly indicates the area of underwing surfaces that has to be cut off for attaching of these PE parts. There is nothing about those top surfaces.
 
"I think the Eduard instruction is OK. Just you has misconstrued the diagram. It clearly indicates the area of underwing surfaces that has to be cut off for attaching of these PE parts. There is nothing about those top surfaces. "

I wanted to make sure before I went cutting, since you dont usually attach the bottom surface only (if Its a two piece) of the wing to the fuselage. Their diagram confused me, because I was expecting both parts to already be attached :D So I thought I'd ask the experts for a photo or two (thankfully I did and I didn't do any damage to the model, it could of ended badly)

I got the right answer and help, I'm happy and very thankful for it :)
 
Last edited:
now if I could only figure some interior flat aluminium options for the ship id be set to start building soon :D is the back area flat alu. as well? Or is it a flat green (Instructions call for flat green but if the dutch buffs are aluminium interior wouldn't the aluminium reflect off the back when the pilot is trying to turn around to look for enemy fighters?) I'll have to edit this post and add a pic to specify the exact area.
 
I have found a few opinions and here you are their quotes
"The interior was, like the USN versions, in aluminum lacquer except for the instrument panel and cover, and the forward upper side sections on both sides, which were black"
"Aluminum Lacquer for all USN cockpit interiors until the F2A-3, which used Dull Dark Green"
"The Finnish and Dutch 339C/D aircraft would match the F2A-1/2 coloring"
"F2A-1 and F2A-2: cockpit was aluminized lacquer....."

Also I found two shots of the cockpit interior:

F2A-2left.jpg

F2A-2right.jpg
 
Last edited:
re you telling us, me, that my Brewster should have a lacquered aluminum finish in the cockpit?????
 
Bill do you mean the BW-372?

In meantime... the next shot of the Buffalo cockpit...

F2A-2front.jpg
 
Last edited:
If it is the one found in the lake my answer is yes. And it's also yes for the answer regarding the cockpit interior . Here you are a few shots I found via the net.

ruuhinen2.jpg

ruuhinen3.jpg

ruuhinen11.jpg

ruuhinen12a.jpg


You can check it here as well...

BW-372
 
So the back was silver, thats so odd, I thought the glare of the aluminium would make the pilots paint it over, thanks Wurger :)
 

Users who are viewing this thread

Back