Hi all. I'm getting there with my Hasegawa 1/32 P-51D Big Beautiful Doll. Nearly ready to join fuselage so am searching now for detail on gun bay doors. I have the Detail Scale book and that is very good but not quite enough. I am having the starboard side guns exposed and have good detail of the larger square hinged door and latch but don't know if the other 2 rectangular ones are bolt on or hinged also. I spent a lot of time scratch building internal vents because otherwise you would see the bottom of the engine through the carby scoop and the underside of the cockpit through the main vent so am not willing to skimp on detail. Unlike my mrs I know you guys will understand this. To me it's about the detail you may not see as well as the detail you will see. All and any help very much appreciated.
Navigation
Install the app
How to install the app on iOS
Follow along with the video below to see how to install our site as a web app on your home screen.
Note: This feature may not be available in some browsers.
More options
You are using an out of date browser. It may not display this or other websites correctly.
You should upgrade or use an alternative browser.
You should upgrade or use an alternative browser.
P-51D gun bay door detail please
- Thread starter chook
- Start date
Ad: This forum contains affiliate links to products on Amazon and eBay. More information in Terms and rules
More options
Who Replied?Airframes
Benevolens Magister
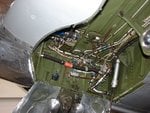
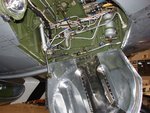
Hi Chook. I have some excellent shots of the upper feed door, the hinged one, on disc. But you already know what that looks like. The bottom door, and the ammuinition tray door, were both 'hatches', which unscrewed and were removed, not hinged. I have yet to see any good pics or drawings of them, but the lower feed access door had a similar pressed - metal finish to the upper door, whilst the ammo tray hatch cover had vertical internal stringers as reinforcement. If you have a look in my thread 'Bare Metal Made Easy', there's a vertical shot of the 1.32nd Dragon P51D, in which you can just make out the inside surface of the ammo cover. I'm afraid I left off the other two doors when the shot was taken. Hope this helps.
Terry.
Terry.
As I recall, the Squadron walk around for the 'Stang has some shots.
http://midwestaero.com/articles/daddysgirl.pdf
Has a good shot of an open gun bay. It's a .pdf, you have to scroll a bit but the shot is more than worth it.
Eighth
http://midwestaero.com/articles/daddysgirl.pdf
Has a good shot of an open gun bay. It's a .pdf, you have to scroll a bit but the shot is more than worth it.
Eighth
drgondog
Major
Airframes
Benevolens Magister
He He! Might be the wrong shots, but VERY useful none the less! Thanks for posting them, they're going in my files!
Terry.
Note to other modellers:- The interior colours of the wheel bays during WW2 was NORMALLY, but not always, laquered aluminium, with the main spar (the rear wall of the well) in that sickly yellow chromate finish, or, green zinc chromate. As per usual, field changes, or a vist to a BAD, could produce modifiications!
- Thread starter
- #7
Thanks guys. Terry your info answers my questions and drgondog I can use those photos too cause the model gives you the flap up only option so I need to scratch build the strut. My next problem is to get that black section with loading details on it. I have never made my own decals but would like to one day but for this case I may just try shrinking a photo and sticking that on. I'd ask for help here but my computer illiteracy would mean you'd need far too much patience and I think it'd be easier to get help face to face.
Airframes
Benevolens Magister
Hi again Chook. If you mean the gun-loading data plate, the black rectangle with the white writing and diagrams, on the inside of the upper feed way door, there should be a decal for it on the Hasegawa kit's decal sheet, there was on the one I built about 16 or 17 years ago. I didn't use it on that kit, but did on the scratch-built door for the Dragon kit! If there isn't, here's a tip for making a fairly good replica, which works well for cockpit placards etc also.
Get a piece of self-adhesive silver foil, or, if unavailable, ordinary kitchen foil, and paint it matt black. Once TOTALLY dry, take a pin, or the tip of a sharp craft knife, and scratch the lettering/ diagram into the paint. The silver will show through. Then, cut it to size, and fix it in place. Don't worry if the 'words' aren't totally legible, as, in this scale, it would be difficult to read anyway, and, on the 'real thing' they were often scuffed, or dirtied, looking rather feint. It's the effect that counts, as the brain will 'read' what it thinks the eye is seeing! Might take a couple of practice attempts, but it works well, and looks effective! Sorry I haven't goy any examples to hand at the moment, but, if you look in my Gustav thread, you can just about make one out, on top of the motor-cannon cover, in one or two of the cockpit shots.
Good luck,
Terry.
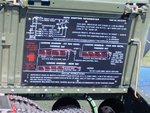
In addition I have found this one.Source unknown.
That exact same picture is in the book P-51 Mustangs in Action by squadron signal if you are interested in knowing.
Airframes
Benevolens Magister
Great stuff again Paul! Both of the data plates are applicable to the 'D', and there was a third style also. I've got some excellent shots on disc, which I can convert and upload, but I'd need advice on copyright, as the pics are overprinted with the photographers' name, date and copyright. They did originate off the net though.
Note, the original WW2 colour on the inside of the door(s) was normally chromate yellow, as were the sills and the intenal parts of the bays; the ammo trays were interior green but, some aircraft had interior green coloured door panels. The outer faces of the locking latches were either 'silver', with the rounded end -pieces in red, and all-red latches could also be seen on occassion. BTW, there are also really good shots of the instrument panel etc and K14 gunsight, in colour, on this same CD.
Terry.
Great stuff again Paul! Both of the data plates are applicable to the 'D', and there was a third style also. I've got some excellent shots on disc, which I can convert and upload, but I'd need advice on copyright, as the pics are overprinted with the photographers' name, date and copyright. They did originate off the net though.
Note, the original WW2 colour on the inside of the door(s) was normally chromate yellow, as were the sills and the intenal parts of the bays; the ammo trays were interior green but, some aircraft had interior green coloured door panels. The outer faces of the locking latches were either 'silver', with the rounded end -pieces in red, and all-red latches could also be seen on occassion. BTW, there are also really good shots of the instrument panel etc and K14 gunsight, in colour, on this same CD.
Terry.
Hi Terry,
I really not and expert on laws but to me its no different then posting pictures say that are on ebay. The picture shows the source of the photo and no one is asking for money so I see no reason why not. But as I said Im no expert so its up to you
Airframes
Benevolens Magister
OK, thanks Paul. I'll do it tomorrow, due to the reasons I've just outlined in my Gustav thread. Hope you see the funny side!
Terry.
Terry.
That exact same picture is in the book P-51 Mustangs in Action by squadron signal if you are interested in knowing.
So it comes from the book.Thank you for the info Paul.

- Thread starter
- #19
Thanks guys heaps. I don't know how I got by before discovering this forum. Terry there is no decal in this kit I just checked. Wurger and Micdrow thanks heaps for the photos. They went to my library for reference. A friend of a friend loves his crop dusters cause his late father flew them (FYI thats not why he's 'late' though) and they are not too common so he vac forms and regularly scratch builds and has agreed to help me. Won't take long but I reckon I could be there playing for quite some time!
Sean
Sean
Airframes
Benevolens Magister
Hi Sean. Looks like Hasegawa have changed the decal sheet!
I've just remembered, the decal i used, i didn't 'transfer' it, i used the actual paper backing as well, gluing it into place, like the 'real' one was riveted or glued to the inside of the door. In that case, you won't nee to make a decal. If you can find a small enough font on your PC, or reduce an existing print out, tou could 'type' your own placard, print it, and cut it out and glue to the door.
I'll transfer those pics I mentioned, and upload them to this thread later.
Terry.
Users who are viewing this thread
Total: 1 (members: 0, guests: 1)