Navigation
Install the app
How to install the app on iOS
Follow along with the video below to see how to install our site as a web app on your home screen.
Note: This feature may not be available in some browsers.
More options
You are using an out of date browser. It may not display this or other websites correctly.
You should upgrade or use an alternative browser.
You should upgrade or use an alternative browser.
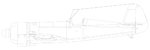
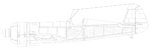
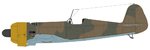
Not really a tutorial...
- Thread starter Clave
- Start date
Ad: This forum contains affiliate links to products on Amazon and eBay. More information in Terms and rules
More options
Who Replied?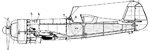
- Thread starter
- #2
Clave
Senior Master Sergeant
- Thread starter
- #3
Clave
Senior Master Sergeant
- Thread starter
- #4
Clave
Senior Master Sergeant
- Thread starter
- #5
Clave
Senior Master Sergeant
wilbur1
Tech Sergeant
Cool stuff Clave
- Thread starter
- #7
Clave
Senior Master Sergeant
- Thread starter
- #8
Clave
Senior Master Sergeant
- Thread starter
- #9
Clave
Senior Master Sergeant
- Thread starter
- #10
Clave
Senior Master Sergeant

Excellent Clave!
mkloby
Senior Master Sergeant
Hey that's pretty interesting clave. Thanks!
Njaco
The Pop-Tart Whisperer
I wish I had a computer that was strong enough to do stuff like that! That is absolutely amzing work Clave! Color me green with envy!
lesofprimus
Brigadier General
Alot of freakin work man, and this gives us an appreciation of just how hard it really is...
Thorlifter
Captain
Very nice Clave. I wondered how you did your work.
- Thread starter
- #16
Clave
Senior Master Sergeant
Thanks! 8)
I think it's because my proper job involves drawing and making a lot changes, I wanted to evolve something that could be changed fairly easily and scaled to any size...
I think it's because my proper job involves drawing and making a lot changes, I wanted to evolve something that could be changed fairly easily and scaled to any size...
Clave thanks for sharing, fantastic work.
Heinz
Captain
I always wondered how you did it all.
Much respect some serious work in those

Much respect some serious work in those
- Thread starter
- #19
Clave
Senior Master Sergeant
Thanks! 8)
It's been a long learning curve, but I hope it will be of some use one day..
It's been a long learning curve, but I hope it will be of some use one day..
Users who are viewing this thread
Total: 1 (members: 0, guests: 1)