dirkpitt289
Master Sergeant
History
When Britain went to war in 1939 the Bristol Blenheim was undoubtedly the most important aircraft in the inventory of the Royal Air Force. The Blenheim was built in vast numbers and set new standards in performance. It was issued to every RAF Command, including Bomber, Night Fighter and Coastal Commands. The introduction of the type heralded the adoption of many new production techniques. The all-metal monocoque structure and complex internal systems were at the leading edge of the technology of the day.
During the opening encounters of the war the Blenheims flaws were brutally exposed by enemy fighters and flak. Casualty rates were alarmingly high and only the dedication and courage of the crews that flew them enabled operations to continue. A total of three Victoria Crosses, Britains highest recognition for bravery was awarded to Blenheim crewmen. Frequently overlooked, the contribution of the Blenheim can not be ignored. Despite its inadequacies, it was the only British bomber capable of offensive daylight operations until the introduction of the de Havilland Mosquito. Blenheim squadrons served in every theatre of the war and chalked up many historic firsts. They pioneered many of the techniques of modern aerial warfare such as airborne radar interception.
A Canadian-built variant of the Blenheim named the Bolingbroke was used as an anti-submarine and training aircraft.
Specifications (Blenheim Mk IV):
Engines: Two 905-hp Bristol Mercury XV radial piston engines
Weight: Empty 9,790 lbs., Max Takeoff 14,400 lbs.
Wing Span: 56ft. 4in.
Length: 42ft. 7in.
Height: 9ft. 10in.
Performance:
Maximum Speed: 266 mph
Cruising Speed: 198 mph
Ceiling: 27,260 ft.
Range: 1,460 miles
Armament: Three 7.7-mm (0.303-inch) machine guns, plus up to 1,000 pounds of bombs internally and 320 pounds externally.
Number Built: 4,422
Number Still Airworthy: One
The Kit:

This kit seems to follow suit to what little I've seen of Airfix kits. Lots of flash, thick clunky parts, and parts that are virtually welded to the spree trees. I have to admit I like the detail to the surface of the aircraft with the rivets and such. Its a shame that a lot of it will be lost when it comes time to sand the filler that this will undoubtedly need.


Like most of us I like to start with the cockpit. Is it just me or is this seat as excited as me to get started?


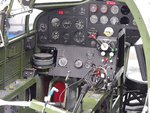
The instrument panel

Adding gauges to the back of the exposed instrument panel.

The bombardier/ Navigators seat will have to go. They sat on a retractable stool that stowed away under the Nav table. This looks more like a folding jump seat from an old Toyota crew cab pickup truck.

The Navigators map table will also have to go. Its Drummel time!

It's almost like the seat was never there

I left a small lip of the original table to give the new table something to attach to.

Now here is where it gets interesting. On the real Blenheim's the cockpit was a multi-level compartment with the pilot sitting high and the Bombardier/ Navigator dropping down to the nose to do his part. The model had it all on the same level. I'm going to attempt to change this.
I started by making a new attaching point for the flight deck.

The deck was then cut to match what the actual Blenheim's had.

Rib work

From what I found online the kit seat didn't look right to me for the pilot. To remedy this I stole a spare seat from one of my Academy B-17s. Cut the legs off, trimmed down the seat back and added arm rests. In the end it was closer to a seat I saw in a picture of a Blenheim.

Next I added a wall between the pilot and the bombardier table which was made from some evergreen styrene.

Painting the Blenheim cockpit


I added the fuel control box the the bulkhead

Next I added the control column and the seats. The pilots seat cushion is a bit shiny for me so I will attempt to tone it down with some flat cote. I also added the map box to the navigators table.

Next up will be the retracting stool that the Bombardier/ Navigator uses at the table and maybe some seat belts.
Till then thanks for looking.
When Britain went to war in 1939 the Bristol Blenheim was undoubtedly the most important aircraft in the inventory of the Royal Air Force. The Blenheim was built in vast numbers and set new standards in performance. It was issued to every RAF Command, including Bomber, Night Fighter and Coastal Commands. The introduction of the type heralded the adoption of many new production techniques. The all-metal monocoque structure and complex internal systems were at the leading edge of the technology of the day.
During the opening encounters of the war the Blenheims flaws were brutally exposed by enemy fighters and flak. Casualty rates were alarmingly high and only the dedication and courage of the crews that flew them enabled operations to continue. A total of three Victoria Crosses, Britains highest recognition for bravery was awarded to Blenheim crewmen. Frequently overlooked, the contribution of the Blenheim can not be ignored. Despite its inadequacies, it was the only British bomber capable of offensive daylight operations until the introduction of the de Havilland Mosquito. Blenheim squadrons served in every theatre of the war and chalked up many historic firsts. They pioneered many of the techniques of modern aerial warfare such as airborne radar interception.
A Canadian-built variant of the Blenheim named the Bolingbroke was used as an anti-submarine and training aircraft.
Specifications (Blenheim Mk IV):
Engines: Two 905-hp Bristol Mercury XV radial piston engines
Weight: Empty 9,790 lbs., Max Takeoff 14,400 lbs.
Wing Span: 56ft. 4in.
Length: 42ft. 7in.
Height: 9ft. 10in.
Performance:
Maximum Speed: 266 mph
Cruising Speed: 198 mph
Ceiling: 27,260 ft.
Range: 1,460 miles
Armament: Three 7.7-mm (0.303-inch) machine guns, plus up to 1,000 pounds of bombs internally and 320 pounds externally.
Number Built: 4,422
Number Still Airworthy: One
The Kit:
This kit seems to follow suit to what little I've seen of Airfix kits. Lots of flash, thick clunky parts, and parts that are virtually welded to the spree trees. I have to admit I like the detail to the surface of the aircraft with the rivets and such. Its a shame that a lot of it will be lost when it comes time to sand the filler that this will undoubtedly need.
Like most of us I like to start with the cockpit. Is it just me or is this seat as excited as me to get started?
The instrument panel
Adding gauges to the back of the exposed instrument panel.
The bombardier/ Navigators seat will have to go. They sat on a retractable stool that stowed away under the Nav table. This looks more like a folding jump seat from an old Toyota crew cab pickup truck.
The Navigators map table will also have to go. Its Drummel time!
It's almost like the seat was never there
I left a small lip of the original table to give the new table something to attach to.
Now here is where it gets interesting. On the real Blenheim's the cockpit was a multi-level compartment with the pilot sitting high and the Bombardier/ Navigator dropping down to the nose to do his part. The model had it all on the same level. I'm going to attempt to change this.
I started by making a new attaching point for the flight deck.
The deck was then cut to match what the actual Blenheim's had.
Rib work
From what I found online the kit seat didn't look right to me for the pilot. To remedy this I stole a spare seat from one of my Academy B-17s. Cut the legs off, trimmed down the seat back and added arm rests. In the end it was closer to a seat I saw in a picture of a Blenheim.
Next I added a wall between the pilot and the bombardier table which was made from some evergreen styrene.
Painting the Blenheim cockpit
I added the fuel control box the the bulkhead
Next I added the control column and the seats. The pilots seat cushion is a bit shiny for me so I will attempt to tone it down with some flat cote. I also added the map box to the navigators table.
Next up will be the retracting stool that the Bombardier/ Navigator uses at the table and maybe some seat belts.
Till then thanks for looking.
")