Aircraft of World War II - Warbird Forums


Go Back   Aircraft of World War II - Warbird Forums > Modeling Section > Modeling > Start to Finish Builds

Start to Finish Builds Show the progress from start to finish of a build.

Reply
 
LinkBack Thread Tools Display Modes
Old 06-20-2009, 03:38 PM   #1
Senior Member
 
imalko's Avatar
 
Join Date: Mar 2009
Location: Vojvodina, Serbia
Posts: 1,307
1:72 P-51B wood/metal rebuilt

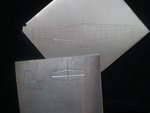
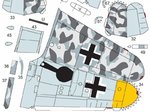
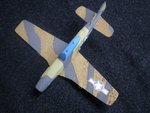
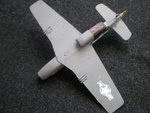
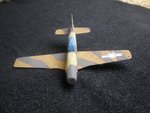
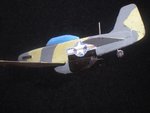
Years ago when I started to build my wood/metal models this 1:72 scale P-51D Mustang was one of my first models. At the time it looked fine to me but few years later I was not satisfied how it turned out at all. (Not to mention rust that began appearing on the wings.) For a long time I was considering rebuilding it and think now is the right time to do it, since it would be great rehearsal for next Group Build (Med/N.Africa).

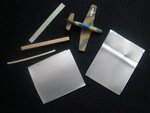
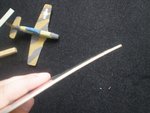
Anyway, I will rebuilt this model to the appearance of P-51B and post progress pictures in this thread. I can't promise very frequent updates but I will do my best to finish this by the end of July and by the beginning of Med/N.Africa GB.

For start, here are few photos of old model...
Attached Images
File Type: jpg p_001.jpg (133.9 KB, 107 views)
File Type: jpg p_002.jpg (124.7 KB, 106 views)
File Type: jpg p_003.jpg (141.9 KB, 105 views)
File Type: jpg p_004.jpg (78.2 KB, 106 views)
__________________

"Find your enemy and shoot him down - everything else is unimportant."

Last edited by imalko; 06-20-2009 at 04:33 PM.
imalko is offline  
Digg this Post!Add Post to del.icio.usBookmark Post in TechnoratiFurl this Post!Spurl this Post!Reddit! Wong this Post!
Reply With Quote
Old 06-20-2009, 03:39 PM   #2
Senior Member
 
imalko's Avatar
 
Join Date: Mar 2009
Location: Vojvodina, Serbia
Posts: 1,307
This are materials I will use. Basically only part of old model I will use is wooden fuselage. Wings, tail surfaces and everything else will be newly made.
For my one engined models I usually use aluminium metal sheets 0.5 or 1mm thick, but for this project I have decided to use 2mm thick aluminium for wings just for practice and so I could see how it will look like. For the future projects I will stick to the 1mm thick metal for one engined models and leave 2mm sheets for twins.
Attached Images
File Type: jpg p_005.jpg (88.0 KB, 105 views)
File Type: jpg p_006.jpg (127.2 KB, 104 views)
__________________

"Find your enemy and shoot him down - everything else is unimportant."

Last edited by imalko; 06-20-2009 at 05:07 PM.
imalko is offline  
Digg this Post!Add Post to del.icio.usBookmark Post in TechnoratiFurl this Post!Spurl this Post!Reddit! Wong this Post!
Reply With Quote
Old 06-20-2009, 03:41 PM   #3
Senior Member
 
imalko's Avatar
 
Join Date: Mar 2009
Location: Vojvodina, Serbia
Posts: 1,307
This is the Mustang I want to make - P-51B of 52 FG USAAF. This was the machine of Lt. Ethan Allen Smith and it was one of 41 Mustangs which on 17th September 1944 provided fighter escort for two B-17s which were delivering arms and supplies to the airfield Tri Duby in Slovakia during the National Uprising. I chose this particular aircraft for three reasons: I like P-51B/C, I have never built one before and with this model I will be able to use paints which I already have so no need for buying new ones.
As for decals I will draw or print them on ordinary paper.
Attached Images
File Type: jpg 02_Groupe Build.jpg (64.7 KB, 102 views)
__________________

"Find your enemy and shoot him down - everything else is unimportant."

Last edited by imalko; 06-20-2009 at 05:12 PM.
imalko is offline  
Digg this Post!Add Post to del.icio.usBookmark Post in TechnoratiFurl this Post!Spurl this Post!Reddit! Wong this Post!
Reply With Quote
Old 06-20-2009, 04:50 PM   #4
Siggy Master
 
Wurger's Avatar
 
Join Date: Jun 2005
Location: Poland
Posts: 13,972
My early scratch-built models didn't exist anymore.I have a few small old B&W pics of my paper ones only.That's a pity.
It is always nice to see the history of our modelling path. Very nice Igor.
__________________


Wurger is offline  
Digg this Post!Add Post to del.icio.usBookmark Post in TechnoratiFurl this Post!Spurl this Post!Reddit! Wong this Post!
Reply With Quote
Old 06-20-2009, 05:05 PM   #5
Senior Member
 
Join Date: Feb 2009
Location: Florida
Posts: 277
I carved a P-39 in 1/48th when I was a kid with a pocket knife. That was a challenge. Your goal (side-view drawing) is a very ambitious one. I wish you patience and luck.
Sweb is offline  
Digg this Post!Add Post to del.icio.usBookmark Post in TechnoratiFurl this Post!Spurl this Post!Reddit! Wong this Post!
Reply With Quote
Old 06-20-2009, 08:29 PM   #6
Senior Member
 
Airframes's Avatar
 
Join Date: Aug 2008
Posts: 9,062
I'm looking forward to your progress here Igor. I love the Mustangs, and much prefer the B/C to the D model.
Have you ever considered cutting off the canopy section, and using it to mould a clear canopy from clear plastic sheet?
__________________


Airframes is offline  
Digg this Post!Add Post to del.icio.usBookmark Post in TechnoratiFurl this Post!Spurl this Post!Reddit! Wong this Post!
Reply With Quote
Old 06-21-2009, 05:17 AM   #7
Senior Member
 
imalko's Avatar
 
Join Date: Mar 2009
Location: Vojvodina, Serbia
Posts: 1,307
Quote:
Originally Posted by Airframes View Post
Have you ever considered cutting off the canopy section, and using it to mould a clear canopy from clear plastic sheet?
Actually I didn't Terry. I always stick to carving and shaping wood with this kind of models and frankly I must admit I don't know how to do that with clear plastic sheet. (No experience in that department what so ever. )
And since the fuselage is made of wood even if conopy would be transparent there wouldn't be much to see beneath it anyway.
__________________

"Find your enemy and shoot him down - everything else is unimportant."
imalko is offline  
Digg this Post!Add Post to del.icio.usBookmark Post in TechnoratiFurl this Post!Spurl this Post!Reddit! Wong this Post!
Reply With Quote
Old 06-21-2009, 08:38 AM   #8
Senior Member
 
Wayne Little's Avatar
 
Join Date: Oct 2006
Location: Adelaide Sth. Aust.
Posts: 12,511
Look forward to your 'carving' too!!!
__________________


Wayne Little is offline  
Digg this Post!Add Post to del.icio.usBookmark Post in TechnoratiFurl this Post!Spurl this Post!Reddit! Wong this Post!
Reply With Quote
Old 06-22-2009, 02:25 PM   #9
Senior Member
 
imalko's Avatar
 
Join Date: Mar 2009
Location: Vojvodina, Serbia
Posts: 1,307
Before actual carving the fuselage the work on the new wings and tail surfaces is needed. This way once when I finish the fuselage the wings will be already prepared for assembly. I started the work today and here is step one...
Attached Images
File Type: jpg Copy of 040.jpg (85.1 KB, 79 views)
__________________

"Find your enemy and shoot him down - everything else is unimportant."

Last edited by imalko; 06-22-2009 at 02:29 PM.
imalko is offline  
Digg this Post!Add Post to del.icio.usBookmark Post in TechnoratiFurl this Post!Spurl this Post!Reddit! Wong this Post!
Reply With Quote
Old 06-22-2009, 02:53 PM   #10
Senior Member
 
Airframes's Avatar
 
Join Date: Aug 2008
Posts: 9,062
Nice Igor. If you ever want to try moulding canopies, let me know, and I'll post a short, illustrated description / tutorial.
__________________


Airframes is offline  
Digg this Post!Add Post to del.icio.usBookmark Post in TechnoratiFurl this Post!Spurl this Post!Reddit! Wong this Post!
Reply With Quote
Old 06-22-2009, 03:02 PM   #11
Senior Member
 
imalko's Avatar
 
Join Date: Mar 2009
Location: Vojvodina, Serbia
Posts: 1,307
Thanks Terry. Feel free to post a tutorial, if it isn't too much trouble... I already downloaded few of your tutorials you have posted earlier on the forum (Bare metal finishes, dioramas). I'm always prepared to learn new things about modeling and if not with this particular model I'm sure will put them to good use with some future project.

Tomorrow I will proceed with cutting the wings...
__________________

"Find your enemy and shoot him down - everything else is unimportant."

Last edited by imalko; 06-22-2009 at 04:53 PM.
imalko is offline  
Digg this Post!Add Post to del.icio.usBookmark Post in TechnoratiFurl this Post!Spurl this Post!Reddit! Wong this Post!
Reply With Quote
Old 06-22-2009, 04:33 PM   #12
Senior Member
 
Airframes's Avatar
 
Join Date: Aug 2008
Posts: 9,062
OK Igor, I'll put something together soon. I may have to mould a new canopy for the Beaufighter, as the kit has the early style, with more frames. If I can't remove the frames and re-polish succesfully, then I'll mould a new canopy, and photograph the process.
__________________


Airframes is offline  
Digg this Post!Add Post to del.icio.usBookmark Post in TechnoratiFurl this Post!Spurl this Post!Reddit! Wong this Post!
Reply With Quote
Old 06-22-2009, 05:04 PM   #13
Siggy Master
 
Wurger's Avatar
 
Join Date: Jun 2005
Location: Poland
Posts: 13,972
Sounds good Terry . Im looking forward to that.

Igor these new parts look very nice.But could you tell me why you didn't make them 3D for instance?
__________________


Last edited by Wurger; 06-22-2009 at 05:07 PM.
Wurger is offline  
Digg this Post!Add Post to del.icio.usBookmark Post in TechnoratiFurl this Post!Spurl this Post!Reddit! Wong this Post!
Reply With Quote
Old 06-22-2009, 05:09 PM   #14
Senior Member
 
imalko's Avatar
 
Join Date: Mar 2009
Location: Vojvodina, Serbia
Posts: 1,307
You mean show them in different angle and not only from above, Wojtek? I was going to do that in one of future posts when I cut them...
Wings are from 2mm aluminium metal sheet and tail surfaces in 0,5mm.
__________________

"Find your enemy and shoot him down - everything else is unimportant."
imalko is offline  
Digg this Post!Add Post to del.icio.usBookmark Post in TechnoratiFurl this Post!Spurl this Post!Reddit! Wong this Post!
Reply With Quote
Old 06-22-2009, 05:24 PM   #15
Siggy Master
 
Wurger's Avatar
 
Join Date: Jun 2005
Location: Poland
Posts: 13,972
No , no, Igor. I meant the way which is used for paper models.Have you ever seen ( been making) these?

Here is an example of a such pattern (template) for Bf109F.Rudders and stabilizers can be made in the same way.
Attached Images
File Type: jpg wings.jpg (83.9 KB, 78 views)
__________________


Last edited by Wurger; 06-22-2009 at 05:27 PM.
Wurger is offline  
Digg this Post!Add Post to del.icio.usBookmark Post in TechnoratiFurl this Post!Spurl this Post!Reddit! Wong this Post!
Reply With Quote
Reply


Thread Tools
Display Modes

Posting Rules
You may not post new threads
You may not post replies
You may not post attachments
You may not edit your posts

BB code is On
Smilies are On
[IMG] code is On
HTML code is Off
Trackbacks are On
Pingbacks are On
Refbacks are On


All times are GMT -4. The time now is 09:25 PM.
Powered by vBulletin
Copyright ©2000 - 2009, Jelsoft Enterprises Ltd.
Content Relevant URLs by vBSEO 3.3.0
Ad Management plugin by RedTyger
Design by HTWoRKS


1 2 3 4 5 6 7 8 9 10 11 12 13 14 15 16 17 18 19 20 21 22 23 24 25 26 27 28 29 30 31 32 33 34 35 36 37 38 39 40 41 42 43 44 45 46 47 48 49 50 51 52 53 54 55 56 57 58 59 60 61 62 63 64 65 66 67 68 69 70 71 72 73 74 75 76 77 78 79 80 81 82 83 84 85 86 87 88 89 90 91 92 93 94 95 96 97 98 99 100 101 102 103 104 105 106 107 108 109 110 111 112 113 114 115 116 117 118