N4521U
Plastic Pirate
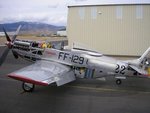
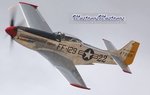
I hope this is appropriate to post a Reno racer? I lettered this plane many years ago when I was sign painting in the states, she is still flying. A repair took place a couple of years ago, oxy bottles gave way while filling on the ground, how lucky was that! Note the Clean skins on the side of one of the pics, all replaced, both sides. Rudder had to be rebuilt as well.
Story about the yellow tail. While racing at Reno the trim tab let loose. Bob Hoover was doing the overhead safety observer duty in his Rockwell Mustang, all yellow. After landing, he was waving to the stands, cockpit open. The waving got more intense, jumping up and down, pointing to his nose, and he waved with more vigor,.............. until......crash. They called it the Hoover Matic. he ran front on into a pick up truck towing another airplane. Straight up through the engine and into the cab, looked like a sliced loaf of bread, everyone bailed from the truck. He loaned his yellow tail to Stu, so he has kept the yellow color.
The owner Stu Eberhart flew F86's in Korea, as he told me he was given the option during training in the UASF, P-51 or F-86, jest were the Thing, then when he was posted all the Mustang trained pilots had to switch to Sabers anyway. His son Bill shares flying, he is also a USAF trained pilot.
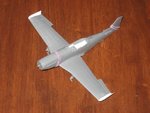
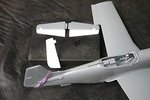
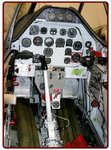
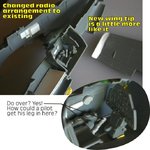
I am adding some cockpit details, scratch built, not too successful, will have to give in and get a detail kit. Having trouble locating one of these here in Oz!
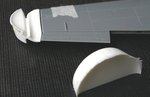
Clipped the wings, you can see in the shots of MM that he has installed flared tips. I tried to sculpt the from "clean clay" then make a mold, some success, will try again. Wing leading edge is clean of gun ports, likewise shell casing openings. Instrument panel is Not military, and cockpit is white! Has a rear seat as well, am getting cockpit detail shots from the planes crew chief and will have to do this somehow.
Have to try and make custom decals, number 22 on sides as well as my nose art. I have an idea for an approach to do this, will have to ask members if someone has a printer to do this? yes? Have received a manual pdf from brewerjerry, what a legend he has turned out to be to do this for me.
Nonetheless, here's my start! cheers, Bill
Story about the yellow tail. While racing at Reno the trim tab let loose. Bob Hoover was doing the overhead safety observer duty in his Rockwell Mustang, all yellow. After landing, he was waving to the stands, cockpit open. The waving got more intense, jumping up and down, pointing to his nose, and he waved with more vigor,.............. until......crash. They called it the Hoover Matic. he ran front on into a pick up truck towing another airplane. Straight up through the engine and into the cab, looked like a sliced loaf of bread, everyone bailed from the truck. He loaned his yellow tail to Stu, so he has kept the yellow color.
The owner Stu Eberhart flew F86's in Korea, as he told me he was given the option during training in the UASF, P-51 or F-86, jest were the Thing, then when he was posted all the Mustang trained pilots had to switch to Sabers anyway. His son Bill shares flying, he is also a USAF trained pilot.
I am adding some cockpit details, scratch built, not too successful, will have to give in and get a detail kit. Having trouble locating one of these here in Oz!
Clipped the wings, you can see in the shots of MM that he has installed flared tips. I tried to sculpt the from "clean clay" then make a mold, some success, will try again. Wing leading edge is clean of gun ports, likewise shell casing openings. Instrument panel is Not military, and cockpit is white! Has a rear seat as well, am getting cockpit detail shots from the planes crew chief and will have to do this somehow.
Have to try and make custom decals, number 22 on sides as well as my nose art. I have an idea for an approach to do this, will have to ask members if someone has a printer to do this? yes? Have received a manual pdf from brewerjerry, what a legend he has turned out to be to do this for me.
Nonetheless, here's my start! cheers, Bill
")