Testors 1/48 P-47D-5 Thunderbolt

Ad: This forum contains affiliate links to products on Amazon and eBay. More information in Terms and rules

Thanks Glenn!

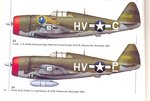
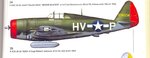
My Thunderbolt will have a red ring on the tail and the rudder is red as well. The grey doesn't seem to come as far up the side, but we will wait and see!

I ordered the decals and the aircraft will in fact be Pistol Packin' Mama and The Cotton Chopper flown by Barnum! I'm excited for this build.
 
Yep, Neutral Grey for the undersides H. The aircraft is from the 56th Fighter Group, and I think I might have a profile, and maybe a pic of it. I'll check tomorrow, as I'm off to bed now. So far, I've found one gear leg, both wheels, the windscreen and the canopy (for a razorback). I should be able to track down the other leg! I'm guessing the parts will be better than the kits'.
BTW, at that period, only one drop tank would normally be carried, under the fuselage. The paper tanks were silver doped (that stuff again!), and metal tanks painted Neutral Grey. The retaining bands were a dull rust red.
The prop blades would definitely have a 4 inch yellow tip, just over 2mm in 1/48th scale.
 
Ahhhh! Thanks very much Terry.

I'll leave the drop tanks off I think. Just waiting for Resin parts to come in the mail so I can finally get some work done.

The kit gear comes with a hub of the wheel already attached. The directions say "Plan ahead incase you want to add parts to the kit."

Well Testors you put the F*$@$ hub on the leg.....YOU should be thinking.
 
Last edited:
Looking forward to this Harrison and nice to see you using that airbrush. Remember that it will take a lot of practice but the superior results should be noticeable quickly.
 
Well I've searched high and low, and I'm blowed if I can find the pic/profile of that bird! However, I have got profiles of other razorbacks from the same Squadron and period, all showing the same camoufalge pattern for the demarcation between top and bottom colours. Let me know if you want me to post one or two, and also which of the parts, or all, mentioned previously.
 
Thanks guys!

Terry,

If the canopy parts you have are able to display the Razorback as having an open canopy that'd be great. The legs can be used as well. Thanks!!!

Also, you can post the profiles IF you have the time :D

EDIT: The postman just dropped me off a nice package with the resin cockpit, wheels and seats (for my P-51)

Will work with them today or atleast take the flash off.
 
Last edited:
Some minor touch ups and let it dry then I'll paint the smaller stuff. I got the first resin pieces off fine. Hoping for some more good modeling! :D
 

Attachments

  • 102_6863.JPG
    102_6863.JPG
    84.3 KB · Views: 150
  • 102_6864.JPG
    102_6864.JPG
    102.7 KB · Views: 140
  • 102_6865.JPG
    102_6865.JPG
    86.7 KB · Views: 158
Looking good H ! Yes, the canopy can be posed open, as it's two separate parts. You might have to sand down the fuselage spine on the kit a bit. BTW, there's a bonus - the canopy and windscreen frames are already painted in Olive drab, weathered! The parts were salvaged from a rather nice model which spun-in off a high shelf!
I'll find the other leg and send everything in a few days, probably Monday, when I get into town. BTW, just in case PM me your address again!
I'll post the profile(s) later tonight.
 
Thanks a bunch T!!

I finally figured out the airbrush! Worked on the seats, armor plating, and rudder pedals. The good thinking about the walls is some spots the paint didn't want to cover but those were the areas that will be painted a different color....*sigh of relief*

No further work will be done since I got a big bad final coming up tomorrow! :evil:
 
Good luck with the final H, meanwhile here's a couple of profiles of 61st Fighter Sqn aircraft from the same period. Note one has a paper drop tank, and the other the 'flat', metal, grey-painted tank. These are from the Osprey '56th Fighter Group' by Roger Freeman.
I also found a pic of possibly the same 'Pistol packin' Mama',from 61st FS, 56th FG, but not the one I was looking for! This is from Squadron signal 'p47 in Action'.
 

Attachments

  • Can Jan 291.jpg
    Can Jan 291.jpg
    70.1 KB · Views: 279
  • Can Jan 292.jpg
    Can Jan 292.jpg
    41.2 KB · Views: 339
  • page 51 Thunderbolt.pdf
    420.6 KB · Views: 92
Ahhh thanks very much T!!

The other one is from, like it says, Neyland who had the words "Pistol Packin' Mama" in white. Barnum had his painted in red and it sort of blends in the first few letters with the ring around the fuselage. Were the stabilizers red on top as well or OD
 
The only red bits were the cowling ring, which changed from the standard white ETO identification, and then the rudder (for the 61st) from March 1944. There used to be a white band across the fin and rudder, but these were removed by painting over in fresh OD, and white bands across the top and bottom of each tailplane, like the P51. These had more or less gone by the period, but the only way to know for sure is from a pic of the actual aircraft.
I'm fairly sure I've got a pic of Barnum's kite somewhere - didn't think the one I posted was the same one.
 
The good thinking about the walls is some spots the paint didn't want to cover but those were the areas that will be painted a different color....*sigh of relief*

Harrison, the thing about resin is it's very important to give the parts a good wash in soapy water before you paint them. There's an oil used to break these from the molds and the residue could play havoc with your paint. Hopefully you did that but from your pics it looks as though the paint was a bit too thin or applied in too thick a coat. Several very light coats gives the best results.

Neverthelss, the cockpit parts look very nice. If you give them a bit of a dark wash to highlight the details, the lighter areas where the base coat appears to be too thin should be hidden.
 

Users who are viewing this thread

Back