imalko
Chief Master Sergeant
Username: imalko
First name: Igor
Category: Category 2/Intermediate
Scale: 1:72
Manufacturer: Hobby Boss
Model Type: Supermarine Spitfire Mk Vb
Details: 355th FS, 4th FG, USAAC, Debden (U.K.), 1942
Decals: spares from 1/72 Italeri Spitfire Mk Vb kit
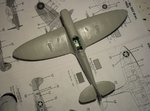
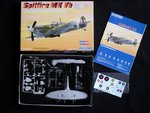
Here's my second entry to this Group Build. It is an Hobby Boss kit from their easy assembly line. As you can see in the picture bellow it is quite basic with small number of parts (indeed the entire fuselage is moulded as one piece as well as main wings). Though the overall shape is correct I believe, the kit has it's issues mainly with canopy, propeller and main landing gear. But more about it later as I'll address these issues during the build in order to achieve more authentic look.
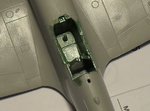
I have spare decals for American Spitfire from Italeri kit I've build recently, so to stay true to the Group Build theme will use those. Must admit I haven't done a lot of research on American use of the Spitfire. I'm keen just to fallow Italeri instructions regarding the paint scheme and markings - standard RAF continental scheme, yellow wing leading edges, sky fuselage band and spinner. No traces of overpainted RAF roundels on the wings? Cockpit would also be RAF interior green I guess. If someone has any pointers regarding this feel free to post…
First name: Igor
Category: Category 2/Intermediate
Scale: 1:72
Manufacturer: Hobby Boss
Model Type: Supermarine Spitfire Mk Vb
Details: 355th FS, 4th FG, USAAC, Debden (U.K.), 1942
Decals: spares from 1/72 Italeri Spitfire Mk Vb kit
Here's my second entry to this Group Build. It is an Hobby Boss kit from their easy assembly line. As you can see in the picture bellow it is quite basic with small number of parts (indeed the entire fuselage is moulded as one piece as well as main wings). Though the overall shape is correct I believe, the kit has it's issues mainly with canopy, propeller and main landing gear. But more about it later as I'll address these issues during the build in order to achieve more authentic look.
I have spare decals for American Spitfire from Italeri kit I've build recently, so to stay true to the Group Build theme will use those. Must admit I haven't done a lot of research on American use of the Spitfire. I'm keen just to fallow Italeri instructions regarding the paint scheme and markings - standard RAF continental scheme, yellow wing leading edges, sky fuselage band and spinner. No traces of overpainted RAF roundels on the wings? Cockpit would also be RAF interior green I guess. If someone has any pointers regarding this feel free to post…
Attachments

Last edited by a moderator:
")