1/35 DIY RC KingTiger from Dragon models

Ad: This forum contains affiliate links to products on Amazon and eBay. More information in Terms and rules

ylp020

Airman
44
0
Jan 10, 2011
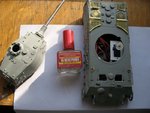
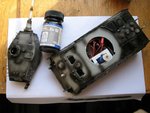
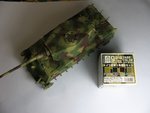
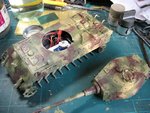
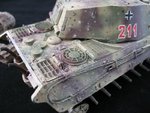
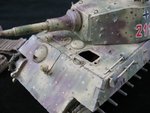
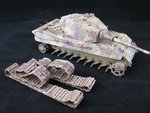
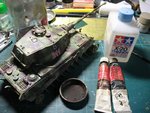
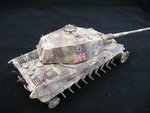
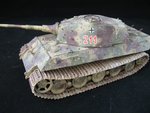
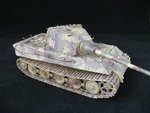
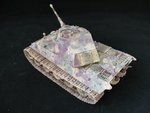
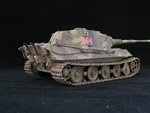
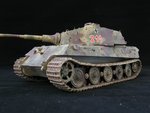
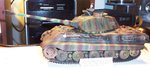
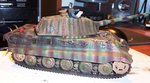
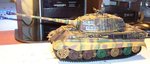
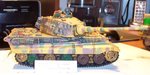
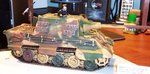
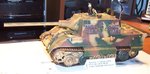
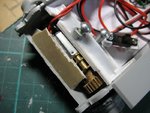
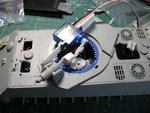
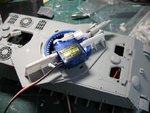
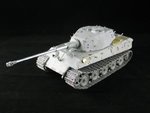
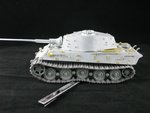
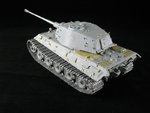
Here is a 1/35 Dragon Kingtiger.I put some RC parts in side to make it movable
it can go forward (stepless motor) backward left and right
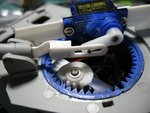
the turret can turn and the cannon can move up and down.
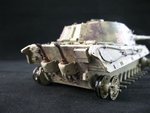
I made the elastic suspension with steel wire.
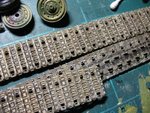
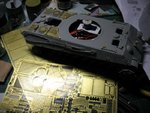
and add some PE parts and a metal track for it.
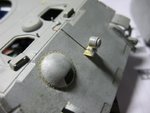
Rebuilt the welding lines with A+B putty
Rebuilt the texture of the ammor with tamiya grey putty.
hope you like it
And here are two videos of test run
http://v.youku.com/v_show/id_XMjE5MTg5MDU2.html
http://www.tudou.com/programs/view/dMVnquXaXCA/
 

Attachments

  • IMG_1793.jpg
    IMG_1793.jpg
    94.9 KB · Views: 186
  • IMG_1794.jpg
    IMG_1794.jpg
    77.6 KB · Views: 176
  • IMG_1796.jpg
    IMG_1796.jpg
    84.1 KB · Views: 164
  • IMG_1797.jpg
    IMG_1797.jpg
    80.2 KB · Views: 178
  • IMG_1798.jpg
    IMG_1798.jpg
    75.7 KB · Views: 163
  • IMG_1802.jpg
    IMG_1802.jpg
    60 KB · Views: 178
  • IMG_1805.jpg
    IMG_1805.jpg
    73.1 KB · Views: 186
  • IMG_1804.jpg
    IMG_1804.jpg
    65 KB · Views: 179
  • IMG_1801.jpg
    IMG_1801.jpg
    58.4 KB · Views: 174
  • IMG_1800.jpg
    IMG_1800.jpg
    102.8 KB · Views: 165
Last edited:
Great stuff, and good photographs too.

I was thinking the same thing Terry.Some nice work thus far look forward to the rest of the build!Oh don't let that little boy Lucky13(Jan) see this he's been on a bit of armor thing of late :) Again nice work.Cheers
 
Thanks guys , for the encouragement.
Here i have more pics.
BTW:What is Lucky13(Jan)'s story?
 

Attachments

  • IMG_1811.jpg
    IMG_1811.jpg
    85.3 KB · Views: 152
  • IMG_1812.jpg
    IMG_1812.jpg
    86.1 KB · Views: 156
  • IMG_1813.jpg
    IMG_1813.jpg
    55.5 KB · Views: 170
  • IMG_1814.jpg
    IMG_1814.jpg
    110.2 KB · Views: 150
  • IMG_1815.jpg
    IMG_1815.jpg
    104.3 KB · Views: 158
  • IMG_1820.jpg
    IMG_1820.jpg
    95.9 KB · Views: 134
  • IMG_1819.jpg
    IMG_1819.jpg
    81.9 KB · Views: 149
  • IMG_1818.jpg
    IMG_1818.jpg
    95.8 KB · Views: 152
  • IMG_1817.jpg
    IMG_1817.jpg
    140.2 KB · Views: 161
  • IMG_1816.jpg
    IMG_1816.jpg
    105.5 KB · Views: 157
  • IMG_1821.jpg
    IMG_1821.jpg
    79.8 KB · Views: 151
  • IMG_1823.jpg
    IMG_1823.jpg
    68.5 KB · Views: 140
  • IMG_1826.jpg
    IMG_1826.jpg
    88.2 KB · Views: 150
  • IMG_1827.jpg
    IMG_1827.jpg
    76.8 KB · Views: 138
  • IMG_1828.jpg
    IMG_1828.jpg
    76.4 KB · Views: 144
  • IMG_1831.jpg
    IMG_1831.jpg
    61.9 KB · Views: 137
  • IMG_1830.jpg
    IMG_1830.jpg
    64.9 KB · Views: 143
Beauty! It looks great in the 'ambush' scheme.
As for Jan - you'll get to know him! He's our tame Swede, living in Scotland, and has recently developed a 'thing' about tanks, but only if they can have a '13' in their call sign numbers!
He might be around later - after his nap and medication .......
 
ylp, very nice work just on the model let alone the converting it to RC. I have 3 king tigers which I built (two with the different turrets and one Jagdtiger). Not that I would even know how to but I would never even consider converting it to RC. Now I have a nice 1/18 Tiger I..... Wish I had your skill
 
Thank you guys. Greeting from East-Aisa.
And speaical thanks to Mr.Airframes for the info about Jan.I'm sure I will get alone well with Mr.Jan the "Lucky 13"(^^).
To Mr.Mikewint:I used nearly no custom made part, all of them are commercial ones available on the ebay or local e-shopping site. The only one is a central control unit made by a friend , cost only 15USD,available on the net as well.
So just gooooo with your RC plan. Nothing difficult.
 
ylp020, thanks, but that's what extremely talented people people usually say about the fantastic things they do while the rest of us just drool and wish. I'm happy just to get the model together and have it look half-way decent
 
ylp020, thanks, but that's what extremely talented people people usually say about the fantastic things they do while the rest of us just drool and wish. I'm happy just to get the model together and have it look half-way decent

No need to sigh. I've seen your M48. It shows you a goood basic skills.
You just need some courage to start weathering. Try it with WASH and Dry brush (or Dry shot?) first. Simple, easily correct and obvious effected.
 
ylp020, there is another poster on this forum Wayne Little who does a fantastic job on him models. he has posted several PDFs on weathering techniques. he uses pastel chalks mostly. I'm giving some serious thought to trying his techniques on my nest model. If you go to "post your models" and "what is on the workbench" I have my 1/48 B-29 and my M1A1 abrams tank posted. I like the chalk idea because I can easily remove it if I don't like the result while washes would require a complete repaint.
1.93m used to be tall but nowadays in the USA it's close to average height.
 
Beautiful! This is what I've bought last few weeks, one isn't there......the Sherman Mk. IC Firefly 'Hybrid Hull', which I'm working.... :D Need to buy paint before moving...

DSCF0022-15.jpg
 
ylp020, Here are my three konigstigers
1. Panzerkampfwagen Tiger VI Ausf. A Sd.Kfz 182 with the Krupp P-2 turret from schwere Panzer Abteil 503
2.Panzerkampfwagen Tiger VI Ausf. B with the improved Porsche turret from schwere Panzer Abteilung 501
3. Jagdpanzer VI Jagdtiger Ausf. B Sd.Kfz. 186 mounting the 128mm PaK 44 from schwere Panzer Abteilung 503
 

Attachments

  • DCP_1500.JPG
    DCP_1500.JPG
    46.7 KB · Views: 136
  • DCP_1501.JPG
    DCP_1501.JPG
    60.9 KB · Views: 133
  • DCP_1503.JPG
    DCP_1503.JPG
    45.8 KB · Views: 132
  • DCP_1502.JPG
    DCP_1502.JPG
    47.7 KB · Views: 126
  • DCP_1499.JPG
    DCP_1499.JPG
    57.3 KB · Views: 139
  • DCP_1498.JPG
    DCP_1498.JPG
    43.1 KB · Views: 117

Users who are viewing this thread

Back