1/72 Eduard B-24J USAAF w/Australian crew lost 28-08-44

Ad: This forum contains affiliate links to products on Amazon and eBay. More information in Terms and rules

N4521U

Colonel
13,434
5,668
Nov 1, 2009
Miranda, NSW
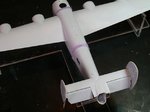
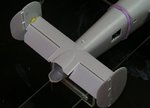
Well I have started another one. I swear I will not post another till I finish these four, Merlin's Magic P-51D start to finish, Brewster unofficial GB, Yak-1b aces GB, and this one.

The story behind this one is it was piloted by Stuart H. Davidson, WO and second in command. Part of the list of Davidson flown AC I have found, and my second Davidson AC. My first was the Typhoon in the Commonwealth GB.
SD1a kit.jpg
SD 1m kit.jpg
SD 1n kit.jpg
View attachment SD 1o SLEEPY TIME GAL.pdfSleepy Time Gal had an all Australian crew with an AIF observer. I have found a transcript of the last messages received.

Summary:
On the night of 28 October 1944 Liberator 42-110120 of 530 Sqn, 380 Bomb Group USAAF, 5th Air Force, failed to return from a mission to Macassar, NEI. The aircraft took off from Darwin at 1751 hours, manned by a RAAF crew of eleven. The following sequence of messages was received by Ops room No 380 (B) Group :
281420Z No 3 out, Position 06.25S 120.50E course 120deg true.
281555Z 2 engines out, posn 0800S 123.35E.
281628Z Not likely to reach base. No 4 giving trouble. Preparing to ditch.
Darwin obtained a bearing of 340deg at 281604Z. Search ships and 4 B24's immediately began search, and B24's, B25's and Catalinas on subsequent days were unable to locate missing aircraft or crew.
 
In this post I am showing the motor, I was kind of dared to "wire" them up. In the second photo I hope you can see the little dimples in front of the cylinders. I drilled a hole the size of my wire for the push rod tubes, cut a length of wire, dropped it into the hole and lifted it to match the rocker arm cover on the cylinder head. Easy peasy, took not time at all. Mybe 0 minutes each!
 

Attachments

  • SD 2a engine.jpg
    SD 2a engine.jpg
    87.3 KB · Views: 292
  • SD 2b rods .JPG
    SD 2b rods .JPG
    96.6 KB · Views: 304
  • SD 2c rods.JPG
    SD 2c rods.JPG
    97.6 KB · Views: 305
  • SD 2d rods.JPG
    SD 2d rods.JPG
    91 KB · Views: 298
The cowls are a little dodgy. The intakes are not consistent at all. I will have to do some "carving" to get them to look a little alike as best I can. The insides of the are pretty ruff as well. Cleaned up the gear legs and the turbos.
 

Attachments

  • SD 6a gear.jpg
    SD 6a gear.jpg
    95.4 KB · Views: 294
  • SD 6b turbos.jpg
    SD 6b turbos.jpg
    67.9 KB · Views: 315
  • SD 6c cowls.jpg
    SD 6c cowls.jpg
    92.6 KB · Views: 292
  • SD 6d cowls.jpg
    SD 6d cowls.jpg
    86.7 KB · Views: 309
Done some unnecessary work on the tail feathers as well. All my mold and casting stuff has been contaminated so I have had to resort to surgery. Hinges on the rudders and elevators. *Oh and my little hole drilling jig for the elevator hinge holes! Had to move one of the trim actuators to the "other" side as the actuators were both on the port sides of the rudders. Makes sense they should be interchangeable. PE stuff at the waist gunners stations. Just them that gets the green paint. Instrument panel is done. PE stuff in the wheel wells. And then the flaps. Cut them off the bottom part of the wing, they are Fowler type. Trimmed a square rod tapering it from one end and wedged it between the upper and lower wing halves. I will have to add some thickness to the flap and ribs in the hole. What can I say, they will be down, as will the elevators and the rudders offset. Call me silly.

Finishing off the flaps now, it may take a few days.
 

Attachments

  • SD 6e rudders.jpg
    SD 6e rudders.jpg
    88.2 KB · Views: 294
  • SD 6f tail assy.jpg
    SD 6f tail assy.jpg
    85.5 KB · Views: 297
  • SD 6g cockpit.jpg
    SD 6g cockpit.jpg
    89.7 KB · Views: 297
  • SD 6h flaps.jpg
    SD 6h flaps.jpg
    80.5 KB · Views: 329
  • SD 6i wheel wells.jpg
    SD 6i wheel wells.jpg
    100.8 KB · Views: 335
Last edited:
Now I'm wondering why I did This!!!!!! No one in their right mind...
Gear leg just looked dodgy. So I cut the bl**dy thing off and replaced it with some PVC rod.
Now I gotta figure out how to put the rings around it and hope the super glue holds the weight of the plane!!!!!!!
 

Attachments

  • SD 7 main gear.jpg
    SD 7 main gear.jpg
    86 KB · Views: 286
Great stuff Bill, and should be a cracker when done !
BTW, you mentioned elsewhere you needed props - Hannant's have just received stock of a set from Quikboost, at approx £6 including the assembly tool.
Meanwhile, here's a few pics I took at Duxford which might be of use.
NOTE: The red 'ring' on the main gear oleos is a safety lock, to prevent the oleo compressing if pressure is lost, and would not normally be seen in operational use unless the aircraft was to be parked for some time.
 

Attachments

  • Czech 173.jpg
    Czech 173.jpg
    83.1 KB · Views: 298
  • Czech 174.jpg
    Czech 174.jpg
    91.3 KB · Views: 280
  • Czech 175.jpg
    Czech 175.jpg
    81.3 KB · Views: 295
  • Czech 183.jpg
    Czech 183.jpg
    90.3 KB · Views: 301
  • Czech 184.jpg
    Czech 184.jpg
    81.9 KB · Views: 303
  • Czech 185.jpg
    Czech 185.jpg
    84.2 KB · Views: 280
  • Czech 186.jpg
    Czech 186.jpg
    91.4 KB · Views: 299
  • Czech 187.jpg
    Czech 187.jpg
    82.7 KB · Views: 278
  • Czech 188.jpg
    Czech 188.jpg
    118.1 KB · Views: 274
  • Czech 189.jpg
    Czech 189.jpg
    89.8 KB · Views: 314
  • Czech 193.jpg
    Czech 193.jpg
    95.9 KB · Views: 305
  • Czech 194.jpg
    Czech 194.jpg
    90.2 KB · Views: 291
  • Czech 195.jpg
    Czech 195.jpg
    100.1 KB · Views: 281
  • Duxford  May 2011 234.jpg
    Duxford May 2011 234.jpg
    107.1 KB · Views: 309
  • Duxford  May 2011 235.jpg
    Duxford May 2011 235.jpg
    112.1 KB · Views: 278
Last edited:
Thems some awesome pictures. Thanks for that. Don't know how much of those details I can conjure up, but will give some a shot!
 
BTW, you mentioned elsewhere you needed props - Hannant's have just received stock of a set from Quikboost, at approx £6 including the assembly tool.QUOTE]

To be posted to Oz I have to buy a bazillion dollars worth of stuff. My supplier in Adelaide says he can get them, a couple of bucks more but I have time for them seeing it's not a timed build. Thanks for the heads up tho, I do appreciate it heaps.

The gear legs are fitting pretty good, I am happy. I might try some vinyl for the rings on the legs.
 
Bill, those red safety locks are only used for long-term storage (as in museums, or maybe at a Maintenance Unit during WW2, if the kite was there for a long time.). They would not normally be used on a Squadron when the aircraft was at dispersal, the shiny oleo would be visible.
 
Dry fit the tail section. I'm happy! Painted the wheels and nose gear. Next time I post I will have the interior of the fuselage painted interior green.

But for now a break from this one and on to my Aces Yak-1b since it finally showed up.
 

Attachments

  • SD8a tail assy.jpg
    SD8a tail assy.jpg
    83 KB · Views: 278
  • SD8b tail assy dtl.jpg
    SD8b tail assy dtl.jpg
    79.3 KB · Views: 277
So along with the Yak, when I can't work on it because something is drying,
I have put the PE stuff in the side gun areas, and the wheel wells, and today I have done some painting.
I just pick away at it when I can.
 

Attachments

  • SD9a interior paint.jpg
    SD9a interior paint.jpg
    166.7 KB · Views: 209
  • D9b wells painted.jpg
    D9b wells painted.jpg
    82 KB · Views: 215

Users who are viewing this thread

Back