Eduard 1/48 Bf-110C (1 Viewer)

Ad: This forum contains affiliate links to products on Amazon and eBay. More information in Terms and rules

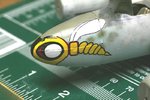
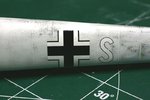
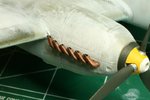
Andy, how do you correct such a thing?

Basically with a lot of 4 letter expletives.

The wrinkles get cut with a very sharp exacto or razor and setting solution applied. Some of the torn parts will need to be touched up with paint or fine tip pens.
 
A bit more progress on the Wespe since post 130.

First pic shows the home made wing decal in place. There are actually 3 there. I figured I would need 2 since the white decal paper would probably show the dark background through. The setting solution on the second decal didn't work well. The decals wrinkled but didn't sit down. So I sanded them down a bit and applied a third one. No setting solution this time. Good thing I printed four.

There's still some trimming of the wings to do. The white decals need to be trimmed exactly up to the black line without obliterating the line. This is quite tricky on the paper so I'll trim it on the model. Also seen is some paint touch up but there's still a bit more to do. The black area forward of the eye in the center of the nose is hand painted. Also noticed a new bubble on the square part of the body that I'll need to repair. Antenna behind the head to be added as well.

The sharp eyed among you will notice that I had to break off the protruding MGs to be able to get the decals on.

Second pic shows the home made white S also to be trimmed slightly and the black outline touched up with a fine tip pen.

More pics to come after a gloss coat is applied.

Thanks for tuning in and your continued interest.
 

Attachments

  • 100215 Wespe.jpg
    100215 Wespe.jpg
    95.8 KB · Views: 200
  • 100215 Ess.jpg
    100215 Ess.jpg
    79.9 KB · Views: 180
Thanks Jan and Dwight.

Jan, I've heard no complaints about the Eduard Wespe decals in any reviews. To work properly, I believe they should have precut slots whihc you can check for. My Eaglecals have these but they still didn't work very well.
 
Thanks NFN.

Jan, from Brett Green's Bf-110E Guide:

"The decals behaved flawlessly on application, even the complex three part Wespe decal over the compound curvature of the nose. There was, however, a gap between the top and bottom halves of the Wespe along the gun cowl join (the decal assumes that the gun cowl will be open, in whicc case this would not be a problem). I cut a circular mask the same size as the Wespe's eye and sprayed Tamiya XF-1 Flat White to hide the gap. While the airbrush was loaded, I also sprayed the white of the wings to match. This left a slight overspray on the black outline, so I touched this up with a fine black Sharpie."
 

Attachments

  • bf110eguide.pdf
    1.6 MB · Views: 97
Last edited:
Doing a bit of work on my 110 to take a break from my Hellcat GB.

Since last time, I did a bit more touch up around the modified Wespe decals (no close-ups as I'm not done yet!), painted the spinners, attached the slats, exhausts, and radio mast and associated boxes and wiring inside the mid canopy section.

Pic 1 is an overall shot of the model as it looks today. One prop is temporarily attached for the "pose" shot.

Pic 2 Before the canopy is installed, these 3 loops on the sill were fashioned out of wire and attached.

Pics 3 and 4 show the antenna mast installed and the associated boxes, wiring, and the DF loop controller added. At first, I tried attaching the boxes to the clear part using white glue but the bond was very poor, probably due to the Future coating. So I reverted to tiny drops of CA hidden behind the painted framework. The wiring was made from copper wire and painted black.

Pic 5 shows the beautifully molded Quickboost exhausts. Pastel staining will be added during the final weathering stage after seal coats have been applied. There was ealrier debate about th espinner colours, some doubt being expressed about the white/yellow/70 combo but based on the photo colourations, I decided to stick with this scheme.

Finally, Pic 6 shows the port LE slat glued in place in the deployed position.

One challenge I had was the carb intake on the port wing which gobbled up my PE grille. The latter now resides inside the wing somewhere in a cranny, and occasionaly lets me know of its presence by rattling around a bit. The only opening is the tiny intake itself and I've not succeeded in getting it out yet. To be continued!

Thanks for checking in.
 

Attachments

  • 100320 Canopy Inner.jpg
    100320 Canopy Inner.jpg
    68.1 KB · Views: 216
  • 100320 Canopy outer.jpg
    100320 Canopy outer.jpg
    63.3 KB · Views: 217
  • 100320 Cockpit.jpg
    100320 Cockpit.jpg
    92 KB · Views: 216
  • 100320 Overall.jpg
    100320 Overall.jpg
    113.9 KB · Views: 239
  • 100320 Exhaust.jpg
    100320 Exhaust.jpg
    80.5 KB · Views: 224
  • 100320 Slat.jpg
    100320 Slat.jpg
    88.5 KB · Views: 218
Last edited:

Users who are viewing this thread

Back