I bought this kit last year while on vacation in the Czech Republic. I noticed there was this rather nice MPM store in Prague which just so happened to be right next to the subway system I used daily to get from the camping place into the city. Needless to say I had to take a look over there, and among other things I took home with me was this Eduard G-4 weekend edition.
Up until now I've looked in the box a great many times and thought about what I wanted to do with it, but the rather incredible amount of plastic and build reports showing that it the Eduard BF-110 series of kits are a tricky bunch (in areas anyway) paired with my limited experience at building kit at the time (I was only just getting back into modelling when I bought it) I kept it safely hidden in my stash up until now.
After a rather sorry experience with the 1/48 CyberHobby kit (due to my own mistakes I might add) I felt like giving a 1/48 BF-110 scale another go, simply because I like the looks of the thing, and especially the sinister looks of the night fighters. So, with some more modelling experience gained over the past year, finally the Eduard BF-110G-4 was pulled from the stash.
I haven't decided yet on a particular a/c I want to make out of it, but a few interesting subjects have crossed my mind sofar (all more or less well known Experten from the night fighting business). However, each aircraft I looked into as potential candidate has features that aren't covered by the Eduard G-4 kit (not even the ProfiPack as far as I can tell). There's still a lot of 'looking into it' needed to see if it is possible to make the changes needed. The various things (depending on the subject) the I need to look into are:
- use of FuG212 radar (not covered by the Eduard kit) in addition to SN2
- use of FuG218 Neptun radar (not covered by the Eduard kit)
- use of the old and trusty MG-17 machine guns in the nose rather then 2x MK108 (I'm not even sure how this might have looked at all).
- position of oblique firing weapons. Certain subjects I've looked into are said to have had these weapons placed way more to the front near the pilot, but Eduard allows them to be place out back only
- at least one subject I've looked into and possibly a second too has a teardrop shaped clear fairing on the hood directly above the pilots seat. This I believe has to do with the gunsight used to aim the Schrage Musik weapons.
I know this project could very well have fitted into the Aces GB, but I fear this is gonna turn out to be a long-term effort, so I'll pass on that GB.
So, where to begin with this huge pile of plastic? I read just about every partial or full build report I could find on the Eduard BF-110 series of kits. Among the things that stood out in these build reports as being points that needs special care…the nacelle to wing assembly. In other words, rather then start out with building up the extremely well detailed and nice looking cockpit of this kit…I decided that getting one of the critical points out of the way would be good way to start this build.
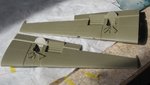
Pic.1: The wings went together just fine! I drilled out a few mounting holes for external fuel tanks and the FuG101 Radio Alti Meter antennae.
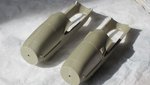
Pic.2: Nacelles glued together. Fit is pretty decent, although the joins will need a little further trimming/sanding/polishing to get completely right.
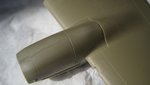
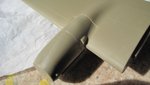
Pics.34: Then it's on to dryfitting and seeing how the fit of the nacelles to the wings is. While indeed it isn't perfect (I must admit it wasn't half as bad as I imagined it would be based on build reports I've read) I managed to improve the fit quite a bit too by careful trimming of the mating surfaces a bit at a time. This is how they sit right now, but exercising a minimum of pressure by means of clamps or something will all but eliminate the steps still visibile and will leave me with only a rather small and easy to fill gap around the join to take care of. All in all not a bad start for what (at least to my mind) was/is a critical area of the kit.
Up until now I've looked in the box a great many times and thought about what I wanted to do with it, but the rather incredible amount of plastic and build reports showing that it the Eduard BF-110 series of kits are a tricky bunch (in areas anyway) paired with my limited experience at building kit at the time (I was only just getting back into modelling when I bought it) I kept it safely hidden in my stash up until now.
After a rather sorry experience with the 1/48 CyberHobby kit (due to my own mistakes I might add) I felt like giving a 1/48 BF-110 scale another go, simply because I like the looks of the thing, and especially the sinister looks of the night fighters. So, with some more modelling experience gained over the past year, finally the Eduard BF-110G-4 was pulled from the stash.
I haven't decided yet on a particular a/c I want to make out of it, but a few interesting subjects have crossed my mind sofar (all more or less well known Experten from the night fighting business). However, each aircraft I looked into as potential candidate has features that aren't covered by the Eduard G-4 kit (not even the ProfiPack as far as I can tell). There's still a lot of 'looking into it' needed to see if it is possible to make the changes needed. The various things (depending on the subject) the I need to look into are:
- use of FuG212 radar (not covered by the Eduard kit) in addition to SN2
- use of FuG218 Neptun radar (not covered by the Eduard kit)
- use of the old and trusty MG-17 machine guns in the nose rather then 2x MK108 (I'm not even sure how this might have looked at all).
- position of oblique firing weapons. Certain subjects I've looked into are said to have had these weapons placed way more to the front near the pilot, but Eduard allows them to be place out back only
- at least one subject I've looked into and possibly a second too has a teardrop shaped clear fairing on the hood directly above the pilots seat. This I believe has to do with the gunsight used to aim the Schrage Musik weapons.
I know this project could very well have fitted into the Aces GB, but I fear this is gonna turn out to be a long-term effort, so I'll pass on that GB.
So, where to begin with this huge pile of plastic? I read just about every partial or full build report I could find on the Eduard BF-110 series of kits. Among the things that stood out in these build reports as being points that needs special care…the nacelle to wing assembly. In other words, rather then start out with building up the extremely well detailed and nice looking cockpit of this kit…I decided that getting one of the critical points out of the way would be good way to start this build.
Pic.1: The wings went together just fine! I drilled out a few mounting holes for external fuel tanks and the FuG101 Radio Alti Meter antennae.
Pic.2: Nacelles glued together. Fit is pretty decent, although the joins will need a little further trimming/sanding/polishing to get completely right.
Pics.34: Then it's on to dryfitting and seeing how the fit of the nacelles to the wings is. While indeed it isn't perfect (I must admit it wasn't half as bad as I imagined it would be based on build reports I've read) I managed to improve the fit quite a bit too by careful trimming of the mating surfaces a bit at a time. This is how they sit right now, but exercising a minimum of pressure by means of clamps or something will all but eliminate the steps still visibile and will leave me with only a rather small and easy to fill gap around the join to take care of. All in all not a bad start for what (at least to my mind) was/is a critical area of the kit.
Attachments
Last edited:
")