Eduard BF-110G-4 Weekend Edition 1/48

Ad: This forum contains affiliate links to products on Amazon and eBay. More information in Terms and rules
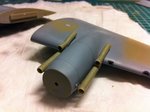
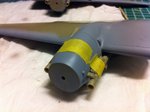
Good recovery and nice work so far. I particularly like the look of the work started on the radio op/gunner's seat.
 
@ Airframes
Thanks, I'm not sure if I'll keep it this way. Looking at what pics I have of the real thing the seat seems to be made of finer material. These tape strips may be a little too big. But for the moment I'm still thinking along the lines of doing something with thin strips of Tamiya tape. This was a bit of a tryout really.

@ Rochie
True. Since I decided I wanted to get the nacelles out of the way first I really didn't look beyond the wings/nacelles construction, and was quite a bit shocked when I found out just how many parts the interior consists of. Should indeed look sweet when.
 
thanks rochie! it's been while since I worked on that part as far as filling sanding is concerned, but I do recall it took me the better of 2 weeks (on and off that is) of working on it before getting near the results I had hoped to achieve.
 
A minor update on the 110. After working my way through the nacelles and office I wanted to take on a few less complicated steps

PIC 1: I glued together some external 300L droptank. Truth be told, I did cheat a little bit on this. I want this 110G-4 to be all out, the whole meat n potatoes radar, drop tanks etc. only to find out the G-4 weekend edition doesn't come with drop tanks :( 
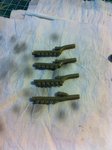
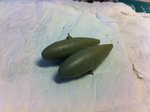
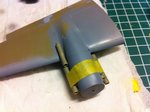
....no sweat...with three Eduard BF-110 kits in the stash I looked in those boxes, and sure enough the BF-110E Weekend Edition (for which I already have made plans that don't include drop tanks) provided a few drop tanks. Gotta love the multi-version parts-breakdown Eduard used for their 110 series. The racks I need to use for the drop tanks do come (also) with the G-4 weekend edition, so with that sorted out I was good to go. On a sidenote, I did look at the 1/48 Me-410 Andy is putting the finishing touches to, and kinda liked the way he made the drop tanks have a few visible dents and scratches to them. So I decided to try and do that as well 'cause I really liked then way that looked on Andy's Me-410. Basically what I did was file a few dents into them and slightly smooth them out with some sanding paper. If you look hard you might be able to see them already, but ofcourse they will hopefully show up more cleary with some paint on, and various techniques to pick out those dents. So since it seems right to give credit where it is due... Andy, thanks for that little bit of inspiration. BTW, I need to look up some decals for the drop tanks, since the 110G-4 weekend edition doesn't come with drop tanks, I doubt it comes with decals for them :S...oh well...that's something to work out at some later time.

PIC 2: show I glued together the exhausts/flame dampers. Fit is OK, but still requires some filing and perhaps a little filling/sanding, but I take it that won't be too much of a problem

PIC 3-5 these pics show I also made preparations for the exhausts to be installed on the engines (at some later time ofcourse) This involved glueing a few mounts onto the nacelles. These required some careful sanding/trimming as they are quite delicate (I cracked one in half too, but that one still came out OK, and with the exhausts placed on them it won't show anyway) Even with those mounts in place I'v found they can still can do with a little additional trimming to make them flush with the nacelles, but that will be easy too.
 

Attachments

  • 805cc482.jpg
    805cc482.jpg
    98.1 KB · Views: 167
  • b9ac1da1.jpg
    b9ac1da1.jpg
    73.1 KB · Views: 186
  • 4abd9e50.jpg
    4abd9e50.jpg
    70.7 KB · Views: 164
  • 50161ad2.jpg
    50161ad2.jpg
    73.3 KB · Views: 166
  • d93323ca.jpg
    d93323ca.jpg
    78.7 KB · Views: 181
Last edited:
Looking good Jelmer and thanks for the nod on those dents. I can not claim it as an original idea but I do think they add a bit of realism to the model. FYI, I include below a couple of reference pics I found on the net that you may find handy. The one showing the strap and release mechanism is the only one if it's kind that I've seen and may inpsire you to fix the detail on the tanks that you have there. Let me know if you can not locate any stencil decals for the tanks as I may have some extras but no guarantees.
 

Attachments

  • orig_tanks1.jpg
    orig_tanks1.jpg
    31.4 KB · Views: 422
  • tanks2.jpg
    tanks2.jpg
    30.1 KB · Views: 206
I can not claim it as an original idea but I do think they add a bit of realism to the model.

I figured as much, but your Me-410 build was the first I noticed it on, as I think there we a few nice close-ups of the drop tanks somewhere in your thread. As for decals, I've got that sorted out as well. The BF-110G-4 weekend edition does (funny enough) comes with some of the decals (Achtung Kraftstoffbehalter) needed for the tanks, but both the E weekend edition and the G-2 weekend edition come with full sets of decals for the tanks, so as with the parts, one of both will have to surrender these to the G-4.

Compared to those pics the detail on the tanks looks pretty convincing already 'as-is', but I think I could still add a thing or two. On a sidenote, I've always wondered why theres such a
 
Last edited:
Obviously an interesting if somewhat frustrating build Jelmer and it's certainly taking shape nicely.
 
Thanks Vic! It's certainly a kit that tests ones patience/skills and needs quite a bit of cleaning up (minor mold lines etc.) and dry fitting and things. I guess the key thing with these Eduard BF-110 is to keep your cool, don't rush it, and leave it alone for a bit if you don't feel like working on it. Although, based on what I read about these kits, things do considerably speed up once you've worked your way through the nacelles and glued the fuselage together with it's complicated cockpit in place.
 
Great reference pics Andy. Just a note on the drop tanks - they weren't all metal type. At least one of the patterns was also made from plywood.
 
@ Terry
Do you mean the 'segments' these drop tanks appear to be made off? In other words, some segments made of metal and some of plywood? Otherwise I'm not quite sure I understand what you mean.

While were talking drop tanks....I've always kind of wondered about why there's such a big dent in the lower back end of these German drop tanks. Dumb question perhaps :oops:
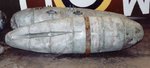
, but I figured it makes production more complicated, so there must be a good reason for it. Looking at kits with drop tanks they are sometimes represented with this big dent and sometimes without. Dunno if that is correct either (in other words, different types of drop tank with and without the big dent) I tried looking it up on the net a while ago, but I haven't been able to find an in-depth study of German drop tanks to be honest 8)
 
Putting my structural engineer's hat on for a second, some of the tanks were flattened at the back for ground clearance for tail draggers. It would not have mattered so much on the 110 because of the height above ground but these tanks would have had a design for universal use. Once you flatten a surface, it becomes weaker against pressure and it must be stiffened either through added ribbing or by adding a "dent" which increases the strength significantly. Corrugated pipe is a good example of increasing the strength by adding ripples and the same principle is at work with the dent.
 
That's how I understand it too Andy. Also, I was once told that the fold, or 'dent' in the metal, being internal, had the benefit of acting as a tank baffle, which helped in minimising fuel surge, although I don't know how effective this was, if at all significant.
Jelmer, the model of drop tank which does not have the 'flat' rear, underside, was produced in metal and also of moulded plywood. In other words, there were two different tanks, of the same shape, in different materials. The metal tanks could be filled and left as such, but the plywood tanks would start to leak after a few hours if fuel was left in them too long, as the fuel reacted with the glues and bonding agents, a similar reaction being experienced with the British-produced, USAAF 'paper' tanks.
 
Aha! Again thanks for the information :D

As for adding details to the drop tanks, I think adding some plumbing between the tanks and the wings seems doable with some copper or lead-wire or something. Found some usable pics of how that might look in my own collection of reference material.
 

Attachments

  • 06 - plumbing on droptanks.jpg
    06 - plumbing on droptanks.jpg
    38.7 KB · Views: 189
Time for a small update on my 110G-4. Last weekend I glued together a good bunch of sub-assemblies that will ultimately form the interior. Today I wanted to make a start with painting the interior. So, some basic grey was sprayed on all the interior sub-assemblies. Time to let this coat of paint cure and dry for a bit and then perhaps tomorrow I can make a start with picking out some of the details.

07-fuselage01.jpg


08-fuselage02.jpg


10-interior02.jpg


09-interior01.jpg


11-interior03.jpg
 

Users who are viewing this thread

Back