Nice work so far!
Navigation
Install the app
How to install the app on iOS
Follow along with the video below to see how to install our site as a web app on your home screen.
Note: This feature may not be available in some browsers.
More options
You are using an out of date browser. It may not display this or other websites correctly.
You should upgrade or use an alternative browser.
You should upgrade or use an alternative browser.
1/48 Airfix Hawker Hurricane Mk.I
- Thread starter Grant Barr
- Start date
Ad: This forum contains affiliate links to products on Amazon and eBay. More information in Terms and rules
More options
Who Replied?Vic Balshaw
Major General
You are doing great Grant even though it keeps chucking a little repair work at you. 

Crimea_River
Marshal
Great stuff. Those sink marks are annoying for sure.
fubar57
General
Very nice Grant
There's a new Hurricane site done by the same group that did the Spitfire.... home It looks like your kite lasted four days after being assigned to 303 Sqn
I was thinking about how many hours this aircraft may have done by the time it was shot down. The number cannot be very high so I resisted the temptation to add even more dirt along with wear and tear, just doing enough to make it look used rather than shiny and new.
There's a new Hurricane site done by the same group that did the Spitfire.... home It looks like your kite lasted four days after being assigned to 303 Sqn
| V6665 | I | M III | 10MU 1-9-40 303Sq 7-9-40 Shot down by Bf109 Pembury Kent 11-9-40 Sgt T Andruszko (Pol) |
- Thread starter
- #45
Grant Barr
Senior Airman
Thanks for the feedback and comments gents. Geo - thanks for confirming my thoughts re: aircraft life, although I might just check to see if it was used elsewhere before assignment to 303 Sqn. I will use the linked website you shared - it has lots of useful information on Hurricanes!
I feel like I've done a tonne of work on the build, but when I look at it there seems to be hardly any progress at all. This is partly due to the seatbelt installation being twice as fiddly as needed because I missed installing it before mating wings to fuselage! Anywhooo - these first two shots show the final belt layout.
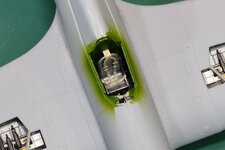
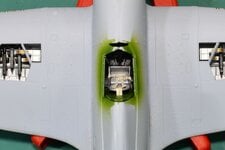
The belts themselves look just that little bit shiny and have lost their colour in a couple of small but noticeable locations. In the next couple of days I will coat the belts with some "dirty" matt clear once I've touched up the chipped areas. This is the second time I've used the paper belts and wanted to make a better fist of it than the first time. I initially painted them with oil paints, thinking this would soak nicely into the paper and give a really nice finish. Wrong!!! The oil paint would not dry - nothing I tried had any impact, which meant that every time you handled them the paint just rubbed off. I cleaned them back with white spirit and set about painting them again, this time with acrylic. Much better outcome, but it did mean the issue of brittleness when bending the belts to shape recurred like last time. The other thing I did was approached the attachment of the buckles much more carefully, being sure that they lined up (buckle front and back as well as to the belt itself). Painting the buckles was easier than I recall from last time, but I put some of that down to the better quality paint I used this time.
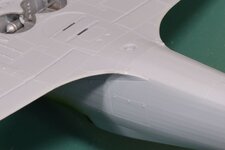
The other task I have been undertaking is making sure that all the parts and surfaces line up with no unsightly gaps or seams appear. The wing root fillet was one area that I was unhappy with, there was a small but very visible gap that I have now filled as seen in the first photo. The other side had a similar issue and was corrected in the same way.
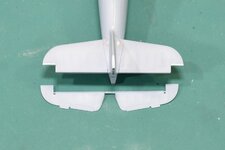
Similarly with the horizontal stabilisers. Offering up the elevators revealed some huge gaps both laterally and fore/aft between the stabilisers and the elevators in the outboard section past the hinge point. If you zoom in on the pic you can see that the lateral gap was minimal, easily fixed with some 0.013 thickness styrene, but the gap fore/aft to the elevator was quite large (over 1mm or over 2" at full scale). I filled the gap with some much thicker card and smoothed and filled them into place. Hopefully you wont see the fix once some undercoat and final paint is applied.
I have done more work removing parts for undercarriage, radiator and propeller from the sprues, cleaning up all the seams and attachment gates in preparation for the next few steps in the assembly process. I will need to paint the radiator internals before its final assembly - one of the jobs I have in mind for tomorrow evening (assuming my workday goes to plan).
Not much else to note, so I will leave it there. As always, thanks to everyone for dropping by for a look.
I feel like I've done a tonne of work on the build, but when I look at it there seems to be hardly any progress at all. This is partly due to the seatbelt installation being twice as fiddly as needed because I missed installing it before mating wings to fuselage! Anywhooo - these first two shots show the final belt layout.


The belts themselves look just that little bit shiny and have lost their colour in a couple of small but noticeable locations. In the next couple of days I will coat the belts with some "dirty" matt clear once I've touched up the chipped areas. This is the second time I've used the paper belts and wanted to make a better fist of it than the first time. I initially painted them with oil paints, thinking this would soak nicely into the paper and give a really nice finish. Wrong!!! The oil paint would not dry - nothing I tried had any impact, which meant that every time you handled them the paint just rubbed off. I cleaned them back with white spirit and set about painting them again, this time with acrylic. Much better outcome, but it did mean the issue of brittleness when bending the belts to shape recurred like last time. The other thing I did was approached the attachment of the buckles much more carefully, being sure that they lined up (buckle front and back as well as to the belt itself). Painting the buckles was easier than I recall from last time, but I put some of that down to the better quality paint I used this time.


The other task I have been undertaking is making sure that all the parts and surfaces line up with no unsightly gaps or seams appear. The wing root fillet was one area that I was unhappy with, there was a small but very visible gap that I have now filled as seen in the first photo. The other side had a similar issue and was corrected in the same way.
Similarly with the horizontal stabilisers. Offering up the elevators revealed some huge gaps both laterally and fore/aft between the stabilisers and the elevators in the outboard section past the hinge point. If you zoom in on the pic you can see that the lateral gap was minimal, easily fixed with some 0.013 thickness styrene, but the gap fore/aft to the elevator was quite large (over 1mm or over 2" at full scale). I filled the gap with some much thicker card and smoothed and filled them into place. Hopefully you wont see the fix once some undercoat and final paint is applied.
I have done more work removing parts for undercarriage, radiator and propeller from the sprues, cleaning up all the seams and attachment gates in preparation for the next few steps in the assembly process. I will need to paint the radiator internals before its final assembly - one of the jobs I have in mind for tomorrow evening (assuming my workday goes to plan).
Not much else to note, so I will leave it there. As always, thanks to everyone for dropping by for a look.
Good work so far!
Vic Balshaw
Major General
Excellent bit of work Grant, love those belts. 

Crimea_River
Marshal
Looks great!
- Thread starter
- #50
Grant Barr
Senior Airman
Progress has been made!
The last of the flying surfaces have now been fitted with the elevators and rudder both drooping/offset respectively. I spent a lot of time making sure that their fit was tight and everything looked just right. Once the glue had a chance to cure I filled in the cockpit, wheel wells, gun bays and landing light recesses with foam in preparation for some primer.
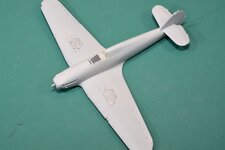
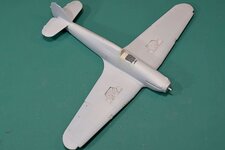
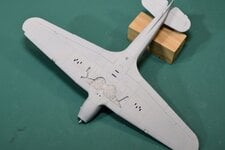
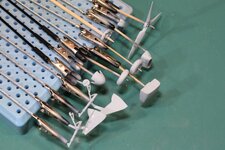
The other task I completed before priming was to part assemble the radiator and other sub-assemblies as appeared appropriate, and cleaned up the mold seam lines on all parts. As we all know this is the least exciting part of any build, being tedious and time consuming, but necessary, as any mold seam that is missed really stands out once the model is painted.
Now that I have a very light layer of primer on board (Vallejo Grey Primer 70.601) I can see that I will need to touch up some fuselage joint (on the engine cowl and just in front of the rudder) but the remaining joints on the wings and tail surfaces all look pretty good - happy days!
Next up will be some fixes to the fuselage joints and another light primer coat to be laid down. Overall I am pretty happy with how this one is turning out. By being just a little more patient and paying more attention to the little things I feel I am getting better results.
Thanks again to everyone dropping by. Hoping to post more progress later in the week.
The last of the flying surfaces have now been fitted with the elevators and rudder both drooping/offset respectively. I spent a lot of time making sure that their fit was tight and everything looked just right. Once the glue had a chance to cure I filled in the cockpit, wheel wells, gun bays and landing light recesses with foam in preparation for some primer.


The other task I completed before priming was to part assemble the radiator and other sub-assemblies as appeared appropriate, and cleaned up the mold seam lines on all parts. As we all know this is the least exciting part of any build, being tedious and time consuming, but necessary, as any mold seam that is missed really stands out once the model is painted.

Now that I have a very light layer of primer on board (Vallejo Grey Primer 70.601) I can see that I will need to touch up some fuselage joint (on the engine cowl and just in front of the rudder) but the remaining joints on the wings and tail surfaces all look pretty good - happy days!
Next up will be some fixes to the fuselage joints and another light primer coat to be laid down. Overall I am pretty happy with how this one is turning out. By being just a little more patient and paying more attention to the little things I feel I am getting better results.
Thanks again to everyone dropping by. Hoping to post more progress later in the week.
fubar57
General
Awaiting the spritz, spritz, spritz
Good work so far!
Users who are viewing this thread
Total: 1 (members: 0, guests: 1)
Similar threads
- Replies
- 114
- Views
- 5K
