Revell 1/72nd SR-71 w/D-21 Drone

Ad: This forum contains affiliate links to products on Amazon and eBay. More information in Terms and rules

Matt308

Glock Perfection
18,961
91
Apr 12, 2005
Washington State
It's been a while since I have made a model that was my own. I am rusty. I am steeped in 20yo modeling techology of yesterday. I have only embraced acrylics in the last year or so and I have zero putty skills. Basically, I suck.

So here is the beginning of a thread where I document my disaster of broadening my horizons. I hope to learn from all and expect that you will guide me with suggestions.

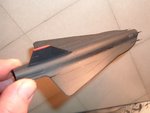
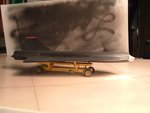
My intentions are to paint the SR-71 with Model Masters Flat Black Acryl. I have used the same for the D-21 drone to get a feel and have realized that acrylic is NOT the same as enamel when painting. The flat black was watered too thin and became spotty. I'm thinking of using distilled water to minimize spotting too. Once I detailed the drone with a lead pencil, I applied a spray coat of Model Masters Flat Clear Acryl to seal. The pencil detail and its graphite effect were muted too much in my opinion.

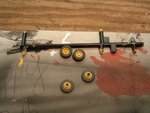
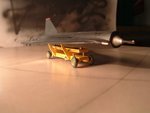
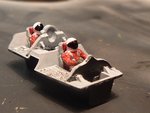
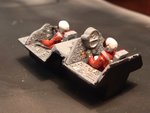
I attempted to sand the three pitot probes in a half-hearted fashion. In my past modeling I used a sewing needle where appropriate, but in this case that didn't seem suitable. I don't like the probes looks. Too bulky.

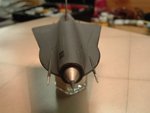
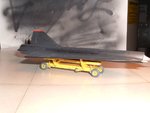
You will find different versions of the D-21 with respect to the color of the inlet spike. I chose to do mine similar to that of some of the earlier configurations that were not to far from the prototype.

I'm still uncertain as to what putty is advisable. I found some Testors at a local store and am not happy with the results. It does not dry fast, consistent, and sands poorly.
 

Attachments

  • DSCF1628.JPG
    DSCF1628.JPG
    90.4 KB · Views: 239
  • DSCF1629.JPG
    DSCF1629.JPG
    125.8 KB · Views: 237
So I thought that I would put together the D-21 cart. My approach was gloss yellow base (God I hate Testors Gloss Yellow but I love that smell man!!!!). Anyone around aircraft ground equipment knows that they are all gloss in original color, tainted with abuse, grease, dings and other contaminants.

I painted the carts wheels while on the sprues (an old habit). Not pretty, but sets the tone.
 

Attachments

  • DSCF1626.JPG
    DSCF1626.JPG
    193.9 KB · Views: 228
I put together the cart. I wanted it to look like it was weathered, used, but not abused.
 

Attachments

  • DSCF1630.JPG
    DSCF1630.JPG
    116.5 KB · Views: 231
I applied a wet wash to the wheels and the cart to simulate its use, maintenance and wear. Then, adding the D-21 it makes for a nice coupling. I took the pic on the bottom of the Revell kit box that has a simulated runway apron (tarmac). Looks kinda cool for a crappy pic.

Effing nose spike won't stay straight, sombitch.
 

Attachments

  • DSCF1644.JPG
    DSCF1644.JPG
    104 KB · Views: 226
  • DSCF1643.JPG
    DSCF1643.JPG
    126.5 KB · Views: 229
  • DSCF1641.JPG
    DSCF1641.JPG
    96.3 KB · Views: 222
I intend to put a black wash on the cart tires and will post them when I do so.

Okay. Next the SR-71 cockpit. The cockpit can be either open or closed. I am going with them closed, as I want the gear up and the SR-71 in its most beautiful state.... flying.

With the cockpit closed, there is not much ability for an observer of the model to see much detail. The kit did not come with decals for the forward and side cockpit control panels. Rather they are molded with much detail that allows for the modeler quite a bit of opportunity. With an aircraft that generates about 300F temperatures at cruise altitude/speed on the windscreen, the glass is obviously going to be minimized.

Therefore, the modeler with a closed cockpit on a 1/72nd model should not opt for spending too much time wasted in detail that will never be seen. Others may dissent who have the patience to kit build better clear pieces, but not me. I'm lazy. And not that talented.

So here are a couple of shots of the cockpit.
 

Attachments

  • DSCF1646.JPG
    DSCF1646.JPG
    149.5 KB · Views: 237
With a cruising altitude of 85,000ft+ the crew wears orange spacesuits that served as the basis for the Space Shuttle suits. Full helmets, gloves and ergonomically sealed suits with independent oxygen systems.

[Crap, these close pics are embarrassing. I swear Wayne Little must have eyes and brush skills like Lilliputian on Meth.]

Again, we don't paint what we can't see. Well Wayne probably does, but I'm human.
 

Attachments

  • DSCF1645.JPG
    DSCF1645.JPG
    144.3 KB · Views: 234
The Reconnaisance Systems Officer (RSO) was responsible for the myriad of RF and optical sensors, as well as the radar warning receiver information. With only a little tiny window, my detail is overkill for a 1/72nd scale window. But it was fun to do anyway.

Heck, if in the future I decide to blow it up with firecrackers I will have the satisfaction of knowing the RSO was "fully engaged". [Lord I'm a child]

Mental note. Pics are too large and too detailed. I'll fix them in future posts. Don't want Adler on my @ss. :lol:
 

Attachments

  • DSCF1647.JPG
    DSCF1647.JPG
    155 KB · Views: 223
Don't be so hard on yourself Matt! Those look great to me. The drone and cart are excellent!

As for the cockpit, I wouldn't be picking out details on the panels like that in 1/72, they'd be getting drybrushed one colour!

Keep us posted on this build, I used to have a poster of a 71 over my bed. 8)
 
Nice Work!

Really like the weathering on the cart

I'm being honest when I say it looks really real

Can't believe you can paint that small for the cockpit
 
Looks good enough to me, Matt. As for the putty you mentioned, I don't know if you can get it in the 'States easily, but I've used 'Milliput' for the last thirty years or so, and have no complaints. It's a 2-part, and sets hard, sands easily, can be drilled, tapped, and moulded. The standard is grey/green, and there's a 'fine' white version, and a silver/grey version. Generally, the standard is best for model work. To get small areas filled and smooth, wet it when in place, and smooth off. I think the nearest to it in the U.S. is 'Greenstuff'.
Hope this helps.
Terry.
 
The Revell kit can be made with cockpits open or closed. I'm going for the closed look to show off the lines of the Lockheed design. Therefore, as I noted before, the 1/72nd windows a SMALL and the ability to see any detail is severely limited. However, it is important to paint the insides of the upper canopies to reflect light. The upper canopies, best I can tell from actual pics, are a dark grey. But I'm inclined to maximize the small light that the windows will allow and paint the unseen parts a "bright" color to ensure you see 'helmets, some control panel, and some other color' to catch your eye.
 

Attachments

  • DSCF1648.JPG
    DSCF1648.JPG
    72.4 KB · Views: 194
I think I finally have this POS camera down. But the damn think sucks up batteries. The pics I posted so far have cost me two AAs. :(
 
No Problem. I Have these like rechargable batteries for the camera so I can alternate between them. It's actually pretty cool. So I dont have to buy a lot of batteries on a daily basis. :lol:
 
Notice I purposely did not paint around the window frames to ensure that the plastic glue had a surface to adhere to. Again, for those areas that cannot be seen accuracy is not for score. :thumbup:
 

Users who are viewing this thread

Back