- Thread starter
- #201
Navigation
Install the app
How to install the app on iOS
Follow along with the video below to see how to install our site as a web app on your home screen.
Note: This feature may not be available in some browsers.
More options
You are using an out of date browser. It may not display this or other websites correctly.
You should upgrade or use an alternative browser.
You should upgrade or use an alternative browser.
Revell 1/72nd SR-71 w/D-21 Drone
- Thread starter Matt308
- Start date
Ad: This forum contains affiliate links to products on Amazon and eBay. More information in Terms and rules
More options
Who Replied?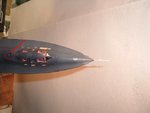
Screaming Eagle
Senior Master Sergeant
very nice matt! makes me wanna do one now.
Great work Matt...impressed!! 
Heinz
Captain
Great work
- Thread starter
- #205
Matt308
Glock Perfection
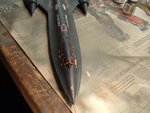
Alright, I got my pics of the stargazing IRS. It's a window on the upper fuselage behind the RSO, but ahead of the refueling receptacle. To make it look like a window or lense, I put a couple coats of future into the recessed area. Allowing the future to dry, this took a couple of days.
Hopefully here in the next week or so this Seattle weather will break and allow some outside pics in pseudo-sunlight. I'm looking forward to that, because flourescent lights are terrible to judge colors, tint and shading.
Hopefully here in the next week or so this Seattle weather will break and allow some outside pics in pseudo-sunlight. I'm looking forward to that, because flourescent lights are terrible to judge colors, tint and shading.
Attachments
109ROAMING
2nd Lieutenant
Very cool Matt
looking forward to your outside pics
looking forward to your outside pics
excellent work matt, is that it finished now or are you still tinkering ?
Airframes
Benevolens Magister
Great stuff Matt, looking better by the minute. And what's this sunlight thing?
I haven't seen any for ages!
I haven't seen any for ages!
- Thread starter
- #209
Matt308
Glock Perfection
It's done guys. Only thing left is to take some pics outside. If I don't get a decent day (i.e., no rain), my some want me to make her a ceiling queen.
Bill G.
Banned
Thanks for your comments on my SR-71. Isn't it funny that we would both build the same bird using different kits! I have a much older Revell 1/72 Blackbird. That one just had pilot heads for the cockpit.
You did a very good job! It was interesting seeing how you built the model and more on the history and loss of the Rapid Rabbit!!!
I read all the problems you had. So here is my decaling method. Cut the decal out and dip into room temperature water until the paper is completely soaked. Remove from the water and let sit. I place the soaked decal in a plastic lid. Once the decal is loose, I wet where it will go with Micro Set (the blue bottle stuff). I then position the decal as needed. Then I blot up the excess fluid and let dry. After drying for a few hours to a day, I brush over the decal with Micro Sol (the red bottle stuff). I put this on heavy. On a flat surface, this should be all you need to do. The decal will get ugly with wrinkles and crinkles. DO NOT TOUCH! These will smooth out on there own as it dries.
As in most rules here is an exception to the do not touch rule. I also decal model RR Freight cars. Sometimes I have to put decals over some huge ribs. This does work. Soak the area in Micro Set. Place the decal in the middle of the area. With a clean, wide brush work the decal as best you can into the base of the rib. Now work the decal over the rib and work the next flat area. It takes time. Now let the decal dry. Now for the fun. Wet the area with the Micro Sol and let it soften the decal. With just and just the weight of the brush bristles, gently press the decal into the base of the ribs. repeating wetting and pressing as needed. It is amazing how much the decal will give and not break.
I have done this many times with different brands and had good luck with it.
Bill G.
- Thread starter
- #212
Matt308
Glock Perfection
Thanks for the tips Bill. I really enjoyed my build and would do many things differently, if I did it over again. The decals are one of them, but the Future method worked out better than I hoped with 30yo decals. Only a couple silvered.
Bill G.
Banned
Matt, when I use old decals, I coat them first with Microscale Liquid Decal Film. I just brush it over the entire sheet. After drying, you just cut the decal as close to the markings as possible. Then wet and apply as normal.
I have used this on many old decals. I have had little problems with decals breaking up.
The silvering is from the decal not fully settling onto the model. My Me-262 does have some of this problem. You can see it on the wing crosses. I should have worked more with the decals when I built the kit. The silvering didn't show up until a few years later.
Bill G.
- Thread starter
- #214
Matt308
Glock Perfection
Mine too were not silvered initially. Interesting. I too coated them with a thin layer of clear. That kept them from disentegrating.
- Thread starter
- #216
Matt308
Glock Perfection
She's all done, Trebor. She's now a ceiling queen in my 9yo's room. I had hope to get her out in natural light, but with winter setting in during that build and rain, I gave up.
For those building the Habu in the future, she is definitely a totally flat matt color. There is no gloss nor semi-gloss on that wonderful airframe. She was less black and more greys and blues. This was a result of her airframe subject to up to almost 1000F temps during Mach 3.5-3.8 operations.
For those building the Habu in the future, she is definitely a totally flat matt color. There is no gloss nor semi-gloss on that wonderful airframe. She was less black and more greys and blues. This was a result of her airframe subject to up to almost 1000F temps during Mach 3.5-3.8 operations.
Users who are viewing this thread
Total: 1 (members: 0, guests: 1)