**** DONE: 1/48 Messerschmitt Bf 110 G-2 - Me/ Fw Group Build.

Ad: This forum contains affiliate links to products on Amazon and eBay. More information in Terms and rules

Terry, Evan, Andy, Jerry, Vic and Wayne Thanks for your comments.

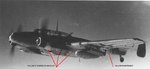
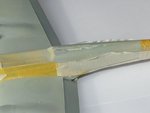
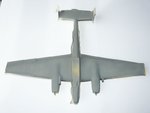
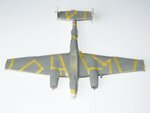
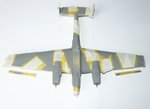
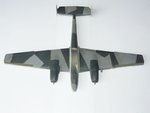
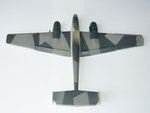
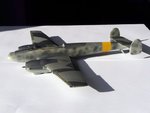
Erich, the aircraft I'm building is based on the photo below. I understood from previous comments that this was likely a ZG 76 aircraft with a yellow rumpfband, therefore I was going to code it M8+EM. The case for the yellow under the nacelles is based purely on my interpretation of the change of the tints apparent in this and one other photo I have of this aircraft in flight. The colour may not be yellow, but it is definitely in contrast to the RLM 76 on either side. It's not shadow and I believe it's too regular to be staining (see the hard line at front and back). If you can throw any further light as to what it might be, it's not too late to change it.

Cheers, Gerry
 

Attachments

  • M8+EM yellow.jpg
    M8+EM yellow.jpg
    48.4 KB · Views: 173
only due to tint as the pic of the A/C came in multiples there are at least 5 fotos of this A/C in flight. it is not yellow I can assure you. it is suppose to be in the 4th staffel and so the pilot and his radio op would not want their 110G-2 really to outshine others in the 4th staffel by being picked up from Allied fighters, the colorful markings were done away with not as early as they should have been. all is depicted on this mount is a replacement under engine cowling which is pretty dirty. it is all RLM 76. I have a much better pic that I am looking at right now. no yellow rudder or wing tips either. the E is in white.

make sense ?
 
Thanks Erich, for taking the time to clarify that. Now it's explained it makes perfect sense and I will revert to a dirtier RLM 76 for the under cowls. I have painted the spinner tips red, as again, I concluded they were a different tone to the RLM 70 at the backs of the spinners. Hope I'm right on this, as it would be difficult to change at this stage.
 
The tonal variation on the other nacelle is much less pronounced but it seems to be there as well. They are definitely heavily stained with oil.
 
Thanks Andy, I would certainly agree with your observation. That's another reason I thought that a different colour had been used under both cowlings.

I'm going to throw another small spanner in the works. On closer examination, the drop tanks and mortar tubes also seem to be a different tonality from the RLM 76, underwing shade. A possible explanation for this could be that these are add-ons from another aircraft and were still in their original colour of (dirty) RLM 65. There is some evidence to support this from the Bf 110G-4 on display at RAF Hendon (see below). I fully understand that it's dangerous to draw too many conclusions from restored aircraft, as many sourced parts can be added to complete a display. However, I would be interested in anyone else's opinion as to the reason for the different tones. I suppose we should also consider if the lower nacelles were replacement parts, still in RLM 65, also? Don't worry, I'm not going to rush into painting anything further 'til I get some feedback on these matters.

Isn't modeling fun!
 

Attachments

  • Bf 110G-4, Hendon.jpg
    Bf 110G-4, Hendon.jpg
    61.7 KB · Views: 173
ask yourself this question

which part(s) gets the most sunlight ? even on LW night fighters the RLM 76 would fade when they sat out in the sun before the last days when they were camo'd by branches and leaves due to Allied jabo's during daylight hours.
 
Gerry, I think a small variation in colour of the tanks and rocket tubes would be completely approapriate but not to the extent shown in that museum piece. That's just my opinion though. Personally, I like getting variations in colours to break up the monotony and given that these parts are add-ons, it stands to reason they could be a little different than the underside of the wings. I think you're doing a fine job so far.
 
Thanks Erich and Andy. I'll take both of your comments into account for the finishing.

Regards, Gerry :D
 
I've just started masking-up for painting the upper surfaces but need to check a couple of things so as not to make any more faux-pas'. I don't have any refs for the top of the a/c but was going to conform to the camouflage pattern below, which I think is roughly correct for the time period. I was also going to use white outline only crosses for the upper wings. Is that correct?

I also have a question about the picture. At first I thought the dark patch on the port nacelle was camouflage pattern (it's close in tone to the dark patch in front of the cockpit). The only problem is that it doesn't conform to any standard Bf 110 pattern that I've managed to find. I don't think it's shadow, because I can't see what might be causing it. Could it possibly be heavy engine exhaust staining, gone black because the photo is so contrasty? I don't want to paint it in as camouflage and find I'm wrong again.

Appreciate any help anyone can offer.
 

Attachments

  • Bf110G-2 Camouflage.jpg
    Bf110G-2 Camouflage.jpg
    119.4 KB · Views: 231
  • M8+EM a.jpg
    M8+EM a.jpg
    50.5 KB · Views: 181
Interesting debate guys and Gerry, I would stick with the RLM 74 (if that's the colour) as directed by the camo instructions. I think what you see on the photo could be a combination of oil, dirt, exhaust soot over the grey-green colour.
 
Gerry, the camo pattern resembles the factory standard scheme for the 110 G shown in Ullmann's Lufwaffe Colours on the port wing but varies on the starboard wing and tail a bit. Perhaps others can confirm. I can scan and post the scheme later tonight.

The 110 commonly had heavy exhaust stains and I'd bet that's what you see. You'll see this in many pics, even to the extent that the stains appear on the rudder.
 
Gerry, here is that scan from "Luftwaffe Colours 1935-1945" by Michael Ullmann. However, there is already a discrepancy between this and the photo you have as there is a clear demarcation between 74/75 on the nose cowl of the aircraft in your pic so obviously variations exist.

110 Camo.jpg
 
Last edited:
Thanks for that schematic Andy, I appreciate you taking the trouble to post it. It ties in to another I had found earlier on the internet, with just minor differences about the cowlings. I had already started painting when yours arrived - patience was never a virtue, I'm afraid - and, as they're both very close, I felt it was OK to progress with my masking. I hope you agree it might fall within the range of 'variation'. I haven't much to report apart from the masking and painting, so I'm padding the post out, with the stages I went through. I should say, that most of the photos have had to be taken with flash, as we haven't seen much of the sun here in the last week - it is July, after all - so the colours are a bit 'colder' than they are in reality.

Pictures 1 2. The aircraft already having an overall coat of RLM 76, I masked off the underside, to avoid bounced or overspray. The fuselage sides were also masked to try as far as possible to conform to the scheme on the photo reference. The mask edge was then prised away to leave an uneven feathered line. I found it easier to work with painters tape for this, as it lifts easier than Tamiya tape.

Picture 3. A slightly transparent coat of RLM 75 was sprayed to give an impression of slight fading. This was a mix of Tamiya acrylics XF 54 Dark Sea Grey and XF 49 Kharki, 3:1, to give a 'mouse grey' tinge.

Pictures 4 5. As the top surface of the wings have hard demarkation lines, I masked these out using Tamiya masking tape. These edges can then be loosened slightly to give a subtle feathered effect. The RLM 75 areas could be filled using the coarser builders tape, not forgetting following the masking through on to the slats, for attaching later.

Pictures 6 7. Finally, the coat of RLM 74 was sprayed. This was a mix of Tamiya XF 63 German Grey and XF 74 Olive Drab, 4:1, to give a slight green tinge to the gray. When the masking tape was removed. i found that the horizontal stabs were done incorrectly, but this was easy to put right, with some local masking and a respray. So now I'll have have a close look to check for any retouching required. The flare on the starboard flap is from photo flash.

So, next stage will be to tackle panel lines and weathering on the underside. More as soon as I have something.
 

Attachments

  • Undersides masked.jpg
    Undersides masked.jpg
    50 KB · Views: 166
  • Fuselage masks.jpg
    Fuselage masks.jpg
    47.6 KB · Views: 145
  • RLM 75 coat.jpg
    RLM 75 coat.jpg
    36.6 KB · Views: 173
  • RLM 74 MASKING GRID.jpg
    RLM 74 MASKING GRID.jpg
    41 KB · Views: 166
  • RLM 74 Full masking.jpg
    RLM 74 Full masking.jpg
    44.5 KB · Views: 184
  • Top camouflage front.jpg
    Top camouflage front.jpg
    38.6 KB · Views: 187
  • Top camouflage back.jpg
    Top camouflage back.jpg
    39.2 KB · Views: 179
Andy, Karl, Terry, Aaron Vic. Thank you for your encouraging words. Hope you're enjoying the build so far. I am again, I think. I hit my 'wall' on this build last week, after days of filling and sanding. Then to have made the mistake on the cowling colour just about capped it all. The project almost had it's test flight out of the workroom window, at the top of the house. But now that I can see some progress again, things don't seem quite so gloomy now.

We had a public holiday here today, and as the weather was pretty dismal, I decided to crack on with the mottling. Then, wonder of wonders, the sun made a rare appearance late this afternoon and I was able to get some natural light shots of progress to date. After the mottling dried, I was able to uncover the Rumpfband as well. I have to thank Andy for his earlier tip on sealing the masking tape with paint to prevent bleed. This seems to have worked perfectly on the yellow and I'm looking forward to trying the technique on the canopy masks, which will be sealed with Klear, before painting - that is, after I get around to masking the canopy.

That's it for now. Talk again soon.
 

Attachments

  • Port mottling.jpg
    Port mottling.jpg
    56.3 KB · Views: 189
  • Starboard mottling.jpg
    Starboard mottling.jpg
    57.1 KB · Views: 198

Users who are viewing this thread

Back