***** DONE -Nakajima A6M2-N "Rufe" of the Yokohama Kokutai Group Build

Ad: This forum contains affiliate links to products on Amazon and eBay. More information in Terms and rules

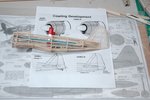
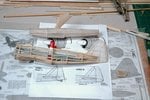
Looking good Charles!

I think we're going to have to edit the anti-swear filters!
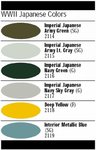
 :lol:

Just stick a zero in the word [c0ckpit] and it works out fine.

After I put the model to bed, tonight, I got to thinking about the change in the rudder. The rudder for the
Zero is very different from the Rufe. So I went back to the drawing board. I wound up cutting almost
and inch and a quarter off the rear of the fuselage, making the last former much thinner, and re-doing
some of the stringers to make the rear of the fuselage tapered. Now the new sized rudder will be no
problem.

Charles
 
Charles here is an idea of the colours cited for the Zero/Rufe, the lefthand pair is one combination the R/hand the other side of the spectrum....you can sort of go somewhere between the 2 if you wish as both greens Dark to Medium Green have been quoted while the same is true for the Green-Grey or Olive_Grey as it has been called in the 2 lighter lower surface or overall colours.
 

Attachments

  • Japanese colours.jpg
    Japanese colours.jpg
    4.3 KB · Views: 128
Thanks, Mate. Wojtek has also given me some Humbrol numbers. I'll check at the hobby shop today.

Fabricated the new style rudder.... it needs to be sanded and covered. Started covering the main float, too. That should
be done today. The fuselage, now 1.25 inches shorter, needs to be sanded and painted with clear dope before it can be
covered. Hope to have pic's tonight for you to voice your opinions of.

Charles
 
Charles Model Master ( Testors ) paints for these that Wayne posted :

FS 34077 - Dark Green - 2116
FS 34092 - Black Green - 1764/2027
FS 24201 - Light Grey Greenish - 1794
FS 16350 - Light Grey/ Light Grey Greenish - 1728 / 1792

Also I included the Model Master II list with patterns of IJ Army/Navy AF colours.
 

Attachments

  • Model Master II Japanese colours.jpg
    Model Master II Japanese colours.jpg
    45.1 KB · Views: 134
Last edited:
Thanks, Wojtek. These Model Master numbers will come in handy.

Here's where we are today, Lads. The Rubber motor has been installed, the fuselage is sanded and the new style tail
has been fabricated and covered. In one of the pic's the tail is pinned to the fuselage. The main float is been covered
and has had one coat of clear dope thinned 50/50 with thinner. In one of the pic's you can see the 1.25 inch piece I
cut off the fuselage to accomodate the new style rudder. While were giving the fuselage a coat of clear dope, we'll
construct the elevator.

Charles
 

Attachments

  • Float1.JPG
    Float1.JPG
    66.5 KB · Views: 130
  • New Tail.JPG
    New Tail.JPG
    70.2 KB · Views: 124
  • Body  float.JPG
    Body float.JPG
    83.6 KB · Views: 137
Last edited:

Users who are viewing this thread

Back