Blohm und Voss strangeness (1 Viewer)

Ad: This forum contains affiliate links to products on Amazon and eBay. More information in Terms and rules

Hamiltonian

Airman
49
4
Feb 17, 2014
I'm hoping to eventually put together a set of 1/48 kits of aircraft my father flew: two Hurricanes, two Spits, two Thunderbolts.
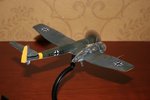
But at present I'm trying to recover my model-building skills (last used 35 years ago) by experimenting with a trio of 1/72 scale aircraft from Blohm und Voss.
First up is an Airfix BV 141B in Eastern Front markings.

Good thing I learned from this: Eduard paint masks preserve sanity when painting complicated glasshouses like this one. :)
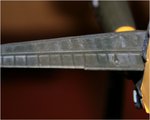
Bad thing I learned from this: I was too impatient with my matt varnish finish - I've got blueish patches all over the upper surfaces that show up *really well* in the camera flash. :(
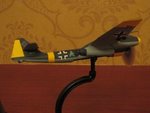
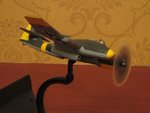
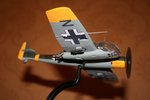
 

Attachments

  • Img_2266.jpg
    Img_2266.jpg
    31.6 KB · Views: 137
  • Img_2268.jpg
    Img_2268.jpg
    32.7 KB · Views: 129
Last edited:
The second of my B&V trio is one that never left the drawing board. A prop and a turbojet in parallel - I can just about imagine getting that settled into level flight, but it would have been a nightmare at take-off.
Again, Eastern Front colours.

Good thing I learned from this: more restraint with the varnish.
Bad thing I learned from this: messed up the camouflage. I used white primer on the BV 141B and ended up with a decent contrast between the dunkelgrun and the schwarzgrun. Same number of camouflage coats on this one, but on a dark green primer - the camouflage pattern is almost invisible. I'm obviously not putting on enough layers to stop the primer showing through. :(
 

Attachments

  • Img_0810.jpg
    Img_0810.jpg
    38.6 KB · Views: 123
  • Img_0812.jpg
    Img_0812.jpg
    37.9 KB · Views: 133
  • Img_0819.jpg
    Img_0819.jpg
    42.1 KB · Views: 126
Last edited:
My last in the trio is a 1/72 BV P170 "Schnellbomber" from Planet Models. Resin and vacform, which is a first for me.
I'm just about to start decalling, so I should have some photos soon. You can expect to see some wonky panel line scribing, since this is the first time I've tried it.
 
My last in the trio is a 1/72 BV P170 "Schnellbomber" from Planet Models. Resin and vacform, which is a first for me.
I'm just about to start decalling, so I should have some photos soon. You can expect to see some wonky panel line scribing, since this is the first time I've tried it.

Pics not loaded?

I like the other two though.
 
Pics not loaded?
The Schnellbomber is still at the decalling stage. I should have some pics soon, although I've just realized I still have the rotating prop discs to build, so that'll delay the finished model.

I've also just noticed that I've deviated from the guidelines on titling a thread in this section. :( So I'll start a new thread, detailing the build in the title, when I put up the Schnellbomber pics.

And now I've *also* noticed that there's a long, sticky "Post your models!" thread at the head of this section - not sure if I should be putting up my stuff there, or doing as I've just suggested and posting a new thread.

(Gad, it's hard work joining a new forum!)
 
Looks like you're modeling skills have weathered the last 35 years quite well. They both look great and I'm looking forward to the third BV. And welcome to the forum!
 
You're all very kind.
If anyone has any suggestions as to how I might undo the mess with the matt varnish (short of stripping and starting again!), or recommendations for a matt varnish that doesn't go blue *quite* so easily, I'd be grateful. (I was using Vallejo when I messed up the first B&V.)

I read somewhere, on another forum, someone who had the idea that you could undo the patchy blue effect by heating the model gently and spraying a new coat. This seemed crazy, but perhaps not crazy enough to be true ...
 
The heating of the model doesn't sound good and I wouldn't follow that way. Could you take a close-up picture of the "bluish" effect there and post here? Unfortunately these uploaded above aren't too good in the view.
 
Last edited:
The heating of the model doesn't sound good and I wouldn't follow that way. Could you take a close-up picture of the "bluish" effect there and post here? Unfortunately these uploaded above aren't too good in the view.
Here's a closeup of the tailplane on the BV 141. The sequence is Lifecolor acrylic camouflage / Vallejo acrylic gloss varnish/ decals / Vellejo acrylic matt varnish. I had thinned the varnish, but can't now recall to what extent.
I fully realize that I messed up and got overenthusiastic with airbrushing the matt coat on the BV 141 - I let it run and pool and I deserve what I got.
But the BV P194 has that silky look to it because I detected a general blueness appearing after a few careful thin coats of matt varnish, so I baled out before it got any more obvious. I presume there's an unavoidable degree of Rayleigh scattering from any matt varnish, but other people seem to get much better results than I'm getting!
 

Attachments

  • IMG_2410.JPG
    IMG_2410.JPG
    37.5 KB · Views: 83
Nice work. My BV-141 has so much dust on it you can't see the decals. Your bluing looks a lot like weathering.
Ed
 
Here's a closeup of the tailplane on the BV 141. The sequence is Lifecolor acrylic camouflage / Vallejo acrylic gloss varnish/ decals / Vellejo acrylic matt varnish. I had thinned the varnish, but can't now recall to what extent.
I fully realize that I messed up and got overenthusiastic with airbrushing the matt coat on the BV 141 - I let it run and pool and I deserve what I got.
But the BV P194 has that silky look to it because I detected a general blueness appearing after a few careful thin coats of matt varnish, so I baled out before it got any more obvious. I presume there's an unavoidable degree of Rayleigh scattering from any matt varnish, but other people seem to get much better results than I'm getting!

THX for the pic and info. Have you had your airbrush cleaned properly? Anyway ... I would try to use some of thinner you used for the matt coat and a soft small rag soaked. But don't "wash" around a large area. Just step by step around a small area trying to remove as much as possible of the bluish deposit. Each time you clean a such area the rag has to be washed thoroughly in clean thinner. Then apply the gloss coat again and the final matt one when the previous coat is fully dried. Be carefull at the decal areas.

Of course you can wash up the entire model removing all colours, clear coats and decals ( unfortynately) and paint the model again.
 
Last edited:
Wurger:
Thanks for taking the time to think about this for me. I'll try what you suggest on the tailplane and see what happens.
I think I'm cleaning my airbrush well - it gets a partial dismantle and water clean between acrylic coats, and I remove the nozzle, soak parts in acrylic airbrush cleaner and clean out with an interdental brush between colours.
 

Users who are viewing this thread

Back