Crimea_River
Marshal
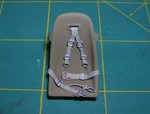
The belts are simply amazing Wojtek!
I'm intrigued by the cockpit colour a bit which you said in an earlier post was RLM 02. Although I never rely on colour accuracy of photos under different lighting conditions, I did note that the trim wheel, ammo boxes and the area under the MGs appear to be a different colour which I would have thought to also be RLM 02. What colours and paints did you use for these different areas? On my screen, the cockpit looks a bit brownish compared to the MG area.
Thanks!
")