Navigation
Install the app
How to install the app on iOS
Follow along with the video below to see how to install our site as a web app on your home screen.
Note: This feature may not be available in some browsers.
More options
You are using an out of date browser. It may not display this or other websites correctly.
You should upgrade or use an alternative browser.
You should upgrade or use an alternative browser.
1:1 Spitfire K9817 Cockpit Build
- Thread starter Tony Hill
- Start date
Ad: This forum contains affiliate links to products on Amazon and eBay. More information in Terms and rules
More options
Who Replied?- Thread starter
- #1,402
Tony Hill
Tech Sergeant


- Thread starter
- #1,403
Tony Hill
Tech Sergeant
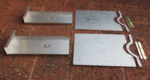
The other day I made the formers for the Height & Airspeed and tried a blank. While I have worked out the technique and the shaping, it didn't work out brilliantly.
I ended up cutting and filing the ridge too short. It covers the computor when inserted but does not go high enough above it. A good first test anyhow.
So decided tonight just to have a fiddle with a better depth holder. This time I used the shrinker much more extensively and worked with a half inch flange (a little too much as it turned out, probably go with 3/8 in future. A lot more attention to the hammer work and the overall curve this time and it paid off.
Using the sand bag as a base for hammering is great..first time I've done that. I can see what a useful tool they are now. They are fairly expensive and until now I have been wondering if I wasted the money. No, they are a nice pick up.
There is a lot of work to be done on cleaning up the finish and I suspect that, as I now have at least two more of these to do, I'll weaken and use the Dremel for a bit of that. I usually like to finish things by hand but looking at the hammer marks and shrinker marks in these, there is a lot of elbow grease to find!
I've also decided to clamp these into the milling machine to cut the rim absolutely evenly. There is still a little meat all the way around to allow this.
Once that is done the other few small pieces can be made and rivetted on. A good heavy piece of elastic fabric and some parachute clip studs complete the deal.
- Thread starter
- #1,404
Tony Hill
Tech Sergeant
T Bolt
Colonel
yes, very nice work Darryl
Airframes
Benevolens Magister
Great stuff !
- Thread starter
- #1,409
Tony Hill
Tech Sergeant
Thanks Guys!
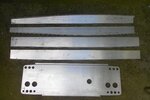
this is what the main base of the H&ASC Holder looks like on the way through the forming process...sometimes it is hard to believe the piece isn't completely ruined as the folds and creases form and every hit to flatten them out causes the ali next to it to form a new crease or rise...but eventually it hammers and shrinks out as you go. This time I plan to try the wooden mallets for finishing, hoping to reduce some of the tool marks at the cost of many, many extra hits.


this is what the main base of the H&ASC Holder looks like on the way through the forming process...sometimes it is hard to believe the piece isn't completely ruined as the folds and creases form and every hit to flatten them out causes the ali next to it to form a new crease or rise...but eventually it hammers and shrinks out as you go. This time I plan to try the wooden mallets for finishing, hoping to reduce some of the tool marks at the cost of many, many extra hits.
- Thread starter
- #1,412
Tony Hill
Tech Sergeant
Thanks Wojtek and Herman!
Herman, the 1.2mm ali and large flange make it difficult but time and elbow grease....
Herman, the 1.2mm ali and large flange make it difficult but time and elbow grease....
Crimea_River
Marshal
Stunning work Darryl.
- Thread starter
- #1,414
Tony Hill
Tech Sergeant
Cheers Andy!
- Thread starter
- #1,415
Tony Hill
Tech Sergeant
A quick round with the shrinker and a little more "blunt force negotiation" and the second one is starting to move towards final shape. In the first and last photos you can see the downside of using the shrinker as opposed to beating the shrinkage in... the grooves from the jaws of the shrinker. Fortunately these come out with some elbow grease in teh finishing stage but a better result is achieved if you can use thinner metal and totally hammer shrink it. Not practical with this size flange and thickness necessary for the Height & Airspeed Computer Holder. ... Oh and for an idea of scale : the final diametre of the holder is 6"


Last edited:
Crimea_River
Marshal
Fascinating process. Amazing that all those little atoms just get a little cozier.
- Thread starter
- #1,417
Tony Hill
Tech Sergeant
Thanks Andy.
It is amazing to watch ONCE you know that it will bend and buckle like crazy first up. I threw a few other bits away a while back because they bent like that. Now I've done the research and started to make these, I can see that the other bits were actually OK. You live and learn. I've no reservations about making top hats and channels etc for the frames now, that is for sure. If you can make rounded circles you can definitely make straight folds around bends.
I think for the next one I am going to go around the outside once with the shrinker before I even start to hammer form. It may just make the initial fold more even. .. it may, however, also tear the outer. The blanks don't take long to produce, so worth a try I think.
Last edited:
fubar57
General
Very impressive Darryl
Good work so far Darryl!
- Thread starter
- #1,420
Tony Hill
Tech Sergeant
Thanks Geo and Hugh!
Finished off forming nicely. The wave in the top of the rim is actually vertical, the walls are actually formed almost perfectly round. I'm now happy (after three tries) that I've got the technique pegged and that these are easily repeatable. I have to make one for me, one for an ASR Spitfire II project and one for a very early Spitfire V project in Belgium.
The rim can now be trimmed down to 1/2" and the small parts made to go around the edges with the front plate and parachute clip fittings last.


You can see how the last one ended up with the rim far too short...

The next pictures will be of the completed unit.
Finished off forming nicely. The wave in the top of the rim is actually vertical, the walls are actually formed almost perfectly round. I'm now happy (after three tries) that I've got the technique pegged and that these are easily repeatable. I have to make one for me, one for an ASR Spitfire II project and one for a very early Spitfire V project in Belgium.
The rim can now be trimmed down to 1/2" and the small parts made to go around the edges with the front plate and parachute clip fittings last.
You can see how the last one ended up with the rim far too short...
The next pictures will be of the completed unit.
Users who are viewing this thread
Total: 1 (members: 0, guests: 1)