1/72 Focke Wulf Fw-190F-8 w. BV 246 Hagelkorn - Me/ Fw Group Build

Ad: This forum contains affiliate links to products on Amazon and eBay. More information in Terms and rules

@ A4K

I'll look it up in the books I have on the FW-190 and if indeed this is the case...a sandingstick should be enough to take care of it. They are way to prominent anyway for this scale (at least to my liking) so trimming them down a tad wouldn't hurt, and if need be completely removed. First I'll be working on getting to wings to the fuselage. They have a rather poor fit, so I want to get that out of the way first before I start working my way through some of the smaller details.
 
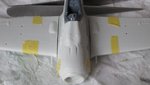
Damn, sad to hear the wings don't fit well. Sure you'll do a good job though mate.

I've build a few of these in the past (or made ambitious but rubbish attempts to do so when I was first getting back into building models ;) ) ....so I know what to expect and have a pretty good idea in what stage to take care of what problem.

To get an idea of what the fit looks like here a pic of the wings taped to the fuselage. Seems like a plastic-card job to me. I considered trying a kind of spacer construction, but the fuselage has little room left to reinforce it with CA-glue and plastic card (without it a spacer-like construction would rip fuselage in half if fear)
 

Attachments

  • 11 - wingroots.JPG
    11 - wingroots.JPG
    49.8 KB · Views: 82
Last edited:
I haven't measured it, but dihedral appears to be somewhat close as is, based on looking at various scale diagrams. There is some room for it to be increased just a tad by lifting the wingtips with a piece of tape wrapped around it and reducing the wingroot gaps in the process, but closeing these gap merely by doing so (looking from the wingtips down to the fuselage) would make the wingtips end up way above the exhaust deflector shield.... which would make it look way off I think .(..more like an imaginary FW-190T(räger) if you know what I mean ;) )
 
Last edited:
So, here's the first step in dealing with these big gaps at the wingroots. I glued a few pieces of plastic strip to the upper wing pieces and sanded those down to match the shape of the wingroot.

Some further trimming and polishing might be in order, but further dry-fitting should reveal to what extend this is needed. Paired with some tape wrapped around the wingtips to slightly increase dihedral this should lead to a minimum of sand/filling around the wingroots.
 

Attachments

  • 12 - wingroots.JPG
    12 - wingroots.JPG
    45 KB · Views: 95
Nice attention to that gap Jelmer. I hope you didn't take offense to the dihedral check. However, I do see quite few models finished with a dihedral that is too flat, (I've made that sin myself!) simply because the molding of the bottom wing half is automatically taken as correct when often it isn't.
 
Great approach mate, I use the same method! :)

Clashed with Andy - good point mate, must keep that in mind myself...
 
Nice attention to that gap Jelmer. I hope you didn't take offense to the dihedral check. However, I do see quite few models finished with a dihedral that is too flat, (I've made that sin myself!) simply because the molding of the bottom wing half is automatically taken as correct when often it isn't.

None taken ;) 
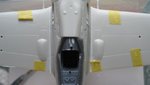
I don't go about these things in a very scientific way (with rulers and measurements and such) so someone pointing it out from time to time is OK. I usually go about these things based some diagrams and a pretty decent sence of measurements/shapes.

As for filling etc. I tend to try and use plastic strip and streched sprue more and more these days to fill the bigger gaps. I feel melting some plastic into a gap can be worked into a smooth surface much more easy then a typical putty which is way more messy, although sometimes there is no escaping it. In addition panel lines can be more easily restored on a piece of plastic then on putty.

EDIT:
A small addition to this post. The first results of dealing with the wingroots. As far as the gaps are concerned...mission accomplished I'd say. This turned out rather well with a minimum of effort really. This should lead to a nice smooth join over the wingroots.

The area where the leading edges of the wings meet the fuselage still need a bit of work, but a little filler should take care of that.

p.s. Andy, what do you make of the dihedral on this pic ;) ? I held a ruler from the wingtip all the way to the fuselage and in a straight line it ends up about halfway on the exhaust deflector thingy...which based on the scale diagrams I have available in my squadron signal FW-190A/F books looks just about right.
 

Attachments

  • 13 - wingroots.JPG
    13 - wingroots.JPG
    37.3 KB · Views: 82
  • 14 - dihedral.JPG
    14 - dihedral.JPG
    61.5 KB · Views: 86
Last edited:

Users who are viewing this thread

Back