Budget Bf109G Build.

Ad: This forum contains affiliate links to products on Amazon and eBay. More information in Terms and rules

Thanks SE!
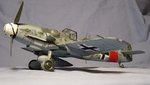
Well, I was going to post the shots of the Gustav in its totally finished state, before showing the completed scene with the diorama in a couple of days time, as I finished the final little details about an hour ago.
BUT!
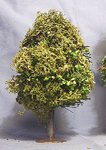
I decided to do a bit more work on the diorama base for it, and found out that the latest batch of Superglue I bought actually works as advertised. It works so well, in fact, that it's taken me ages, using a scalpel, to separate the small pieces of real wood from the skin between my left forefinger and thumb! I was joining some bent wooden skewers, in order to make the 'trunks' and 'boughs' for a silver birch tree, and, although the wood didn't seem to want to bond together, it did discover that it liked to bond itself to my digits, and the latter to each other! Of course, in trying to remove the offending pieces of A) wood, and B) superglue deposits, part C) also became bonded, when part C) = the thumb and forefinger of my right hand!
Now, given that you have all recovered from rolling around the floor in a tangled heap, p*****g yourselves laughing at my expense, I can inform you that said left and right digits are now separated, but minus some of their exterior coating, i.e. skin, and have a lumpy, shiny membrane of hard superglue replacing the missing organic matter, therefore, there was no way I was going to try to pick up, let alone operate, my camera!
So B******s to it, I'm going to bed!
Terry.
 
Thanks guys. looking back on it now, I can see the amusing side. It was very Pythonesque! Should have some pics of the Gustav, and progress on the base, posted later tonight.
 
I bought some Loctite Gel Superglue. It bonds instantly to nothing except my fingers. Superglue is highly overrated.
 
I totally agree Matt! The last batch I had, which I think I told you about, I bought from a 'Poundland' store, where everything is...a Pound! (75cents).
There were 8 x 20ml bottles on a card, and it was great stuff! This time, having used, or had a friend 'borrow', all the bottles over the last 18 months or so, I couldn't get any of that type, the shop was waiting for stock, so I bought a tube of Loctite. It sticks to my fingers, but f*** all else!
Next installment of the Gustav build coming up!
 
PART TEN
This should have been the final installment of the Budget Build, but, due to various other commitments, and Mr. Superglue, it's taking a little longer than anticipated. However, on with the story!
The Gustav itself is finished, with the exception of a very few minor jobs, which will be completed when she's ready to sit on the 'dispersal'.
There follows a series of pictures which I trust will show off this model to advantage and, in case anyone has forgotten, remind you all that this started out as a 'toy' kit, costing much less than the average 1/48th scale fighter kit, and this is 1/32nd scale! Note that virtually all of the model is 'out of the box', with very few additions, none of which, with the exception of a few decals, are 'after market' accessories; any additions are scratch-built, so it just goes to show how good the basic kit is.
O.K., it's not a high-tech, state of the art 'Tamigawa' product, and this is evident in those parts that are 'plain', such as moulded-closed flaps etc., but, and it's a big but, I feel that this kit could stand alongside any of the 'big boys' without shame. I just hope that 21st Century Toys continue to supply these kits, and that the range expands, with easier accessability.
Note that the under-wing cannon gondolas are fitted temporarily, they will eventually be removed, and that the 'lost' aileron mass-balance has not yet been replaced. Also, I deliberately omitted adding the canopy check-wire, which I had already made, as most photos I've seen of Bf109's with the 'Erla' hood don't show this feature, and the scratch-built temporary pitot tube will be replaced with a better example eventually.
The penultimate installment, following this one, will show the progress on the 'wooded dispersal' diorama base; I hope you have enjoyed this so far.
Terry.
 

Attachments

  • 21 Gustav 303.jpg
    21 Gustav 303.jpg
    49 KB · Views: 51
  • 21 Gustav 287.jpg
    21 Gustav 287.jpg
    51.2 KB · Views: 41
  • 21 Gustav 288.jpg
    21 Gustav 288.jpg
    45.9 KB · Views: 39
  • 21 Gustav 289.jpg
    21 Gustav 289.jpg
    61 KB · Views: 48
  • 21 Gustav 292.jpg
    21 Gustav 292.jpg
    60 KB · Views: 43
  • 21 Gustav 302.jpg
    21 Gustav 302.jpg
    46.4 KB · Views: 41
  • 21 Gustav 299.jpg
    21 Gustav 299.jpg
    55.7 KB · Views: 47
  • 21 Gustav 297.jpg
    21 Gustav 297.jpg
    47.4 KB · Views: 43
  • 21 Gustav 295.jpg
    21 Gustav 295.jpg
    52.5 KB · Views: 38
PART ELEVEN
And now the penultimate post!
Having decided part-way through the build that this model deserved to have its own display base, I commenced work on a diorama base, depicting a dispersal point set in the wooded area of Juterbog-Waldlager Luftwaffe airfield, south of Berlin, in June 1944.
From the pictures supplied by 'Wing Commander' Wayne, I could see that there was mixed forestry, and that the aircraft modelled, 'Yellow 13' of 9/JG300, was standing on an area of block-paving, or flat cobbles. I had seen this type of forest dispersal before, on a former Luftwaffe field, whilst on military exercises in Germany in the early 1970's, where 'cobbled' hardstandings, constructed from small, flat, stone blocks, were set amongst the trees, leading off from roads or gravel tracks. From the air, the airfield would not be too conspicuous, looking more like an open area in a forest, with roads running across it, and around and through the trees, and therefore, benefiting from natural camouflage.
In order to replicate the 'cobbles' in miniature, I used a (reclaimed) sheet of embossed plastic, designed to be used for roof tiles or stone walling on H0/00 gauge model railways, which is set at an angle on a base cut from a sheet of MDF. The groundwork is made up of 'hairy grass' mat, cut and shaped as required, and sandy-earth 'scatter' material, whilst the brush and bushes are clumps of lichen, with some added dried herbs, cut and shaped and fixed in place with PVA adhesive. The area was given depth and height, by constructing small contours from layers of carboard, covered in filler.
I had intended making my own trees, but, I was unable to obtain some of the required materials in time; not that I was in a rush, but I wanted to complete the diorama, in order to free me to continue work on the 'Diorama Guide' and other projects. Consequently, I bought some inexpensive 'model railway' trees, and embellished them by trimming where required, and adding foliage from lichen, dried herbs, and dried, used tea leaves(!) A little spot of watercolour or acrylic paint will be required in parts to complete the job. In order to break the symetry of the 'evergreens'. and provide a variation in the heights of the trees, thereby creating the illusion of depth and thickness, I also made a 'silver birch' tree, using wooden BBQ skewers, split, and taped together, before being painted and having lichen added. (after I surgically removed the skewers from my superglued left hand!)
PICTURE 1 shows a plan view of the base under construction, with the area in the left foreground earmarked for the 'forest'.
PICTURE 2 is an oblique shot of the base, whilst a closer view of the intended 'wooded' area is shown in :-
PICTURE 3.
PICTURE 4. These are the small trees as purchased. They are designed as somewhat tall examples for the smaller scale of model railways, and are just about suitable to represent smaller, younger trees in 1/32nd scale, without being so tall as to dominate the scene.
PICTURES 5 to 8 show the 'model' trees after some additions, together with the 'home made' birch tree. The latter has yet to be trimmed and shaped, and all of the trees will be given a touch-up of varied greens and browns, before having their bases trimmed, where neccessary, and being 'planted' into drilled holes in the base, and set with PVA adhesive.
There is still a way to go on the base, when individual 'cobbles' will be picked out in varying colours and the 'cement' joining the various sections will be coloured also. Some more work will be done on the ground-cover, and some accessories added, in the form of wheel chocks for the aircraft, a fire extinguisher, an oil drum or two, and at least one figure, representing a ground-crew member. It's a pity there are not more 1/32nd scale figure kits available, as there are in other scales, as my 'stock', now roughly 30 years old, is very depleted!
If all goes according to plan, PART TWELVE should show the finished diorama, with the 'Budget Gustav' in place.
Thanks to everyone for your support, kind comments and enthusiasm for this project so far.
Terry.
 

Attachments

  • 21 Gustav 316.jpg
    21 Gustav 316.jpg
    99.3 KB · Views: 44
  • Buys 004.jpg
    Buys 004.jpg
    66.2 KB · Views: 45
  • 21 Gustav 309.jpg
    21 Gustav 309.jpg
    115.7 KB · Views: 55
  • 21 Gustav 307.jpg
    21 Gustav 307.jpg
    81.7 KB · Views: 44
  • 21 Gustav 306.jpg
    21 Gustav 306.jpg
    110.9 KB · Views: 39
  • 21 Gustav 317.jpg
    21 Gustav 317.jpg
    77.5 KB · Views: 42
  • 21 Gustav 312.jpg
    21 Gustav 312.jpg
    110 KB · Views: 37
  • 21 Gustav 315.jpg
    21 Gustav 315.jpg
    69.7 KB · Views: 40
Paint-up a Corsair as a 'What If?' ! Could look good in Luftwaffe markings. Even better, modify it to a slightly different look, and call it an experimental, or 'what if', in coincidental parrallel developent by the RLM! A Messerwulf BW 4D !!!
 

Users who are viewing this thread

Back