**** DONE: 1/72 Lancaster Mk.III - Heavy Hitters II GB

Ad: This forum contains affiliate links to products on Amazon and eBay. More information in Terms and rules

Great work Bill, and Terry beat me to it with the tail wheel info. Can confirm his post in any case!

Remember to watch the size of it btw, Hasegawa made it closer to 1:48 scale than 1:72!
 
I just Gooooogled tail wheel and now have a better idea of what it Should look like and will give what I've got a go. I think I can get it to work. If not, some more mail between the continents!

Cheers. :)
 
Thanks Woody.

So... I tackled the wheel. 1) Took the Flange off the edges, since there is no ribby looking flange, down to the side wall. 2) Took the spacer off the inside to be flush with the top flat of the side wall. Then 3 layers of .5mm sheet glued together, marked with a compass and trimmed and filed round then glued to one side. 3) glued the other side on and while I was at it used the pointy end of my scalpel made the wheel yoke a bit more 3D looking. I think the reult is okey dokey! The wheel is slightly over 10mm Evan, but looks sh!t loads better.

The glass on the nose I had to take some material off the upright for the guns and the curved front edge the glass sits against. There was a space of about .5mm at the back against the back wall.

I sailor on.............
 

Attachments

  • 18 Lanc 13c.jpg
    18 Lanc 13c.jpg
    45.7 KB · Views: 80
  • 18 Lanc 13a.jpg
    18 Lanc 13a.jpg
    34.3 KB · Views: 72
  • 18 Lanc 13b.jpg
    18 Lanc 13b.jpg
    35.7 KB · Views: 74
Looks a million bucks to me Bill, well done!
(Thanks for the heads up re the nose turret glass too!)
 
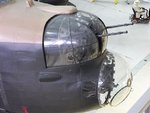
Nice work Bill. Blank off that 'door' in the rear of the turret - the Lanc's front turret had a one-piece, sheet metal rear 'wall', entry to the turret being made from underneath, with the gunner sitting on a canvas 'strop' or saddle, which was hooked at each end, attaching to the turret ring. His legs dangled down in front of the bomb-aimer, and to be honest, this turret was rarely used.
 
Looking great Bill. Lots of good info exchanged as well. I got lucky with my rotator cuff. Physio and electro-shock did the job for me.

Geo

Physio........... sometimes I think it's another term for witch doctor, or medicine man....... or a duck, quack quack.
I could use a bit of electro-shock, but it would be around the noggin, not the shoulder!

Thanks guys for the kudos. It's compulsive.

Thanks for the heads up on the front turret. I'll have to see what I can do about that back wall. I would hope the turret gunner had clean socks at least.
 
He might have had very warm feet! The front turret, on the (relatively) rare times it needed to be used, would be manned by the radio operator (WOP/AG = Wireless Operator/Air Gunner), who sat in the warmest place in the aircraft, where the hot air inlet was!
Best way to blank-off that 'hatch' would be to form a curved 'wall' across the entire height and width, to meet the edges of the turret transparency. The real turret was curved at the rear, with a sort of semi-dished rear wall of aluminium. The pic below might help a bit, but if you need a better reference, let me know and I'll dig out something.
 

Attachments

  • Duxford  May 2011 058.jpg
    Duxford May 2011 058.jpg
    93 KB · Views: 87
Thanks guys.....

Thanks again for the terrific photo and information on that front turret.

In looking closely at the photo, and then the kit, I am a little disappointed the fairing doesn't extend forward to cover the rear edge of the glass. It buts up and in just short of flush with the sheet metal. Can't have it all I guess. I'll have to fudge a bit and put a really thin sheet across the back opening since it's all together now and difficult to get to. Maybe foil.

Painted the black underside of the fuselage. Cold and bl00dy raining today so can't paint the underside of the wings which is next.

I sailor on.
 
Nice work Bill tail wheel looks a lot better.
 

Users who are viewing this thread

Back