**** DONE: J2m3 U.S marked - Captured / Aircraft in Foreign Service GB

Ad: This forum contains affiliate links to products on Amazon and eBay. More information in Terms and rules

N4521U

Colonel
13,463
5,710
Nov 1, 2009
Miranda, NSW
User Name : N5421U
Real : Bill
Category : Still somewhere in the middle
Entry : U.S. Captured Jack
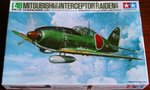
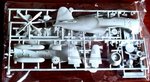
Kit : Tamiya 1/48th scale..... OTB! Maybe some scratch build stuff. Gonna keep this one simple.

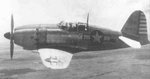
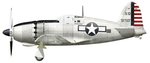
Easier to start a new thread for this one. Only have a few pictures to work from, but another odd one for the cabinet. U.S. markings from another kit. Only done a little bit from the other thread. All silver aluminum on this one, U.S. markings. Pretty simple, yah right!
 

Attachments

  • jack1a plane.jpg
    jack1a plane.jpg
    37.3 KB · Views: 306
  • jack1b plane.jpg
    jack1b plane.jpg
    11.5 KB · Views: 200
  • jack2a box.jpg
    jack2a box.jpg
    80.7 KB · Views: 212
  • jack2b kit.jpg
    jack2b kit.jpg
    85.5 KB · Views: 208
Last edited by a moderator:
Good project Bill!

Here's another pic, from 'Koku-fan No.99: Imperial Japanese Navy Aircraft':

STA51312.JPG
 
Thanks for that Evan, additional information is always welcomed. This is a bare metal finish is it not????

You are right Wayne, I have no more time for any miscief at all.

So now, if this is an IJN aircraft, would IT's wells be the transparent blue?????? Like I have already painted them????????????????

As I stated in my Zero post, if it doesn't Need to be this color, don't paint it this color. It applies pretty thick to get the color even. It needs to be seriously masked. I can't paint over it cuz it's so thick, and can't remove it, or don't want to spend the time trying.

I sailor on.
 

Attachments

  • 3 wheel wells.jpg
    3 wheel wells.jpg
    74.1 KB · Views: 195
Been slaving on the others, but have done the painting in the cockpit and "aged" it by scraping off color. The instrument panel is a very simple one, flat plastic and a clear decal. I have sprayed the panel silver, then brushed on the panel color, then after drying scratched off some of the color with my trusty wire brush, Future coated it and applied the clear printed panel decal. I gave it a generous coat of Future and then trimmed the decal after it was all dry. I can button up the fusey pretty soon now, and hope it's done by the end of the GB time.

Gadzooks.
 

Attachments

  • jack3 instr pnl.jpg
    jack3 instr pnl.jpg
    96.1 KB · Views: 168
Okay, finished the cockpit, well, added the decal. Picture attached. I have the sides of the fusey together now and am cleaning up the seams. I'll spray some paint on some of the panels to give different texture to give color to give it a "used" look. The forgiving thing on this one is it is overall one color, bare metal!!!!!!!

I sailor on.
Now if I can get a couple of days off next week to concentrate on the important things in life, I may get them all done!.
 

Attachments

  • jack4 cockpit.jpg
    jack4 cockpit.jpg
    81.1 KB · Views: 163

Users who are viewing this thread

Back