Epiphany and a silver question (airbrush painting)

Ad: This forum contains affiliate links to products on Amazon and eBay. More information in Terms and rules

Ralph Haus

Tech Sergeant
1,717
1,924
Jul 24, 2016
Leander Texas
An epiphany, or a nod to those that use 'brand name' airbrush paints such as Tamiya as I am now doing. Since my conversion from brushing on acrylic finishes to airbrushing with same I now realize the advantages of using paints that are specifically formulated for these applications. Not really trying to 'cheap-out', I was trying to use my collection of acrylic colors that I have in stock. Buying all of the colors again would (will ) be an investment. But continuing with the craft colors usually ends in a disappointment!

With the craft store acrylics adhesion was good at best but usually not. With the higher end (Tamiya in my case), it is almost impossible to remove once applied! The only issues that I have is with clean up. This 'higher end' paint seems to dry quicker in the airbrush barrel and cause double, to triple, the time to clean. Suggestions are welcome? Having to use 91% Iso instead of the airbrush cleaner (which just won't dissolve the dried paints!). But I'm now spraying at lower PSI (15-20) and getting much better control when doing camo. A good thing.

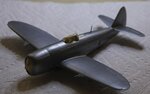
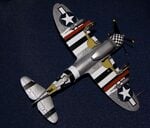
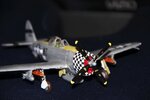
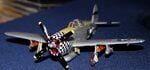
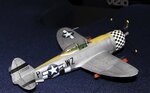
A secondary question, if I may, also relevant to airbrushing. My current build a P 47-D Thunderbolt "bubbletop", calls for a bare metal silver paint scheme (along with camo). Any suggestions on what paint to use? The instructions indicate the spray can variety which I want to avoid. Technically I can get away with the pre bubbletop gray color, but I would like to do the silver as a learning experience.
 
To make the time of drying of the acrylic paints longer use a retarder. Most of firms recommend their own ones. The Tamiya as well.

For removing of acrylic paints also these dried you may use a paint remover .Eg... The Tamiya Paint Remover. Wamod remover or AK-119 Perfect Cleaner.

For the NMF of models you may use the Alclad II paints like the Polished Aluminium, Chrome, Silver etc... the kind of paints requires the gloss black primer. Eg.. Humbrol Black Gloss enamel.
 
The AK Interactive range of metallic colours also look very interesting, and I intend to try them soon.
According to their web-site, and other videos, they can be sprayed over a 'normal' primer base, for example, and clean up easily, and don't need the 'specialised' prep or attention of the Alclad range.
The range includes many various shades of 'bare metal' and they certainly appear to have a good finish.
Note that I normally use enamels (acrylics are the work of the Devil !), so trying these will be a bit of a step for me !
 
I've bee experimenting! Not wanting to use enamel, I dug through my acrylic stash and found a silver (probably to silver) to try as an acrylic metal finish coat. The posted image is the 'attempt' at my first try at this metal finish. As I said, probably to metallic, but please pass on your judgements. I was anticipating muting the reflectivity somewhat by appliing my typical matte acrylic spray ( Krylon ) on the finished build. Using the paint that I chose I sprayed a sample on a couple of throw away parts. I sure am glad I tried the matte spary on the painted sample. It produced a beautiful 'orange peel' finish? Acrylic on acrylic? What the heck (although I did use stronger language!) Feedback please on the coat on the model that I am building. I probably will complete as is and not put on a protectant but chalking this up as a lesson learned.
 

Attachments

  • post.jpg
    post.jpg
    312.4 KB · Views: 244
Not too bad. It looks quite good. Have you used the primer? If you haven't the effect of the "orange peel" could be the result of that. Unfortunately using of not dedicated coats for modelling with those dedicated ones may be the reason for that too. Just one acrylic can be different from another one.
 
Wurger - You are most likely spot on with you comment regarding those paints that are not 'specifically' for modeling. I was in need of a non enamel 'metallic' style paint and thought I'd give what I have on hand a try. As it turns out I chose the wrong one. I have others. I have actually used this same paint when finishing landing gear, interior cockpit detailing, and such. Probably to small of a surface areas for me to have noticed the finish changing? I may just take the 'easy' way out and from now on select models that have a non-metallic color schemes! Nah! To much of a challange here. I will find the right acrylic combo!!! But there will be more 'experimenting' before I spray another real project.
 
I see. You may try to apply the acrylic silver and then try to apply a gloss clear coat. It would be fine if the silver and the clear varnish were of the same brand. Unfortunately the silver or aluminium colours like getting darker when oversprayed with different clear coat. Usually it's the "fault" of the thinner of the clear varnish. Also you may use the gloss black acrylic paint as the primer. The smoother surface the better final effect. But you should keep in mind that each coat has to be cured fully before applying the another one. Most of acrylic colours is said to be dried entirely in 3-4 hours. But it is not true. All of them need at least 24 hours to be cured fully. So please don't rush.


PS. I have forgotten.. the orange peel can be cused by too high air pressure from the compressor. Acrylic paints prefer low pressure mostly.
 
With trepidation I present my first photo evidence of modeling. This really is intended to show the final results of my attempt at a metal finish. Other than a 'aarrrgh' moment when the masking tape tore out a large patch of the cowling decal AND a landing light lens 'snapped' into the depths of a grey carpet. I am somewhat pleased at the end results. Still learning. But still baffled by how to manage application of large decals???

By the way the 'orange peel' texture was somewhat eliminated, when spraying on the gloss coat, by letting the acrylic paint color coat (silver) dry for about a week. Still a bit of damage, but for this model, tolerable.

My hat is still off too many of those on this site that do such excellent work. Still striving though!
 

Attachments

  • Belly.jpg
    Belly.jpg
    769 KB · Views: 259
  • Frnt l.JPG
    Frnt l.JPG
    443.8 KB · Views: 242
  • L side.jpg
    L side.jpg
    368.6 KB · Views: 248
  • R side.jpg
    R side.jpg
    149.1 KB · Views: 280
Keep on striving Ralph, its how we improve. I see every model as one step to the better. I don't envy you putting on that checkered cowling decal
 

Users who are viewing this thread

Back