Galland's Bf 109E-4 1/32 scale

Ad: This forum contains affiliate links to products on Amazon and eBay. More information in Terms and rules

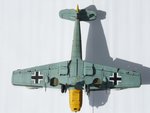
Fabulous work Gerry. I agree with Andy about the 'Zu' alignment stencils; the yellow paint on the cowling was a temporary 'distemper' -type coating, which could be removed by washing with petrol (gasoline). Normally, this was just brushed over everything, and the stencil would still be there, unseen, until the yellow was washed off. As Andy says, if the 'Black men' didn't know how to open/close a latch by then .....
 
I've been making some more progress on finishing the build but encountered some unforeseen problems (aren't all problems, by definition, unforeseen???) which slowed me down somewhat. Here's just a couple of quick, interim shots to update the build.

Picture 1. I reapplied and painted the aileron trim tabs and having finished applying all the stencils (yippee!!), I gave the model a couple more sprays of Klear to protect the decals before weathering. When dry (overnight) I washed all detail and panel lines in a very diluted mixture of Revell Antracite Grey mixed with Burnt Umber Oil Paint, diluted with white spirit.

This was left for about half-an-hour, then gently wiped off with a white cotton cloth with a drop of white spirits, wiping across the panel lines to avoid wiping away the wash within the lines. Then wiping any residue in the direction of the airflow.

Picture 2. This is the result. I tried to give a sense of the 109, in field service and seeing action, without overdoing it. I added some cannon smoke by dry brushing the above mixture. This will possibly be enhanced with black pastel later. Some oil stains were added with a very dilute mix of Rust Brown Black enamels, which was mixed for the exhaust pipes, which are now added.

As you can see the undercarriage, the pitot tube and the aileron balances have been added at this point. No problems, except with the main gear. These should have been pre-painted and assembled as per the instructions but I chose to assemble the wheels completely and add them when the legs were already in position. This was a problem, as the gaiters I added earlier were in the way of proper location. I had to cut and sand away the inside of the gaiters to give a surface I could get a good bond on, then I had to align the wheels so that the pre-flattened tyre bottoms were in the right position. All very fiddly and time consuming. Because of this I think the whole undercarriage is very fragile and won't stand up to any rough handling. Oh - and I had to search for the locating hole for the pitot tube, as I had stupidly forgotten to note it's position before I applied the crosses.

Picture 3. Top view. Although it doesn't look it, the panel lines and details have been subtly washed. Again, I didn't want to overdo it. There is still some attention to detail required. At this stage the engine and oil bath have been secured in place and the engine fits neatly.

I suspect that in scale, the engine assembly is about 3mm too long, (you can't see the bottom of the coolant tank through the opening in the bottom cowling, as you can in the real aircraft) but there is no way of correcting this, other than taking a chunk off the back of the engine and supercharger or taking 3mm off the depth of the ammo boxes, which would put them out of pro.

I had to disassemble the MGs, again, to get the saddle cowling to fit properly. After rubbing down the bases of the MG assembly, I assembled the guns individually, testing and fitting each component separately, until I was happy with the fit. These are now secured in place but need a bit of touching up because of the repairs. In fact, the whole gun bay needs a bit of a spruce-up. The rudder went on without any drama and now it's just the canopy, which might prove a bit difficult to pose open (a first for me), a few other small points of detail and of course, the aerials (another first) need adding.

I'm hoping that I will be able to complete this build by the weekend, notwithstanding any disasters, and will post a full set of photos of the completed aircraft as soon as I can.
 

Attachments

  • Washed Bf 109E.jpg
    Washed Bf 109E.jpg
    59.1 KB · Views: 183
  • Weathered Bf 109E Top.jpg
    Weathered Bf 109E Top.jpg
    48.1 KB · Views: 172
  • Weathered Bf 109E Bottom.jpg
    Weathered Bf 109E Bottom.jpg
    54.2 KB · Views: 170
Cory, VikingBerserker, Andy, Woody, Terry and Wayne, thank you all for your continued interest and comments on this build. After almost exactly four months, I believe I have finally reached the end of this project - that's unless anyone spots something I've overlooked.

What was originally only intended to be a representative Yellow nosed 109, during the course of the build turned into our best guess as to what Adolf Galland's Bf109E-4(N?) appeared at 57 victories between Nov 30 and Dec 5th, while stationed at Audembert, France - thanks largely to the input from the members of this Forum.

Since my last post, I posed the centre canopy open and added the retention wire and spring, both scratch-built. The antennas were added, using microfilament, which was silvered using a pentel. The insulators were added using blobs of PVC, painted white. The insulator cones were made from rounded sprue ends, cut to size and drilled. The insulator where the antenna enters the fuselage, is made from thin plastic card, bent around a drill bit and glued and filed to shape. Apart from that, I enhanced some of the weathering with pastels, particularly the exhaust and gun stains. I also simulated some paint damage with silver paint.

Without further ado, I'll let the photos tell the rest of the story. I've taken shots of as many angles as I could think of. Hope I haven't overdone it and hope you like the result.
 

Attachments

  • Yellow nose starboard.jpg
    Yellow nose starboard.jpg
    69.5 KB · Views: 201
  • 4.jpg
    4.jpg
    54.9 KB · Views: 212
  • u 2.jpg
    u 2.jpg
    64.8 KB · Views: 199
  • 4.jpg
    4.jpg
    50.1 KB · Views: 212
  • 4.jpg
    4.jpg
    49.1 KB · Views: 216
  • Yellow nose port.jpg
    Yellow nose port.jpg
    69.5 KB · Views: 204
  • Top view.jpg
    Top view.jpg
    45.8 KB · Views: 209
  • Starboard.jpg
    Starboard.jpg
    49.6 KB · Views: 206
  • 4.jpg
    4.jpg
    55.6 KB · Views: 209
  • Port.jpg
    Port.jpg
    50.8 KB · Views: 215
  • Front.jpg
    Front.jpg
    38.5 KB · Views: 204
  • u 1.jpg
    u 1.jpg
    53.5 KB · Views: 206
  • Back.jpg
    Back.jpg
    45.5 KB · Views: 216
And now some shots with the cowls removed...
 

Attachments

  • Engine port.jpg
    Engine port.jpg
    69 KB · Views: 179
  • Engine starboard.jpg
    Engine starboard.jpg
    58.9 KB · Views: 188
  • u.jpg
    u.jpg
    68.4 KB · Views: 208
  • u starboard.jpg
    u starboard.jpg
    70.8 KB · Views: 187
  • Tail  rudder.jpg
    Tail rudder.jpg
    51 KB · Views: 185
Beaut job Gerry, it's turned out very well indeed. Only one thing really jumped out at me that could do with a little attention - the paint wear on the wing looks a little bright. Maybe tone it down a bit if possible?
 
Well done Gerry, the most important feature not captured on most Galland 109's is the Accurate colour and sequence of the RED BLACK victory bars.
 
Thanks Woody for your continued support. I'm hoping you'll get back into production on your 109 Trop build soon. Will look forward to seeing how that turns out. Terry, yes, I think that the paint wearing on the wing roots could be taken back without too much difficulty. It's only at certain angles that it appears as bright as in the photo.

Peter, Mark, Chris and Wayne thank you for your reactions to the build. It's really gratifying to get this type of reaction to something I put this amount of time and effort into.

I have to confess that, despite all my moaning during the course of the build, I'm very pleased - and surprised at how well it's turned out. At the start of the build, I just could never have hoped that my ability would live up to my aspirations. It's a cliché, I know, but I couldn't have done it without you - the Forum members. Without your input, this build would have turned out both inaccurate in its specific markings and in its depiction of a Bf109E-4 of that period. For instance, until I researched it on the Forum, I hadn't realised that the 109 had exposed control cables from the aft fuselage to the rudder!

So, a big thank you to all the members who contributed to the Thread, particularly those who posted references and/or suggestions, for your interest and supportive comments during the build. You all encouraged me to up my game and to attempt things I would otherwise not have had the confidence to try. I would like to especially thank Terry (Airframes) for generously sharing his extensive knowledge and references and for keeping me straight on painting details. I found his BoB build of the Matchbox Bf109 indispensable for modifying this kit to depict an accurate 109, as also was Wurger's 1/24 scale 'Bed of Thorns' Thread. A special thanks to Wayne Little for sharing his encyclopedic knowledge of Galland's 109s of that particular period, particularly for posting the references that gave me the correct camouflage and markings and for his accurate knowledge regarding the victory markings. To Andy (Crimea River) for being more observant than I was and taking the trouble to point out the inconsistencies on my paint scheme and for his continuous support during the build and finally to Chris (Njaco), for starting the 'Galland's 109s' Thread, which contains wonderful, otherwise hard to source, reference shots for Galland's 109s of the 1940 period.
 
Gerry, I must say I love it! A museum piece and worthy of the highest compliments. Well done, sir!

Looking forward to see what you have up your sleeve for the next project.
 
Gerry! we have a problem....I have just realised Techmod got the sequence wrong on the victory marking decals...I didn't pick this up....my apologies..:(...what was I thinking????

How easy is it for you to change some of the colours, is the rudder fixed in place?
 

Users who are viewing this thread

Back