Hi y'all,
I've been on this forum for a while and started having a lot of free time over the summer, so I finally bit the bullet and decided to try building model kits in real life after years of making liveries and 3d models.
Previous attempts/Not super relevant stuff
Now, this isn't technically my first time modeling. My dad and I (by which I mean my dad did like 90% of the work) built two kits when I was around 5 or 6; a Gee Bee R1 and a B-17F. We never painted them or added decals and I don't really know where they are now, I think they were tossed in the garbage years back. The hobby shop we bought them in is long gone now, but we're still friends with the owner and he has a tiny little baked goods shop that we visit every now and then. My dad isn't big on planes, but has told me many times that he used to build kits and quit because of a particularly frustrating F4U kit. He still dislikes the Corsair.
Getting Started
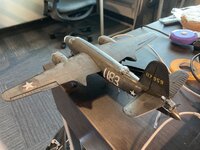
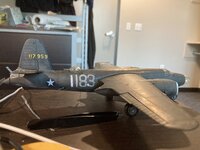
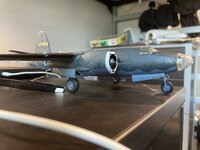
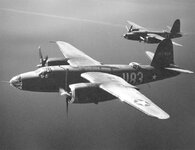
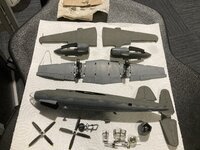
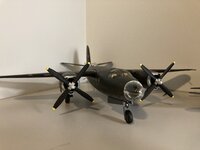
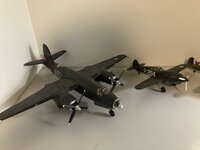
I decided to start modeling again because I wanted a short wing B-26, and by all accounts Monogram's snap-tite kit in 1/72 would be the best option. I bought it in early February used on ebay. Of course, it required painting and decals and I'd have to decide on a livery. Eventually I decided that given how much I spent on the model and how important it was to me, that I should get some practice first instead of making it my first kit. We'll circle back to the Marauder later.
Airfix Hurricane Mk. I Starter Set (1/72)
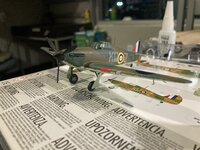
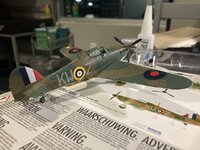
Well if I'm getting started, why not go with a starter set? I don't really remember why I picked the Hurricane in particular, but I wanted to go with a starter set so that I wouldn't need to buy paints or a brush. That turned out to be a bad plan. I don't know if it was due to shipping or if this is a common issue, but three of the kit's four paints (Humbrol 29, 30 and 33) arrived solid. I watered them down a bit and managed to get them usable, but that left me with very runny colored water and clumps. Parts of the model are quite lumpy because the latter. Humbrol 90 came in good condition and its tiny container seemed to have a different design for the lid. Perhaps it was better sealed? I decided to paint the smaller parts while they were on the sprue and I think that ended up being a good approach, though I watered down the Humbrol 90 too much initially. Luckily I remembered to use a different container before adding water, meaning the rest of the paint was fine.
Onto construction and the issues started immediately. The first step in the Hurricane kit is building the wheel wells, and I struggled a lot with that. The main reason for that is quite obvious in hindsight: I hadn't bought any tweezers, thinking I wouldn't need them. I did need them. Eventually I got them on well enough, but then I couldn't get the wing halves to close. I don't know if this was a manufacturing issue or (most likely) a mistake on my part, but the wing would not sit flush with the small wheel well parts attached. I tossed the two sidewalls in the trash and got the wings to close. This turned out to also be a mistake, as those side walls were very important for properly mounting the landing gear, which I later glued on quite crooked. I pressed on and built the cockpit. I loved how detailed it looked and managed to do a decent job with the black and light green on the joystick. I decided I'd glue the canopy open so that my hard work was easier to see, though sadly I couldn't get my camera to focus when taking photos, so I don't have any.
By the time I painted the camouflage I was quite excited and happy with the results. Sure, it was messy, but it looked like an airplane and I couldn't believe that I had managed to paint that camouflage. The process itself was a handful, and I found myself in a cycle of accidentally painting past where I intended, changing colors to fix that and going past the boundary again, but that was a good learning experience and lesson: buy masking tape. This was my first time using decals, and I managed to get all of them on except for the walkways on the wings, which I accidentally crumpled up trying to line them up. I wanted to see if I'd really need decal solutions or not. The decals on the Hurricane immediately silvered, so the answer was a clear yes. That's three things I need for next time then.
The entire process took me roughly 20 hours spread over two days. I originally walked away very frustrated and had decided to build no further models, as I didn't enjoy the process. But I was also very proud of how the Hurricane turned out and felt an urge to get better at modeling, so within a few days I was buying paints, brushes, decal solution, masking tape, tweezers and my next project. I learned a lot from this kit, mainly what not to do, and still think the result looks quite nice other than the landing gear, especially given that it was my first kit. I might go back and try to fix the crooked landing gear at some point, as I think it's the only thing I'd really consider bad about my model. I did manage to keep the propeller free from glue, so it can spin!
Livery:
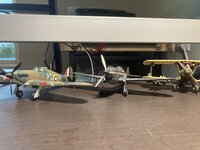
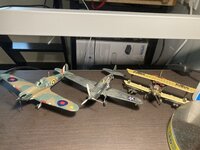
As close as I could get it to the one on the box, LI592 from No. 615 Squadron, August 1940. Used only the paints included in the kit (Humbrol 29, 30, 33 and 90). I did no research on this aircraft.
Airfix P-40B Warhawk (1/72)
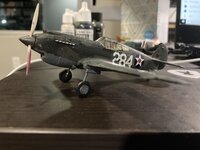
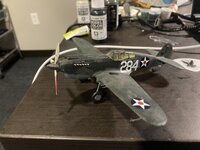
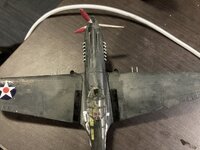
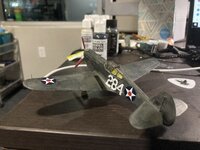
At this point it was very clear to me that I should not buy starter sets and would indeed need to buy paints, so I opted to buy another aircraft I liked and one that used paints the Marauder would also need, in order to minimize leftovers. The P-40B met both of these criteria. My supplies arrived piecemeal, the P-40 kit itself being one of the last items to do so. I did research beforehand on the proper color of the propeller blades as I was confused by the bare aluminum on one side and black on the other, and found that at the time propellers were to be left mostly unpainted but painted maroon on the side facing the pilot to eliminate glare, starting at the tip and ending at either the 18" or 24" mark from the hub. I couldn't find any maroon so I bought dark red and figured I'd see how well that turned out. I found the P-40 kit far less difficult to build.
My mistakes:
-I did not check whether the paints I bought were for paintbrushes or airbrushes beforehand, buying the cheapest and smallest bottles I could find. I ended up with three airbrush paints: Mission Models Olive Drab 41 and Interior Green, and Vallejo White. The white wasn't relevant for this kit, so I'll save it for the Marauder section. The Olive Drab caused 90% of my problems with this model, as it would not dry even when left for 24 hours. It was also too runny to use on the canopy properly, going everywhere except the struts. I finished the canopy mainly using dry bits of paint from the lid applied via a modified paperclip that I had been using to apply polycement. The Interior Green also took long to dry but it looked damn good if I dare say so myself, so no complaints there.
-I bought Vallejo silvergrey thinking that it would be a great color for the propellers and oleo struts, only to find that it is not shiny at all. Apparently I should have purchased a different color instead. I didn't notice until just now that the bottle even said silvergrey instead of silver!
-The Vallejo dark red was not even close to maroon. I'm quite new to acrylic paints, so maybe there's a better way to do this, but my attempt to fix this was to add a layer of very watered-down Humbrol 29 Dark Earth on top. It did not work, the propeller just looked brown, so I wiped it off before it could dry.
-I used scissors and a nail clipper to break the parts from the sprue, using the clipper's file to clean up the resulting bumps. Neither was a good option, I ended up cutting of chunks of the plane, and left an ugly large scar on one of the propeller blades.
Livery:
My multiple coats of OD 41 without giving them proper time to dry ended up giving a very weathered look, which I quite like despite it being entirely unintentional. I used Tamiya masking tape to paint the wing walkways and am quite happy with them. I painted the kit to match the livery on the box, 41-13297 from the 18th Pursuit Group, December 1941. I looked up some photos as reference instead of using the boxart. Happy with how the kit came out with the exception of the damaged non-shiny propellers. Colors used were Mission Models Olive Drab 41 & Interior Green (cockpit, inside of doors and wheel wells), Vallejo Black, Dark Red (propeller anti-glare), Gunmetal Grey (for the exhaust stacks and all 6 machine guns), Neutral Grey and Silvergrey (oleo struts, propeller). I used the kit's decals as best I could, but quite a few of them were too small for me. This was also my first time using Microsol + Microset. I think the results were quite good, but whenever I applied it to the model the never-drying Olive Drab would rub off. Could also have been the water from the decals. Like I said, the Olive Drab was the cause of almost all my problems. I really need to read the labels before buying next time.
Thoughts on the kit:
I enjoyed the P-40 much more than the Hurricane, partly because I had better supplies and more practice, but also because the kit itself was easier. It was very difficult to misalign any parts due to long square pins and holes. That being said, the instructions were a bit confusing when it came to one item: the small inboard landing gear doors. it's very hard to tell which side of them is the outside and which is the inside, or which is the top and which is the bottom. I glued them on upside down at first, and after fixing that I still think I might have accidentally put them in each other's location. My only other complaint is that the main landing gear are attached to the sprue by the same pins that are used to attach them to the airplane, meaning that a mistake when cutting out the parts can ruin their attachment. Thankfully their shape and length still lines them up 100% correctly as long as you add enough glue to compensate.
I've been on this forum for a while and started having a lot of free time over the summer, so I finally bit the bullet and decided to try building model kits in real life after years of making liveries and 3d models.
Previous attempts/Not super relevant stuff
Now, this isn't technically my first time modeling. My dad and I (by which I mean my dad did like 90% of the work) built two kits when I was around 5 or 6; a Gee Bee R1 and a B-17F. We never painted them or added decals and I don't really know where they are now, I think they were tossed in the garbage years back. The hobby shop we bought them in is long gone now, but we're still friends with the owner and he has a tiny little baked goods shop that we visit every now and then. My dad isn't big on planes, but has told me many times that he used to build kits and quit because of a particularly frustrating F4U kit. He still dislikes the Corsair.
Getting Started
I decided to start modeling again because I wanted a short wing B-26, and by all accounts Monogram's snap-tite kit in 1/72 would be the best option. I bought it in early February used on ebay. Of course, it required painting and decals and I'd have to decide on a livery. Eventually I decided that given how much I spent on the model and how important it was to me, that I should get some practice first instead of making it my first kit. We'll circle back to the Marauder later.
Airfix Hurricane Mk. I Starter Set (1/72)


Well if I'm getting started, why not go with a starter set? I don't really remember why I picked the Hurricane in particular, but I wanted to go with a starter set so that I wouldn't need to buy paints or a brush. That turned out to be a bad plan. I don't know if it was due to shipping or if this is a common issue, but three of the kit's four paints (Humbrol 29, 30 and 33) arrived solid. I watered them down a bit and managed to get them usable, but that left me with very runny colored water and clumps. Parts of the model are quite lumpy because the latter. Humbrol 90 came in good condition and its tiny container seemed to have a different design for the lid. Perhaps it was better sealed? I decided to paint the smaller parts while they were on the sprue and I think that ended up being a good approach, though I watered down the Humbrol 90 too much initially. Luckily I remembered to use a different container before adding water, meaning the rest of the paint was fine.
Onto construction and the issues started immediately. The first step in the Hurricane kit is building the wheel wells, and I struggled a lot with that. The main reason for that is quite obvious in hindsight: I hadn't bought any tweezers, thinking I wouldn't need them. I did need them. Eventually I got them on well enough, but then I couldn't get the wing halves to close. I don't know if this was a manufacturing issue or (most likely) a mistake on my part, but the wing would not sit flush with the small wheel well parts attached. I tossed the two sidewalls in the trash and got the wings to close. This turned out to also be a mistake, as those side walls were very important for properly mounting the landing gear, which I later glued on quite crooked. I pressed on and built the cockpit. I loved how detailed it looked and managed to do a decent job with the black and light green on the joystick. I decided I'd glue the canopy open so that my hard work was easier to see, though sadly I couldn't get my camera to focus when taking photos, so I don't have any.
By the time I painted the camouflage I was quite excited and happy with the results. Sure, it was messy, but it looked like an airplane and I couldn't believe that I had managed to paint that camouflage. The process itself was a handful, and I found myself in a cycle of accidentally painting past where I intended, changing colors to fix that and going past the boundary again, but that was a good learning experience and lesson: buy masking tape. This was my first time using decals, and I managed to get all of them on except for the walkways on the wings, which I accidentally crumpled up trying to line them up. I wanted to see if I'd really need decal solutions or not. The decals on the Hurricane immediately silvered, so the answer was a clear yes. That's three things I need for next time then.
The entire process took me roughly 20 hours spread over two days. I originally walked away very frustrated and had decided to build no further models, as I didn't enjoy the process. But I was also very proud of how the Hurricane turned out and felt an urge to get better at modeling, so within a few days I was buying paints, brushes, decal solution, masking tape, tweezers and my next project. I learned a lot from this kit, mainly what not to do, and still think the result looks quite nice other than the landing gear, especially given that it was my first kit. I might go back and try to fix the crooked landing gear at some point, as I think it's the only thing I'd really consider bad about my model. I did manage to keep the propeller free from glue, so it can spin!
Livery:
As close as I could get it to the one on the box, LI592 from No. 615 Squadron, August 1940. Used only the paints included in the kit (Humbrol 29, 30, 33 and 90). I did no research on this aircraft.
Airfix P-40B Warhawk (1/72)


At this point it was very clear to me that I should not buy starter sets and would indeed need to buy paints, so I opted to buy another aircraft I liked and one that used paints the Marauder would also need, in order to minimize leftovers. The P-40B met both of these criteria. My supplies arrived piecemeal, the P-40 kit itself being one of the last items to do so. I did research beforehand on the proper color of the propeller blades as I was confused by the bare aluminum on one side and black on the other, and found that at the time propellers were to be left mostly unpainted but painted maroon on the side facing the pilot to eliminate glare, starting at the tip and ending at either the 18" or 24" mark from the hub. I couldn't find any maroon so I bought dark red and figured I'd see how well that turned out. I found the P-40 kit far less difficult to build.
My mistakes:
-I did not check whether the paints I bought were for paintbrushes or airbrushes beforehand, buying the cheapest and smallest bottles I could find. I ended up with three airbrush paints: Mission Models Olive Drab 41 and Interior Green, and Vallejo White. The white wasn't relevant for this kit, so I'll save it for the Marauder section. The Olive Drab caused 90% of my problems with this model, as it would not dry even when left for 24 hours. It was also too runny to use on the canopy properly, going everywhere except the struts. I finished the canopy mainly using dry bits of paint from the lid applied via a modified paperclip that I had been using to apply polycement. The Interior Green also took long to dry but it looked damn good if I dare say so myself, so no complaints there.
-I bought Vallejo silvergrey thinking that it would be a great color for the propellers and oleo struts, only to find that it is not shiny at all. Apparently I should have purchased a different color instead. I didn't notice until just now that the bottle even said silvergrey instead of silver!
-The Vallejo dark red was not even close to maroon. I'm quite new to acrylic paints, so maybe there's a better way to do this, but my attempt to fix this was to add a layer of very watered-down Humbrol 29 Dark Earth on top. It did not work, the propeller just looked brown, so I wiped it off before it could dry.
-I used scissors and a nail clipper to break the parts from the sprue, using the clipper's file to clean up the resulting bumps. Neither was a good option, I ended up cutting of chunks of the plane, and left an ugly large scar on one of the propeller blades.
Livery:
My multiple coats of OD 41 without giving them proper time to dry ended up giving a very weathered look, which I quite like despite it being entirely unintentional. I used Tamiya masking tape to paint the wing walkways and am quite happy with them. I painted the kit to match the livery on the box, 41-13297 from the 18th Pursuit Group, December 1941. I looked up some photos as reference instead of using the boxart. Happy with how the kit came out with the exception of the damaged non-shiny propellers. Colors used were Mission Models Olive Drab 41 & Interior Green (cockpit, inside of doors and wheel wells), Vallejo Black, Dark Red (propeller anti-glare), Gunmetal Grey (for the exhaust stacks and all 6 machine guns), Neutral Grey and Silvergrey (oleo struts, propeller). I used the kit's decals as best I could, but quite a few of them were too small for me. This was also my first time using Microsol + Microset. I think the results were quite good, but whenever I applied it to the model the never-drying Olive Drab would rub off. Could also have been the water from the decals. Like I said, the Olive Drab was the cause of almost all my problems. I really need to read the labels before buying next time.
Thoughts on the kit:
I enjoyed the P-40 much more than the Hurricane, partly because I had better supplies and more practice, but also because the kit itself was easier. It was very difficult to misalign any parts due to long square pins and holes. That being said, the instructions were a bit confusing when it came to one item: the small inboard landing gear doors. it's very hard to tell which side of them is the outside and which is the inside, or which is the top and which is the bottom. I glued them on upside down at first, and after fixing that I still think I might have accidentally put them in each other's location. My only other complaint is that the main landing gear are attached to the sprue by the same pins that are used to attach them to the airplane, meaning that a mistake when cutting out the parts can ruin their attachment. Thankfully their shape and length still lines them up 100% correctly as long as you add enough glue to compensate.

