P-51 Mustang III - Vasilios Vassiliades - 'Vass' (1920-1945)

Ad: This forum contains affiliate links to products on Amazon and eBay. More information in Terms and rules

zaxos345

Senior Airman
372
108
Jul 20, 2009
Ilion, Attiki
Good morning guys, after a short period of relaxing i continue this informal tribute to the Greek pilots that flew with foreign Airforces. This time is Vasilios Vassiliades - VASS.

vassiliades1.jpg


You can read his story here Vassiliades Vassilios - Vass

For this project i am using the Tamiya's 1/48 P-51 Mustang III

IMG_1050.jpg


Some of the aftermarket that are going to be used..

P1050084.jpg


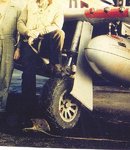
Being waiting for a Part's set for the aircraft i started from the rear wheel. Tamiya gives this one

th_IMG_2091.jpg
th_IMG_2093.jpg


I wanted to make something like this one

sec4_0131.jpg


Finally this came up

th_P1050067.jpg
th_P1050069.jpg
th_P1050075.jpg


Next i removed all the interior details from the fuselage and wings in order for the resign parts to take their place. A lot of dry fit is going to be needed!!!

th_P1050079.jpg
th_P1050083.jpg
th_P1050087.jpg
th_P1050093.jpg


This is the very good in detail resign wheel well that Vector provides.

P1050086.jpg


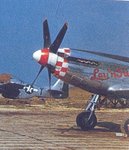
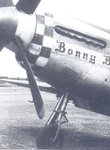
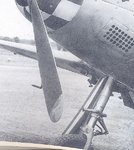
After that having seen and compared those two photoes...

th_LtFelixkozaczka363rdFighterGroup382.jpg
th_goodsonhofer.jpg


I realized that when the Malcon modification took part on the Mustangs a small fillet was added in the area where the canopy rolled in order to add the rails for it. So i added also, my intention is to also try to replicate this small rail, we will see...

th_P1050088.jpg
th_P1050089.jpg


Thats all for now, until the next update

All the best

John
 
Last edited:
Good morning guys, A bit more time for modelling so i am trying... Continuing my work next project was to replicate correctly the throttle quadrant, as Aires had the early one. So i modified the one Part gives (this one is also wrong i think) and finally i placed it to position.

P1050106.jpg


Next it was stick time, i added some details and i also replicated the control locking mechanism.

P1050137_resize.jpg


P1050140_resize.jpg


P1050141.jpg


Then a quick dry fit...

P1050151.jpg


P1050159.jpg


Afterwards i replicated the manual hydraulic pump, off she goes...

P1050172_resize.jpg


P1050175.jpg


The position of the pump showed me that i had incorrectly opened the fuel gauges holes on the floor, so i closed the wrong ones and i opened new.

P1050188.jpg


I was very happy with the progress until a question i made to Britmodeller changed some things...

''Only aircraft in the serial blocks FB350-399, HB900-961 and KH421-640 had the rear fuselage tank fitted, aircraft in the serial blocks FB100-124, FB125-349 and FX and FZ serialed aircraft did not have fuselage tanks and therefore no red filler cap.''

That means that the aircraft i am building had no fuselage tank installed, so i had to modify the Aires resin...

P1050224.jpg


My effort will be to replicate this, but this will be done later...

radio.png


It was time for the landing gear, the kit provides this

th_P1050195.jpg
th_P1050196.jpg


So i tried to make them a bit better...

P1050201.jpg


P1050210.jpg


I put the plumping for the brakes and i painted them with Alclad

P1050251.jpg


P1050252.jpg


Later on i placed the missing part of the plumping, which was some kind of plastic

P1050258.jpg


th_P1050259.jpg
th_P1050262.jpg
th_P1050271.jpg


Thats all for now gents, hope to be able to post progress soon, thanks for looking

John
 
Last edited:
Excellent work my friend. One point on the landing gear - the legs were the silver colour, made from paint, aluminium powder and clear laquer, but the yoke from the leg to the wheel axle was a darker colour, being a cast piece, more of a metallic grey.
 
Leave it with me John, and I'll scan and post something later. The area I mean is the part held in your tweezers, which curves up into the main gear leg, where the oleo itself joins the axle stub and yoke to the main leg.
 
Here's some colour pics (from Roger Freeman's 'Mighty Eighth in Colour') showing the variations in tones, some no doubt due to dirt and possibly brake dust. The part in question is the joint at the base of the leg, leading down to the wheel axle, where the pilot's foot is on the wheel in the first pic.
The monochrome pics show the contrast and, finally, a pic showing the same parts on my 1/48th ICM kit.
Hope these help.
 

Attachments

  • Mustang gear legs 002.jpg
    Mustang gear legs 002.jpg
    89.9 KB · Views: 185
  • Mustang gear legs 005.jpg
    Mustang gear legs 005.jpg
    52.4 KB · Views: 196
  • Mustang gear legs 004.jpg
    Mustang gear legs 004.jpg
    115.9 KB · Views: 193
  • Mustang gear legs 001.jpg
    Mustang gear legs 001.jpg
    59.1 KB · Views: 185
  • Mustang gear legs.jpg
    Mustang gear legs.jpg
    89.6 KB · Views: 186
  • D Day mustang 127.jpg
    D Day mustang 127.jpg
    38.1 KB · Views: 185
Good evening guys, after some time (it is hot here and most time is spent at see 8)8) ) a small update. After removing the tank from the resin i had to build the IFF receiver. Two unlucky attempts but finally i think i managed it.

P1050392.jpg


Also i made the small part where is going to be placed. Here you can see it after a dry fit.

P1050299.jpg


Now how am i going to manage and get it in there is another issue. Next i build the battery and you can see how it is going to be placed into the cockpit.

P1050309.jpg


P1050312.jpg


Rudder pedals....

P1050391.jpg


...And finally the rails for the canopy. A big party here!!!! A 0.5Χ0.3mm strip with 28 small disks punched with a 0.5 mechanical pencil. Totally 56 for both rails, not to mention how many i lost during the process but i think that it deserves the time! Just to note down that the disks were glued in position with the clear fix from Humbrol.

P1050370.jpg


P1050377.jpg


Now some minor details have to be fixed and i hope to proceed with the painting procedure soon enough.
Thats all folks, hope you like it so far

John
 
:cool: 
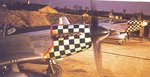
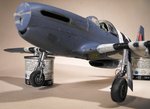
However pay your attantion to the way these rails were attached to the fuselage. It wasn't going a such way you showed in the pic above. Here and example....


p51bccocpit7bcwindshiel.png

skalskiod9.jpg

skalski3.jpg

309kaminskief2.jpg
 
Last edited:

Users who are viewing this thread

Back