I concur with Terry and Michael...For the period you are modelling, the RLM 71 would be correct!
Navigation
Install the app
How to install the app on iOS
Follow along with the video below to see how to install our site as a web app on your home screen.
Note: This feature may not be available in some browsers.
More options
You are using an out of date browser. It may not display this or other websites correctly.
You should upgrade or use an alternative browser.
You should upgrade or use an alternative browser.
Galland's Bf 109E-4 1/32 scale
- Thread starter Gerry
- Start date
Ad: This forum contains affiliate links to products on Amazon and eBay. More information in Terms and rules
More options
Who Replied?- Thread starter
- #182
Gerry
Staff Sergeant
Bill, thanks for your reply. i'll follow that link to your build. Terry, Michael, and Wayne, thanks for clarifying that point. RLM 71 it is, then!
Airframes
Benevolens Magister
Don't know where the author got the idea for that photo caption. RLM66 wasn't used inside or outside at that period, and the lighting and angle only is causing the high contrast of tones - looks like he had an idea, which to him eventually became fact.
- Thread starter
- #184
Gerry
Staff Sergeant
Firstly, Bill, would love to know how your 1/48th "Merlin's Magic" turned out, as it started really well. Did you ever post finished pictures? Terry, your comments just confirm how much conflicting opinion there is on these matters. Who do you trust? Well, unless I hear differently, I'm putting my trust in the opinions of the members of this Forum.
An update of where I am at the moment on the build, just to pretend I haven't been slacking, totally.
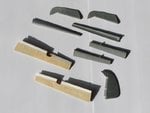
Picture 1. After an initial bout of sanding, I sprayed a coat of primer on the control surfaces, to show up any defects and to see if more sanding is required. These will get another coat when these adjustments are made. The flap extensions were added, first pinned with superglue, then 'welded' to the flaps with liquid poly on the undersides. These need to be trimmed to fit properly in a deployed position and then should slide under the tailing edges, with a curved surface, after a bit more sanding and a coat of primer to check joins, etc.
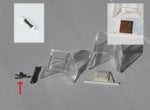
Picture 2. Shows the stages of scratch-building the telescope and head armour. Inset 1. shows the telescope comprising three sections. From top to bottom, a piece of sprue, drilled at the back, as the eyepiece. The centre piece is part of an old 1/72 rotor hub assembly, from the parts box, which just mirrors the shape of the actual 'scope, nicely. The front piece is rolled plastic card, secured with liquid poly, trimmed and sanded to get rid of the step-join. Main photo; the telescope, from the front, in scale to the canopy, after a coat of primer and sanding. The arrowed part will, hopefully be adapted to represent the mount for the 'scope, from the canopy frame. The pilot's armour/headrest, made from three pieces of plastic card - the top piece being thinnest - still separate at this stage. The centre canopy is the part supplied with the kit, for scale, as I haven't got around to slicing the replacement vac-form canopy yet (slacking again!). Inset 3. is the padded headrest completed. The top two pieces were cemented together and covered with two layers of builder's textured masking tape, enough to give a padded effect. This was carefully pressed into the stepped contour with the back of a scalpel blade. I was then able to indent the edge pattern into the soft tape. The three circular indents in the pad were achieved with the rounded point of a pencil. I then gave it a coat of brown/red enamel and dry brushed with burnt umber, with the edges highlighted in lighter brown.
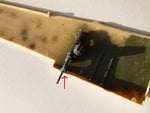
Picture 3. I decided to add blast tubes to the cannon openings (Why, you may well ask!). The trouble with this, is that a blast tube wide enough to accommodate the full barrel wouldn't allow the wings to close, hence the truncated version you see here. This was fashioned from the plastic tube of a cotton bud, which is just the right diameter to allow the wing to close. A coat of RLM 02, and nobody will be the wiser.
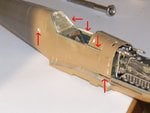
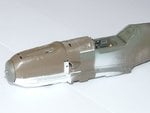
Picture 4. is the fuselage finally buttoned up. The adjustments, I made earlier to the trim wheels etc., worked and it slotted together without any difficulty. From back to front, the (oil?) hole in the fuselage has been filled and will be indented in the centre. The sloping back plate has been fitted and any gaps filled and sanded, awaiting painting. the port side sill has been added. the saddle cowling is now (loose) in its final position. Unless I file the gun tops to nothing, you can see where shimming is required. The cowling top still requires filling and sanding.
So that's where I am to date. I'm now trying to decide the best sequence to progress the rest of the build. I think finish the wing assemblies first, then attach them and the tail planes to the fuselage, ready for painting. Then, I think, work on the canopy, masking for painting internally and externally and when painted add the telescope, making sure it doesn't interfere with the Revi sight, when that's installed. Then on to the prop assembly and lastly, undercarriage and all small external details.
I'll keep you updated as it progresses.
An update of where I am at the moment on the build, just to pretend I haven't been slacking, totally.
Picture 1. After an initial bout of sanding, I sprayed a coat of primer on the control surfaces, to show up any defects and to see if more sanding is required. These will get another coat when these adjustments are made. The flap extensions were added, first pinned with superglue, then 'welded' to the flaps with liquid poly on the undersides. These need to be trimmed to fit properly in a deployed position and then should slide under the tailing edges, with a curved surface, after a bit more sanding and a coat of primer to check joins, etc.
Picture 2. Shows the stages of scratch-building the telescope and head armour. Inset 1. shows the telescope comprising three sections. From top to bottom, a piece of sprue, drilled at the back, as the eyepiece. The centre piece is part of an old 1/72 rotor hub assembly, from the parts box, which just mirrors the shape of the actual 'scope, nicely. The front piece is rolled plastic card, secured with liquid poly, trimmed and sanded to get rid of the step-join. Main photo; the telescope, from the front, in scale to the canopy, after a coat of primer and sanding. The arrowed part will, hopefully be adapted to represent the mount for the 'scope, from the canopy frame. The pilot's armour/headrest, made from three pieces of plastic card - the top piece being thinnest - still separate at this stage. The centre canopy is the part supplied with the kit, for scale, as I haven't got around to slicing the replacement vac-form canopy yet (slacking again!). Inset 3. is the padded headrest completed. The top two pieces were cemented together and covered with two layers of builder's textured masking tape, enough to give a padded effect. This was carefully pressed into the stepped contour with the back of a scalpel blade. I was then able to indent the edge pattern into the soft tape. The three circular indents in the pad were achieved with the rounded point of a pencil. I then gave it a coat of brown/red enamel and dry brushed with burnt umber, with the edges highlighted in lighter brown.
Picture 3. I decided to add blast tubes to the cannon openings (Why, you may well ask!). The trouble with this, is that a blast tube wide enough to accommodate the full barrel wouldn't allow the wings to close, hence the truncated version you see here. This was fashioned from the plastic tube of a cotton bud, which is just the right diameter to allow the wing to close. A coat of RLM 02, and nobody will be the wiser.
Picture 4. is the fuselage finally buttoned up. The adjustments, I made earlier to the trim wheels etc., worked and it slotted together without any difficulty. From back to front, the (oil?) hole in the fuselage has been filled and will be indented in the centre. The sloping back plate has been fitted and any gaps filled and sanded, awaiting painting. the port side sill has been added. the saddle cowling is now (loose) in its final position. Unless I file the gun tops to nothing, you can see where shimming is required. The cowling top still requires filling and sanding.
So that's where I am to date. I'm now trying to decide the best sequence to progress the rest of the build. I think finish the wing assemblies first, then attach them and the tail planes to the fuselage, ready for painting. Then, I think, work on the canopy, masking for painting internally and externally and when painted add the telescope, making sure it doesn't interfere with the Revi sight, when that's installed. Then on to the prop assembly and lastly, undercarriage and all small external details.
I'll keep you updated as it progresses.
Attachments
Airframes
Benevolens Magister
Excellent work there Gerry, very well done indeed. You'll find it easier to shim the saddle cowling, and the shims can easily be sanded to match the fuselage/cowling profile.
Looking forward to the next bits!
Looking forward to the next bits!
Coming along nicely Gerry!
Tony Hill
Tech Sergeant
Loving it!
looking good man....
- Thread starter
- #191
Gerry
Staff Sergeant
Thanks, Guys. I'm still masking, sanding and shimming. Found the reassembly of the wings, flaps and slats trickier and more time consuming than I originally thought, mostly down to finding suitable secure attachment points. Hopefully will be able to post photos of progress later.
Airframes
Benevolens Magister
Looking forward to more Gerry.
- Thread starter
- #194
Gerry
Staff Sergeant
Thanks for your kind comments, Javlin Terry.
I'm disappointed that I haven't made as much progress as I had hoped this week. I think, because of my inexperience, I'm not doing everything in the best order, therefore spending more time than I should waiting for things to dry - either cement or paint - rather than having an efficient production line sequence in place. I also find I have to correct some things as I go; for instance I thought I had the bottom of the engine cowling filled and sanded to perfection, only to discover that when I sprayed a white basecoat for the eventual yellow, it was anything but. So, more sanding and painting was required and more time lost, waiting for it to dry.
Anyhow, that's enough moaning for one post . Here's what's new to date.
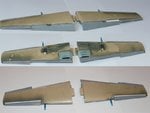
Picture 1. The flaps and slats have been attached to the wings and deployed in a lowered position. In the top shot you can see I had to repair the starboard flap as the original broke on installation. The ailerons I kept in neutral position.
In the centre shot, the canvas wheel well liners have been added but still need some adjusting through the cannon bulges. Because of the angles of the lowered flaps, the radiator bath backs needed a lot of trimming to get them to sit properly. This was achieved with much sanding and many fits but eventually they fitted and look right.
The bottom shot shows the slats deployed with the under skin carriage made from light plastic card. This is a very delicate attachment on both wings and have had to reattach then on a number of occasions when I'd accidentally knocked them off. The idea now, is that the wings will be attached to the fuselage, before I spray any more primer, as I want to avoid too much paint build-up. There is also some sanding and repairs to seams to be done before any more painting. The cannon barrels have been covered with cut cotton bud tubes, to give them some protection.
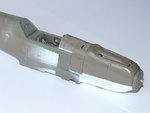
Pictures 23. Show the gaps in the cowlings filled with shims. The engine is still sitting loose under the hood, just to confirm the fit, as I think it will be easier to paint the under cowl if the engine doesn't have to be masked in position. The spinner back plate is just testing for position. On the port side, I may have to fill the gap behind the air filter head. I'll decide that when I see how much it hides the gap. I've painted the sloping bulkhead and added the strap on the luggage bin. The underside of the cowling has been basecoated for the yellow nose.
And that's it for now, folks!!!
I'm disappointed that I haven't made as much progress as I had hoped this week. I think, because of my inexperience, I'm not doing everything in the best order, therefore spending more time than I should waiting for things to dry - either cement or paint - rather than having an efficient production line sequence in place. I also find I have to correct some things as I go; for instance I thought I had the bottom of the engine cowling filled and sanded to perfection, only to discover that when I sprayed a white basecoat for the eventual yellow, it was anything but. So, more sanding and painting was required and more time lost, waiting for it to dry.
Anyhow, that's enough moaning for one post
. Here's what's new to date.Picture 1. The flaps and slats have been attached to the wings and deployed in a lowered position. In the top shot you can see I had to repair the starboard flap as the original broke on installation. The ailerons I kept in neutral position.
In the centre shot, the canvas wheel well liners have been added but still need some adjusting through the cannon bulges. Because of the angles of the lowered flaps, the radiator bath backs needed a lot of trimming to get them to sit properly. This was achieved with much sanding and many fits but eventually they fitted and look right.
The bottom shot shows the slats deployed with the under skin carriage made from light plastic card. This is a very delicate attachment on both wings and have had to reattach then on a number of occasions when I'd accidentally knocked them off. The idea now, is that the wings will be attached to the fuselage, before I spray any more primer, as I want to avoid too much paint build-up. There is also some sanding and repairs to seams to be done before any more painting. The cannon barrels have been covered with cut cotton bud tubes, to give them some protection.
Pictures 23. Show the gaps in the cowlings filled with shims. The engine is still sitting loose under the hood, just to confirm the fit, as I think it will be easier to paint the under cowl if the engine doesn't have to be masked in position. The spinner back plate is just testing for position. On the port side, I may have to fill the gap behind the air filter head. I'll decide that when I see how much it hides the gap. I've painted the sloping bulkhead and added the strap on the luggage bin. The underside of the cowling has been basecoated for the yellow nose.
And that's it for now, folks!!!
Attachments
Airframes
Benevolens Magister
Excellent Gerry. I have a feeling it might be better to fit the lowered flaps after the wings have been fitted and set, less chance of them becoming detached, and possibly more surface to key to.
Taking shape now Gerry, lookin' good!
Firstly that is some very impressive work going into that model.
Re: canopy frame and cockpit colours. We should be very wary of drawing hard and fast lines. Dave Wadman has shown,based on Dutch and German research,that with the introduction of the heavier canopy on the E-4 the framing was finished inside and out in RLM66.Whether it was later re-sprayed with the camouflage colour can be difficult to determine. RLM66 appeared inside cockpits as early as 1940,sometimes only above the level of the cockpit sill. Take a look at Bartel's bellied in Bf109E-1.

W.Nr 6296F. The F is for "Flugklar" so it has been returned to flying condition after earlier damage and has the heavier framed canopy retro-fitted. Look at that interior colour,it doesn't look like RLM02,too dark. Wadman reckons it is probably RLM66 and I'd agree. That picture was taken on,or shortly after,24/7/40.
There is a tendency for the switch to RLM66 interiors to be linked to the switch to the 74/75 camouflage scheme which followed an order of 24/6/41 (hence the new scheme appearing on early Bf109F-2s) or to date it in November 1941 at the time of the re-issue of L.Dv.521/1
Cheers
Steve
Re: canopy frame and cockpit colours. We should be very wary of drawing hard and fast lines. Dave Wadman has shown,based on Dutch and German research,that with the introduction of the heavier canopy on the E-4 the framing was finished inside and out in RLM66.Whether it was later re-sprayed with the camouflage colour can be difficult to determine. RLM66 appeared inside cockpits as early as 1940,sometimes only above the level of the cockpit sill. Take a look at Bartel's bellied in Bf109E-1.
W.Nr 6296F. The F is for "Flugklar" so it has been returned to flying condition after earlier damage and has the heavier framed canopy retro-fitted. Look at that interior colour,it doesn't look like RLM02,too dark. Wadman reckons it is probably RLM66 and I'd agree. That picture was taken on,or shortly after,24/7/40.
There is a tendency for the switch to RLM66 interiors to be linked to the switch to the 74/75 camouflage scheme which followed an order of 24/6/41 (hence the new scheme appearing on early Bf109F-2s) or to date it in November 1941 at the time of the re-issue of L.Dv.521/1
Cheers
Steve
Crimea_River
Marshal
Gerry, this build is looking exceptional. Your methodical approach to ensuring everything fits well and is just right before proceeding to the next step is a real strength in your work. Many of us tend to rush on to the next stages before we really should and so I applaud you on your patience and will to get the work done right.
Going back over the last few pages, I really like the details you put into the telescope and especially the headrest. Masking tape to simulate leather - perfect! On the flaps, though, I agree with Terry and would have attached these after the wings were glued to the fuselage. I find that there's a lot of fiddley work with masking tape, and sometimes rubber band "pursuaders" to get the dihedral right and that the flaps and slats might just get in the way, especially when you may want to lay the model flat on a serface and measure each wing tip. The deployed flaps make this a bit harder and may make the model not sit flat.
As to the canopy frames, the debates may never end. I think your model will look good in either colour but I vote for the green as well.
Looking forward to more on this build!
- Thread starter
- #200
Gerry
Staff Sergeant
Steve, thank you for taking the time to post that information. As you probably realise, from the thread, I'm no expert on these points of detail and, in fact, joined the Forum hoping to get guidance for this and other builds, from the more knowledgeable contributors. I think I have realised, at this stage, that there are very few definitive answers to be had on these debates, but a lot of genuinely held opinions based on experience and research, by members, over the years. I know from experience from my previous career in graphics, just how difficult it is to extrapolate colour information from a black and white photo. A lot of interpretation is required. I am inclined to accept your contention of the supply of replacement canopies in RLM 66 and probable use before repainting was possible. In fact, I have seen evidence of replacement rudders, still in primer, being used by the Luftwaffe in combat situations. As to whether Galland's W/N 5819 used RLM 66, well, I'm going to sit this one out on the fence and accept the consensus of the responses that your thoughtful post will no doubt encourage.
Woody, thank you for you support. Andy and Terry, yes you were absolutely right about the flaps. I lost both flaps and a slat, thanks to my clumsy mitts, when attaching the wings to the fuselage, which I've now done. So that's one to look out for, in future builds. Fortunately, no damage was sustained, other than hurt pride, and all have been reattached successfully. Again, Andy, thank you for you appreciation of my efforts. I've found, during the build, that I'm encouraged by positive comments to raise the bar and have attempted things, such as the flaps and slats, that I hadn't intended tackling when I started. I also find that creating a solution, such as the leather headrest, gives me great satisfaction.
Having said that, I found that the join between the wings and fuselage on this kit is very good and tight, with hardly any fiddling to get the dihedral correct. I actually don't think any filling will be required at the wing roots, upper or lower. It's nice to see it actually taking the shape of an aircraft, as, up to this point, I didn't feel i'd been making any appreciable progress over the last few sessions.
I'll post more photos as soon as I can.
Users who are viewing this thread
Total: 1 (members: 0, guests: 1)