Galland's Bf 109E-4 1/32 scale

Ad: This forum contains affiliate links to products on Amazon and eBay. More information in Terms and rules

Steve, thank you for taking the time to post that information. I know from experience from my previous career in graphics, just how difficult it is to extrapolate colour information from a black and white photo. A lot of interpretation is required. I am inclined to accept your contention of the supply of replacement canopies in RLM 66 and probable use before repainting was possible. As to whether Galland's W/N 5819 used RLM 66, well, I'm going to sit this one out on the fence and accept the consensus of the responses that your thoughtful post will no doubt encourage.

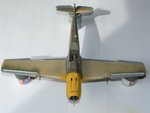
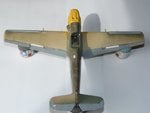
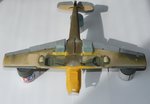
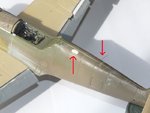
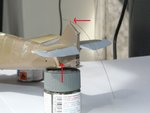
I'll post more photos as soon as I can.

My post was absolutely not meant to imply that the framing on Galland's aircraft was in RLM66. I've modelled this aircraft and I too went with the consensus that it was in the camouflage colour!
I did mean to show that the "hard lines" beloved of some modellers simply don't apply.Farbton 66 was a pre-war colour (it is referred to in recently discovered in pre-war Heinkel documents as an interior colour for example) and was in common use in crew compartments long before the summer of 1941. It's early use in the Bf109E is more contentious, but it did occurr. The afore mentioned Dave Wadman thinks its use maybe linked to which sub-contractor built or upgraded the aircraft (Fiesler,Arado etc)
Keep up the good work,I'm looking forward to the photos.
Cheers
Steve
 
I agree with Steve re the earlier use of RLM 66 in interiors, and this, or a very similar shade, was already being used by Junkers for example. However, in the photo of Bartel's downed E1, I feel that the interior colour, on the rear bulkhead and what is seen of the canopy frame, is RLM 02, matching the tonal value seen on the upper decking camouflage to the rear of the RLM71 over the cockpit area, including the canopy.
But to just stretch things a little further, it certainly is a very spurious area when hard and fast rules are concerned. Have a look at many 'cockpit shots' of Bf109Es, and you should notice that some are apparently finished in a colour that is neither RLM02 or RLM 66, but somewhere in between, and is most likely the result of production, as Steve said, bny different factories, such as Arado, Erla, etc etc.
 
Thanks to Steve and Terry for elaborating on the RLM 66 dilemma. Steve, as my original posting on the matter was in relation to Galland's aircraft's canopy, yes, I'm afraid I did intimate that your original reply was suggesting that it may have been possible that Galland's canopy could have been finished in RLM 66. Thanks for your clarification in your second post. The consensus on this matter is, so far, unanimously in favour of a RLM 71 finish.
 
Thanks to Steve and Terry for elaborating on the RLM 66 dilemma. Steve, as my original posting on the matter was in relation to Galland's aircraft's canopy, yes, I'm afraid I did intimate that your original reply was suggesting that it may have been possible that Galland's canopy could have been finished in RLM 66. Thanks for your clarification in your second post. The consensus on this matter is, so far, unanimously in favour of a RLM 71 finish.

Sorry for the confusion, I could have worded my first post better! A hazard of the internet I'm afraid.

Cheers
Steve
 
Here's what I've been at since my last post, with the 109E at last beginning to take shape.

Pictures 12. The wings, tailplanes, tailplane struts, air filter and control surfaces attached, with the exception of the rudder. I thought it would be easier to pre-paint, the yellow nose cowling, at this stage. The elevators have been positioned at a slight down angle. Because of the shims, the air filter was positioned higher than indicated. This meant just removing the locating pin at the back.

Picture 3. The underside. This, so far, is the only area where I identified a serious concern with this kit. The join under the nose cowl was a problem, with the openings on both sides not matching up properly and because the locating pins were removed to allow for a better engine fit, there was a slight step. This required a fair bit of filling and sanding, neither of which I would consider myself expert at. When painted, I notice it's still visible and will require still more sanding and repainting. The radiator baths have been masked to protect the pre-painted rads. The front and rear shutter to the oil bath still has masking tape on.

Pictures 45. Some work on the rear fuselage. I added the fuel door cover out of thin plastic card cut to the shape. This was scribed around and will be sanded down to a level with the surrounding panels. I choose this method because my scribing skills are seriously lacking. I've drilled a holes for the arial and sub-arial. The pieces of microfilament are to prevent paint from clogging them. I also scribed a channel for the rudder control cables and a hole where they exit the fuselage.

Picture 6. I've started to pull the canopy together. The front canopy has had to be slightly thinned at the bottom curve to fit around the after-parts canvas instrument cover. It also needed a thin shim to sit properly. I've started to mask it internally, for painting. The remaining sections haven't been masked yet. The centre section is from the vac-form canopy. Because of an uneven cut - even with a fresh blade I found it really hard to cut straight - I've added front and back frames from thin plastic strip. The metal frames, on both sides, and the opening handle are from the Aries kit with a knob added, from sprue. The spinner has been painted and test fitted. The back plate and blades still need painting in RLM 70, before final assembly.

Picture 7. I don't know if there are many of these old Matchbox kits still out there on people's shelves, awaiting assembly. If there are, then I would suggest you ignore the instructions sequence when it comes to the engine and install it last. I would also strongly suggest that you don't attach the oil radiator until the engine is in place in the engine compartment. I found that when the rad was attached to the base of the engine as instructed, it pushed the engine too far forward, so that the coolant tank was forward of the cowling front by about 2mm, meaning quite a gap between the prop back plate and the cowling. My own solution was to trim about 2mm off the back of the rad and seal it with plastic card. After a test fit with the engine, for position, I attached the rad to the cooler bath and cemented the lot into position. The engine is now easier to manoeuver in the compartment and fits better. As you can see, I got some overspray in the compartment and this will be re-sprayed before the engine is positioned. The more astute among you will also have noticed that I've knocked the MG barrel off, again!!!

Picture 8. The dihedral was mentioned in an earlier post. Although I was fairly sure that I had gotten it right, I conducted this little exercise in which I superimposed a diagram of the 109E (in red) over a frontal shot of by build. Obviously, although the perspective caused by the depth of field throws the proportion of the tailplane way out, you can see that at the front wings, the match is pretty accurate.

I would love to claim that my brilliance was responsible for this but, in fact, the tight fit of the port wing to the fuselage gave the dihedral accurately. After a visual check against the dihedral diagram, the starboard wing, which had a little more give, was adjusted to the same angle and held in place with tape until dry.

I've been trying to think how this technique might help in future builds but unfortunately, the wings need to be firmly in place before you can check the measurement.

I now need to finish the canopy and get it into position for painting and now that the aircraft is at this stage, I'll check for filling, sanding and polishing before the nose is masked and everything gets a coat of primer to show up any missed defects. Hopefully, any small defects can then be corrected and the plane masked for final painting. More updates will follow.
 

Attachments

  • 109E Top view.jpg
    109E Top view.jpg
    48.9 KB · Views: 140
  • 109E Top Back.jpg
    109E Top Back.jpg
    49.8 KB · Views: 130
  • 109E Underside.jpg
    109E Underside.jpg
    53.2 KB · Views: 148
  • 109E Port fuselage.jpg
    109E Port fuselage.jpg
    61.8 KB · Views: 133
  • 109E Port Tailplane.jpg
    109E Port Tailplane.jpg
    59.8 KB · Views: 135
  • 109E canopy masking  Spinner.jpg
    109E canopy masking Spinner.jpg
    39.4 KB · Views: 130
  • 109E Oil Rad  Bath.jpg
    109E Oil Rad Bath.jpg
    56.2 KB · Views: 130
  • 109E Dihedral trace copy.jpg
    109E Dihedral trace copy.jpg
    41.9 KB · Views: 138
Gerry your build is coming along great and looking great. What MG barrel hmmm.
 
Gerry, thats a great looking build. Good info on the dihedral and superimposing the diagram. I just finished Galland's Emil in 1/48 scale (posted on the completed models forum), and had the same issues with wing dihedral alignment. I ended up going with what looked right, eyeballing both wings independently against the horizontal stabs. That for me was the rub...one wing was off, so I had to separate it and re-glue. Ofcourse, this only works if you've got good tail feather alignment. Love the MG's, have not seen a plastic 109 with that arrangement. Most are cowling glued. I look forward to your progress. Good luck!
 
Thanks to you all for your supportive comments. Still frittering away on the canopy modifications and masking.
 
Thanks Javlin, I hope I got the sequence right, otherwise it'll add more time to the build. Inspired by Airframes (Terry's) current Hurricane build and the rate he's getting through it, I've tried to get the finger out and press on with mine.

Picture 1. I've masked the canopy interior and exterior. The red exterior masks came pre-cut with the Techmod decals I'm intending to use. Because they were designed for use with the Hasegawa Kit, a lot of tweaking was required to get them to cover properly. Any gaps were filled with off-cuts of the masking material. The interior masks (with the exception of the canopy rear, which was supplied) were all hand cut from Tamiya masking tape and that was a very fiddly job to get them accurately positioned.

Pictures 2, 3 4. After some filling, sanding and a good polish, The yellow nose was carefully masked and the wheel wells and tailwheel bay were stuffed with damp tissues and the gaps in the slats, with folded paper. I then got a couple of coat of Halford's Grey Plastic Primer, straight from the can, on to the completed airframe. Somebody on another thread said that a coat of primer makes all the difference and I'd have to fully endorse that statement. It really makes everything pristine and fresh, something I appreciate, as I think I'm quite a 'dirty' builder!

The primer has shown up a few small areas to be looked at and repaired, but not as many as I feared. So, some small filling and sanding, a touch-up with primer and I should be ready to get a coat of RLM 65 on the under surfaces and fuselage.

Pictures 56. While waiting for the primer to harden, I pressed on with some other detailing jobs. The first was adding the control horns to the rudder, cut and shaped from plastic card. Then I had a go at making the retention wire spring for the centre canopy section. I was quite pleased that this worked so well. It's 5 amp fuse wire twisted round a sewing needle. The wire is very mallable, yet holds its shape well when the needle is removed. The front and back coils got a pinhead of superglue to hold them in place, but to be honest, the amount was so minute, I don't know if it took at all. I think, looking at the close-up, it would be better to make the retention wire from the same gauge wire as the spring, rather than from microfilament as I was intending.

As I had the dregs of my first mix of RLM 02 left, I decided to give the canopy interior a spray. I ran out of mix before I could get a good coverage on. I'll wait 'till I make up a fresh batch and spray again.

That's it for now, but I feel the finish line is just about hoving into view at this stage.
 

Attachments

  • Canopy Mask exterior combined.jpg
    Canopy Mask exterior combined.jpg
    48.5 KB · Views: 152
  • Rudder Horns.jpg
    Rudder Horns.jpg
    41.5 KB · Views: 162
  • 109E Primed 2.jpg
    109E Primed 2.jpg
    37.5 KB · Views: 151
  • 109E Primed 1.jpg
    109E Primed 1.jpg
    37.2 KB · Views: 149
  • 109E Primed 3.jpg
    109E Primed 3.jpg
    42.9 KB · Views: 154
  • Canopy interior RLM 02  Spring.jpg
    Canopy interior RLM 02 Spring.jpg
    52.8 KB · Views: 155
Some day!!!!!!!!!!!


In my next life mine will look so good.
So great to see the progress photos, but still anxious to see the big finish!
 
Alright you got the seam along the the top of the fuse :thumbleft: So many think myself included it should be smooth.I now know better for those future builds.Cheers
 
Looking great Gerry, and I like that antenna link. One thing though - don't forget the upper, central, internal brace frame on the rear glazing, which was finished in RLM 02.
 
Thanks again, Guys.

Bill and Andy, yes I'm also looking forward to getting to the final painting, but not without some trepidation as I have concerns about my airbrush skills. I do tend to be very impatient when it comes to building layering in light coats and have been very heavy handed in the past, trying to get coverage. I remember, years ago picking up a booklet on modelling, by Verlinden. His argument was that so many otherwise good builds are 'wasted', as he put it, by bad painting and weathering. So fingers crossed all the way - it's never too late for a disaster!

Javlin, the fuselage seam was something I only picked up on recently, too. The intuition is to fill and sand all seams but it does appear there is a visible join along the top and bottom fuselage. In one modelling article I read recently, the author recommended that, in reality, this is a slight step join and to reproduce it accurately, lay a length of tape along the centre seam and spray a couple of coats of primer against the tape edge, so that when the tape is removed you're left with a slight lip. I'll leave it to others to judge if this is an effective method, as I haven't tried it myself.

Terry, thanks as ever for your continued interest. Your point about the rear glazing has been allowed for. Techmod supplied both inner and outer masks for the rear canopy. You can just about see the inner masking in the first shot, before the RLM 02 was sprayed. There are three internal braces allowed for but because the external mask is fully covering the exterior glazing, you can't see them yet. One question, Terry, that you or someone else may be able to answer: Would the trim tabs on the ailerons and elevators and the rudder trim tab have been finished in red on this aircraft?

Thanks again for all your interest.
 

Users who are viewing this thread

Back