Grant Barr
Senior Airman
My next build is an addition to my Yellow Wings collection - the Brewster Buffalo from Tamiya. I scored this kit from ePay a little while back not knowing much it. Turns out the kit itself is quite old. The date on the sprues is 1974, which I am assuming will be the original mold block creation date. A cursory review of the instructions and other printed bits on the box reveal a copyright date of 1992, so I think the kit dates from around then. The other thing I noted is that the kit was manufactured in the Philippines and not Japan (cheaper labour I assume...).


I don't have any after market decals for this aircraft, so have elected to go with the colour scheme included in the kit for US Navy VF-2 based on the USS Lexington. I am hoping this scheme will make what was a universally unloved aircraft into a decent looking model.
Using the kit decals is going to pose some issues. As you can see they have deteriorated significantly with yellowing of the carrier film, and what is not as evident is a lot of drying out cracks on all decals. The yellowing I can reduce by leaving the sheet out in the sun for a short period of time and the cracks I am hoping to resolve with a few coats of clear varnish to stop them breaking up when being used.

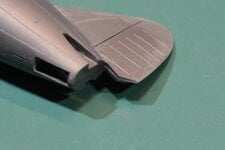
As for the kit itself, it has the old Tamiya silver styrene (I'm not a huge fan of this old plastic - flaws are harder to see on the silver surface). There is quite a bit of flash and the mold seams are quite pronounced - the molds were probably quite worn by the early 1990's, especially if the blocks were not well maintained over the intervening 20 years.


I happened to have on hand a Metallic Details R1820 resin engine, which I will use in this build. If you look closely at the kit engine you can see why I decided on this - it's pretty crappy. It looks like the kit engine has been "thinned" longitudinally to allow them to place an engine "bulkhead" well in front of the wing root. Looking at cut-away diagrams of the Buffalo reveal it is not positioned there, hence the squashed up engine. The after market replacement will therefore require some "adjustment" to the kit, removing and replacing this firewall further back to accommodate the proper engine depth. This is probably going to get very messy...
There will be a lot of clean up required on kit parts for this one. I've already done most of the clean up work, just don't have any photos prepared as yet to show this work. Once downloaded from the camera and reduced in resolution I'll get them uploaded.
I am hopeful that I can complete this kit in a more timely manner than some of my previous efforts. Please feel free to leave comments or feedback. Cheers!
I don't have any after market decals for this aircraft, so have elected to go with the colour scheme included in the kit for US Navy VF-2 based on the USS Lexington. I am hoping this scheme will make what was a universally unloved aircraft into a decent looking model.
Using the kit decals is going to pose some issues. As you can see they have deteriorated significantly with yellowing of the carrier film, and what is not as evident is a lot of drying out cracks on all decals. The yellowing I can reduce by leaving the sheet out in the sun for a short period of time and the cracks I am hoping to resolve with a few coats of clear varnish to stop them breaking up when being used.
As for the kit itself, it has the old Tamiya silver styrene (I'm not a huge fan of this old plastic - flaws are harder to see on the silver surface). There is quite a bit of flash and the mold seams are quite pronounced - the molds were probably quite worn by the early 1990's, especially if the blocks were not well maintained over the intervening 20 years.
I happened to have on hand a Metallic Details R1820 resin engine, which I will use in this build. If you look closely at the kit engine you can see why I decided on this - it's pretty crappy. It looks like the kit engine has been "thinned" longitudinally to allow them to place an engine "bulkhead" well in front of the wing root. Looking at cut-away diagrams of the Buffalo reveal it is not positioned there, hence the squashed up engine. The after market replacement will therefore require some "adjustment" to the kit, removing and replacing this firewall further back to accommodate the proper engine depth. This is probably going to get very messy...
There will be a lot of clean up required on kit parts for this one. I've already done most of the clean up work, just don't have any photos prepared as yet to show this work. Once downloaded from the camera and reduced in resolution I'll get them uploaded.
I am hopeful that I can complete this kit in a more timely manner than some of my previous efforts. Please feel free to leave comments or feedback. Cheers!

 Feels like I am a teenager again some days....