Navigation
Install the app
How to install the app on iOS
Follow along with the video below to see how to install our site as a web app on your home screen.
Note: This feature may not be available in some browsers.
More options
You are using an out of date browser. It may not display this or other websites correctly.
You should upgrade or use an alternative browser.
You should upgrade or use an alternative browser.
1/48 Tamiya Brewster F2A-2 Buffalo
- Thread starter Grant Barr
- Start date
Ad: This forum contains affiliate links to products on Amazon and eBay. More information in Terms and rules
More options
Who Replied?Crimea_River
Marshal
Very good Grant.
fubar57
General
Looking good
Vic Balshaw
Major General
At first glance I thought the masking was painted blue paint. Beautifully masked and with all your effort I recon you have the makings of a winner. 

Good work so far!
- Thread starter
- #46
Grant Barr
Senior Airman
Actually managed to get some painting done this afternoon. The weather here was a touch warm this afternoon (a balmy 39C or 102F in old money), but it did allow me to lay down two coats of gloss black primer.
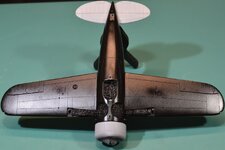
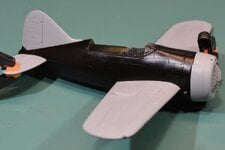
As you can see, the finish did come up a little bit grainy, probably as a result of the paint drying almost as soon as it left the airbrush. I'll give this at least 24 hours and then start the process of wet sanding and polishing. My aim is to have the smoothest possible finish on which to lay down the silver/aluminium/duralumin/etc final coats. I hope by doing this I give myself the best chance of achieving a natural metal finish that looks as real as possible, although I expect that I will be experimenting a bit with the silvers to see how to get the best finish. As I noted earlier in this build - there could be some serious swearing coming up!
I think once the black primer has been polished I might lay down the white primer before moving onto the silver. This might help minimise handling on the finished silver sections which can easily ruin the paint job.
That's all for this evening. As always, many thanks for popping by with messages and reactions. Cheers!
Vic Balshaw
Major General
That looks real good Grant. 

buffnut453
Captain
Actually managed to get some painting done this afternoon. The weather here was a touch warm this afternoon (a balmy 39C or 102F in old money), but it did allow me to lay down two coats of gloss black primer.
View attachment 763353 View attachment 763352
As you can see, the finish did come up a little bit grainy, probably as a result of the paint drying almost as soon as it left the airbrush. I'll give this at least 24 hours and then start the process of wet sanding and polishing. My aim is to have the smoothest possible finish on which to lay down the silver/aluminium/duralumin/etc final coats. I hope by doing this I give myself the best chance of achieving a natural metal finish that looks as real as possible, although I expect that I will be experimenting a bit with the silvers to see how to get the best finish. As I noted earlier in this build - there could be some serious swearing coming up!
I think once the black primer has been polished I might lay down the white primer before moving onto the silver. This might help minimise handling on the finished silver sections which can easily ruin the paint job.
That's all for this evening. As always, many thanks for popping by with messages and reactions. Cheers!
Grant,
Not to rain on your parade (the work you've done on this old kit is outstanding) but USN F2As weren't in natural metal finish. They were painted in an aluminium lacquer designed to protect the airframe from the salt spray environment aboard an aircraft carrier.
Hope this info doesn't perturb your build at all.
- Thread starter
- #50
Grant Barr
Senior Airman
Thanks for the information on the finish Buffnut! No raining on parades here.Grant,
Not to rain on your parade (the work you've done on this old kit is outstanding) but USN F2As weren't in natural metal finish. They were painted in an aluminium lacquer designed to protect the airframe from the salt spray environment aboard an aircraft carrier.
Hope this info doesn't perturb your build at all.
That actually makes my life much easier in terms of final finish but won't change my approach to the undercoats. I still want a nice smooth finish on which to lay down the silver/yellow/blue etc. so that work will continue. I will be happy not to have to bollocks' around getting variation on panels seen on NMF - winning!!
Good work so far!
- Thread starter
- #52
Grant Barr
Senior Airman
Went a bit quiet on this one - but I have actually been making some progress.
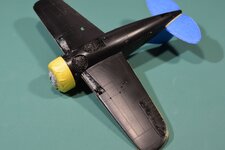
I have undercoated the engine cowl, wing uppers and tail surfaces in white. This way the yellows and blue will show true rather than take on any undercoat shading. Not 100% sure why, but I always find the Vallejo matt undercoats bond much better than the gloss, not a huge issue but annoying if I forget and lean too heavily on the gloss undercoats when sanding.
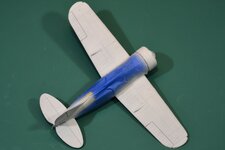
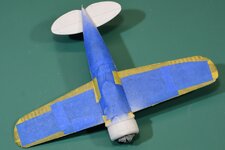
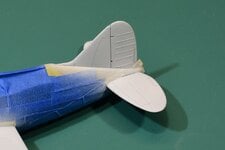
This next shot shows the gloss black after very lightly sanding and you can see in spots where it has just come away from the plastic - just pealed off!
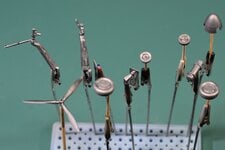
I also assembled all the various outstanding small parts, having cleaned them up and removed seam lines where necessary. All are ready for undercoat and paint.
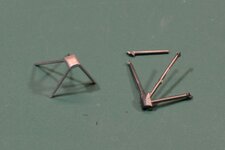
Inside the rear of the cockpit, over the top of the emergency life-raft cannister is a tubular framework. When I started to remove this part from the sprue it pretty much just shattered. These really fine styrene rods had become brittle with age and every time I touched them they would just break in a different place. I finally cracked the sh*ts and made a replacement from styrene rod and bar as shown in the shot below. Very fiddly but I am quite pleased with how it turned out.
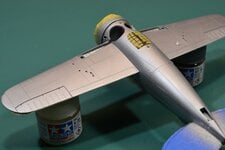
I have also managed to get some final aluminium paint down on the fuselage and lower wing surfaces. It is a tiny bit grainy to touch, but once I add the cockpit glass and lay down the final coats I hope some clear varnish over the top will remove some of this effect.
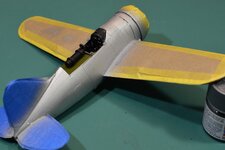
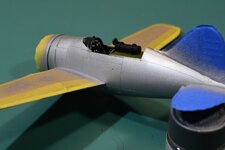
Finally, I have mocked up the fit for the scratched framework and confirmed it does not foul on the life-raft cannister and will allow the cockpit glass to be positioned without interference. I am hoping to glue this properly in place and fit the cockpit glass in the next couple of days - assuming all goes to plan.
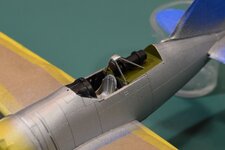
That's about all I have for now.
As always, thanks to everyone who stops by for a comment or reaction.
I have undercoated the engine cowl, wing uppers and tail surfaces in white. This way the yellows and blue will show true rather than take on any undercoat shading. Not 100% sure why, but I always find the Vallejo matt undercoats bond much better than the gloss, not a huge issue but annoying if I forget and lean too heavily on the gloss undercoats when sanding.


This next shot shows the gloss black after very lightly sanding and you can see in spots where it has just come away from the plastic - just pealed off!

I also assembled all the various outstanding small parts, having cleaned them up and removed seam lines where necessary. All are ready for undercoat and paint.

Inside the rear of the cockpit, over the top of the emergency life-raft cannister is a tubular framework. When I started to remove this part from the sprue it pretty much just shattered. These really fine styrene rods had become brittle with age and every time I touched them they would just break in a different place. I finally cracked the sh*ts and made a replacement from styrene rod and bar as shown in the shot below. Very fiddly but I am quite pleased with how it turned out.

I have also managed to get some final aluminium paint down on the fuselage and lower wing surfaces. It is a tiny bit grainy to touch, but once I add the cockpit glass and lay down the final coats I hope some clear varnish over the top will remove some of this effect.


Finally, I have mocked up the fit for the scratched framework and confirmed it does not foul on the life-raft cannister and will allow the cockpit glass to be positioned without interference. I am hoping to glue this properly in place and fit the cockpit glass in the next couple of days - assuming all goes to plan.

That's about all I have for now.
As always, thanks to everyone who stops by for a comment or reaction.
Vic Balshaw
Major General
Some very fine work there Grant. 

fubar57
General
Beauty
Nicely done so far!
Crimea_River
Marshal
Great work for sure. Thanks for the detailed update.
- Thread starter
- #59
Grant Barr
Senior Airman
Sunday afternoon update.
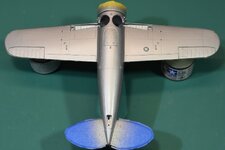
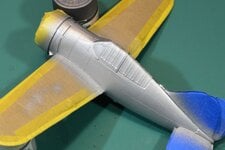
I have managed to put some clear polyurethane down over the Tamiya Aluminium and I am happy with how it has turned out. It's a bit hard to see in these shots but it has that slightly glossy finish making the silver look like it was painted rather than NMF - job done I think.
Having done the clear coat I set about masking up again to do the yellow top of wings. I didn't bother taking any shots of this - one masked up aircraft looks much the same as any other masked up aircraft!
With the yellow this time around I took a bit of time to do a tiny amount of brown pre-shading, which I hope you can see just showing through. I only put 3 very light, heavily thinned coats of yellow on before again hitting it up with some clear coat.
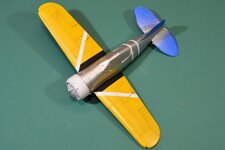
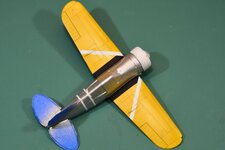
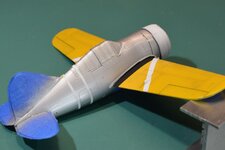
I've left the diagonal stripes on the wings unpainted so when the blue goes on it will match the shade for the cowling and I have started the masking process to get the blue band around the fuselage. I am hoping that being silver it won't throw a different colour shade to the wings/cowl. If it does then it might just be far enough apart from the other blue sections for it to be hard to spot? Maybe - I hope!
Edit: forgot to note the black wing walk areas. Even though I toned down the black it still looks a bit stark - I might hit it with some paint chips and some dirty clear coat and see how that looks. If that fails I'll just do it again but a bit more washed out this time.
Not much else to talk about - just more masking and painting to do. Tedious work, but I am enjoying the output. Hopefully another post later next week if all goes to plan.
Cheers.


I have managed to put some clear polyurethane down over the Tamiya Aluminium and I am happy with how it has turned out. It's a bit hard to see in these shots but it has that slightly glossy finish making the silver look like it was painted rather than NMF - job done I think.
Having done the clear coat I set about masking up again to do the yellow top of wings. I didn't bother taking any shots of this - one masked up aircraft looks much the same as any other masked up aircraft!
With the yellow this time around I took a bit of time to do a tiny amount of brown pre-shading, which I hope you can see just showing through. I only put 3 very light, heavily thinned coats of yellow on before again hitting it up with some clear coat.


I've left the diagonal stripes on the wings unpainted so when the blue goes on it will match the shade for the cowling and I have started the masking process to get the blue band around the fuselage. I am hoping that being silver it won't throw a different colour shade to the wings/cowl. If it does then it might just be far enough apart from the other blue sections for it to be hard to spot? Maybe - I hope!
Edit: forgot to note the black wing walk areas. Even though I toned down the black it still looks a bit stark - I might hit it with some paint chips and some dirty clear coat and see how that looks. If that fails I'll just do it again but a bit more washed out this time.
Not much else to talk about - just more masking and painting to do. Tedious work, but I am enjoying the output. Hopefully another post later next week if all goes to plan.
Cheers.
Vic Balshaw
Major General
It is looking good Grant with all that lovely yellow. 

Users who are viewing this thread
Total: 1 (members: 0, guests: 1)
