Galland's Bf 109E-4 1/32 scale

Ad: This forum contains affiliate links to products on Amazon and eBay. More information in Terms and rules

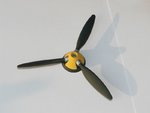
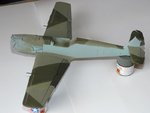
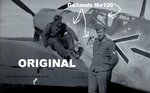
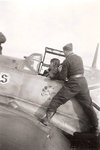
Ah, I can just see it now i look closely! I would think that the trim tabs would have been red on this airframe, yes.
 
Well, I finally got the airbrush out. I've been using an old graphics Aerograph dual action airbrush, from my graphic design days. This is fine for large area coverage but haven't tried it yet for small tight detail. I recently invested in a Badger 200 Airbrush, as backup, in case the Aerograph sat down on me, but haven't tried it out for real, so far. It's single action, where the spray coverage is set by a valve on the brush. It can't be increased or decreased during spraying without the valve been reset. My compressor is a small Testors desktop model outputting about 35psi. This is fixed and can't be adjusted on the compressor. Everything in this set of pictures was using the Aerograph.

The following pictures are probably standard for all builds but should explain my (lack of) techniques.

Picture 12. Undersides and sides got a coat of RLM 65. In this case, Tamiya XF 23 with a touch of white (about 5:1), thinned with Tamiya Thinners. I found that this sprayed well, with very little evidence of splatter. Any small splatter that occurred, was dealt with with the edge of kitchen towel, and when dry (very quickly), a further dusting. There was some overspray in the top of the wheel wells, when the tissue was removed, but this shouldn't be too difficult to fix.

In Picture 2, the saddle cowling is sitting a a little high. This is because it's sitting on masking tape to prevent penetration through the apertures to the engine bay. You may have noticed that I also added the thin metal bands between the wing and wing roots drilling rivet holes in those and the wing roots themselves.

Picture 3. Not being confident enough about my freehand spraying ability, the RLM 65, including the undersides, was masked off with a soft-edge mask to prevent any spray leaks. (With the amount of masking I put on, I don't believe that a nuclear blast would get through!).

My RLM 02 mix is based on Wayne's formula, Equal parts of Tamiya XF 22 and XF 49 and a splash of XF 19, Sky Grey (5:5:
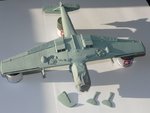
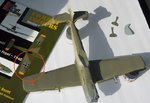
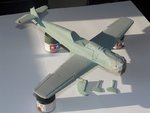
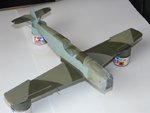
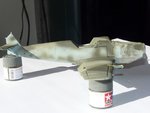
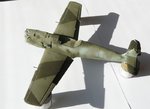
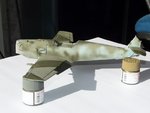
1), thinned. I don't have any accurate way of measuring out paint, so it tends to be approx, with a final visual judgement. This was then sprayed on in thin coats, varying the amount so it didn't appear too uniform on the wings. The illustration on the book cover is my physical ref for RLM 02.

Picture 4. My 'take-no-chances' masking for the RLM 71 coat. Not particularly pretty, but effective - I hoped. The spray edges of the masking tape on the wings and stabs was just gently prised off the surface with the back of a scalpel blade, enough to give a slight feather. The fuselage masks were more loosely fitted with paper masks. The slat openings were masked with same width plastic strip, held down with a dot of PVC, at both ends. I couldn't think of any easier way of doing this.

Pictures 56. The masks removed with the RLM 71 Dunkelgrun sprayed. I used Tamiya XF 61, thinned from the bottle. There's some retouching required, but that can be done at the same time I'm tackling the mottling. The difference in tonality of the RLM 02, on the outer starboard wing is not at all apparent in natural light. But I will double check it and repair as necessary. The paint all looks too fresh and needs to be softened down and aged considerably. Any hard edges will be treated similarly. I'm still try to figure out the best way of achieving this, without ruining what I've already done.

Picture 7. The spinner has been assembled, with the blades and backplate finished in RLM 70, Tamiya XF 27, thinned, straight from the bottle. Fresh from the factory!

Picture 8. The canopy outer frame has had a coat of RLM 71. Th interior and exterior masks haven't been removed yet. The forward face of the rear glazing needs a touch-up of 02.

I was hoping to press on with this over Easter, but the weather is so glorious here, that I might well take a break. Also, my daughter is visiting and I hope to devote some time to her.

Happy Easter, everyone. Any comments would be appreciated. More soon.

Gerry
 

Attachments

  • 1.jpg
    1.jpg
    61.9 KB · Views: 147
  • Painted Spinner Assembly.jpg
    Painted Spinner Assembly.jpg
    37.3 KB · Views: 158
  • Painted RLM 02.jpg
    Painted RLM 02.jpg
    72.3 KB · Views: 178
  • 2.jpg
    2.jpg
    59.9 KB · Views: 152
  • 65 A.jpg
    65 A.jpg
    53.9 KB · Views: 150
  • Masked for RLM 71.jpg
    Masked for RLM 71.jpg
    55.2 KB · Views: 172
  • 65 B.jpg
    65 B.jpg
    49.7 KB · Views: 161
  • Painted Canopy RLM 71.jpg
    Painted Canopy RLM 71.jpg
    31 KB · Views: 157
Very, very nice Gerry. Despite your unfounded reservations on air brushing abilities, I think you've done a magnificent job. This rig is going to look superb when done.

As to the apparent slight differences in tonality, I personally think that this is somewhat of a bonus in that it enhances the weathered look of the finished model if that's what you're trying ot achieve. In fact, there are modelers out there who do this on purpose. Also, keep in mind that the variations may become less obvious if you apply gloss coats, subsequent matt or flat coats, and decals. Of course, if you're going for the factory fresh look, you may want to address this but my personal preference has always leaned toward the workhorse look unless historical documentation of a particular subject proved that it's time between manufacture and demise was relatively short.

Great work!
 
Gerry that paint look's great how much weathering will you be doing this is turning out to be excellent.
 
Once again, thanks for your support, Guys.

Andy and Woody, I'm aiming to replicate Galland's W/N 5819, with 57/58 kills on its rudder, so it certainly won't be factory fresh. From what ref photos I have (mainly of the port side), the mottling looks quite subtle and blended, and this is what I'll try to achieve - 'try' being the appropriate word! The weathering and exhaust staining should represent the aircraft before it's re-paint in November/December 1940, so reasonably dirty, without overdoing it. I'm intending to start delicately, then post a few shots and gauge the reaction. If it's deemed too subtle, it's easier to add rather than subtract.

Terry, I'm very pleased with the results I'm getting with the Aerograph, although I'm sure it was never designed for model making. Any problems with the finish, I'm afraid, is down to the workman rather than his tools. The only problem with the Aerograph is that as far as I can see it has been discontinued, so spare parts could be an issue in the future.

I had a couple of hours free after my last post and experimented with mottling on some sheets of paper. I was pleased with the result. Because of the dual action, spray strength is controlled with finger pressure and after some practice, I was getting some good, subtle results. Next step is to try it on the model.
 
Gerry, the thing I found out about spraying on paper is that it takes up paint differenty than plastic. I too did lots of practicing on paper for the squiggles on my He 219 but when I took the settings and technique to the model, I had to re-adjust everything. I'd suggest you spray against an old model if you have one or, if not, onto some plastic card.
 
Why am I not surprised at the fantastic spray job!

It's good to spray Any kind of solid material with the color you want to do your squiggles on. For practice and to get the coverage and flows to where you want them. Paper is not what you want for this as it soaks up the liquids in the spray and gives you a false sense of how it wil act on the planes finish. You'll get there matey.
 
Thanks Wayne. Andy and Bill, thanks for the timely warning. I don't have any old kits I can experiment on but I took your advice and tried spraying on some plastic sheet. I had some free time over the last couple of nights, so, taking my courage in both hands and my airbrush in my third, I tentatively started spraying the model. By chance, I still have the nose section masked, to protect the yellow. I was able to test spray on this mask for pressure and once satisfied with the result, transferred the same move to the model.

I sprayed the RLM71 first and worked backwards through the lighter colours, using thin coats and very gently building coverage. The photos I referenced from can all be found in Najco's 'Galland's 109s' Thread, which is referenced at the bottom of my thread pages. I've taken the liberty of lifting a shot from his thread, from post 90, as a comparison with what I achieved.

I'm quite pleased with the result. It generally achieved the subtle mottling I've seen on photos of Galland's 109E-4. But I would welcome your comments as to whether you feel thats correct.

Pictures 12. Port and starboard sides. I have better references for the port side than I do for the starboard but the general mottling seems to start more heavily under the cowling and cockpit and gets lighter as it moves towards the rear fuselage.

Picture 3.[/B] An overall view of the scheme, as it now stands.

Picture 4. Galland's actual aircraft, I hope from the correct time period. I hope that this uploads OK, as it's a different format from the rest of my shots.

Picture 5. My attempt to replicate the same angle and tonality for comparison purposes. This was taken with a modern digital camera and worked on in Photoshop to try to 'age' it to a 70 year old photo - very difficult!

That's as far as I've got. I look forward to your comments.

Finally, to recap: Galland'd 109E-4. Open yellow spinner. Mickey Mouse Telescope sight. 57-58 kills on a RLM 65 patch on the rudder. November/ December 1940. At this stage would the two access hatches on the port fuselage, for the nitrous tanks, have been installed? It's not to late for me to put them in, if that's correct.
 

Attachments

  • Port mottle Black  White.jpg
    Port mottle Black White.jpg
    62.2 KB · Views: 177
  • Starboard mottle.jpg
    Starboard mottle.jpg
    55.2 KB · Views: 170
  • Overall camouflage.jpg
    Overall camouflage.jpg
    57 KB · Views: 184
  • Port Mottle.jpg
    Port Mottle.jpg
    57.5 KB · Views: 169
  • Galland 109 3-bc.jpg
    Galland 109 3-bc.jpg
    51.4 KB · Views: 189
Looking good Gerry, and it should really 'come to life' once the clear coats go on. As for the nitrous access hatches, I'm not sure without doing a bit of digging, but no doubt Wayne will have the answer off the top of his head !
 
Looks excellent Gerry! I think your mottling has turned out very well and I can tell you've been tryng to replicate the scheme from that B&W pic. Well done!

Having said that, if you're going for complete accuracy, I did notice in the B&W pic that the dark splinter on the wing angles back away from the fuselage just ahead of the flap indicator whereas you've made it a stright line. No big deal really but I just thought I'd point it out in case it was important to you.
 
Andy, I can only endorse Terry's comment - well spotted! As regards accuracy, yes, I would like to get the build as accurate as the kit and my ability will allow, without becoming obsessive. At the end of the build I would like to have achieved a result that would be viewed as a good attempt to replicate this particular aircraft.

In posting my photos, I was hoping to have any such errors pointed out, at a stage when they are still easily fixable. I hadn't spotted that variation on the splinter scheme, just assuming that the standard scheme would have been applied. This is easy enough to correct, at this stage, before a sealing coat or decals have been applied, as indeed will the inclusion of the nitrous hatches, should that be correct.

Your spot made me go back through Najco's thread again to see could I find any other differences to the splinter pattern. Unfortunately, because of reflection or sheen at the low angles at which most photos were taken, I couldn't spot anything else. I am open to correction on this. I enclose a couple of photos from Najco's thread, which show the new line clearer. The first is from post 73, picture 2, the second from post 133, shot 2. This also seems to show that the flap doesn't follow the separation between RLM 02 RLM 71 on the wing, but is entirely in RLM 71.
 

Attachments

  • gal2small.jpg
    gal2small.jpg
    65 KB · Views: 151
  • gal100.jpg
    gal100.jpg
    33.2 KB · Views: 152

Users who are viewing this thread

Back