Skyediamonds
Staff Sergeant
- 1,083
- May 26, 2018
Good morning gentlemen.
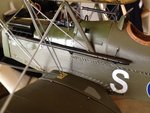
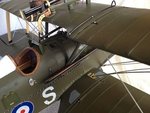
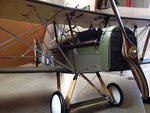
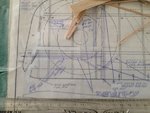
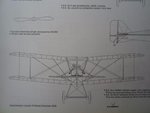
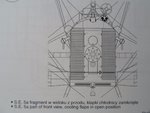
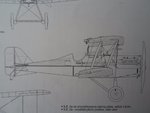
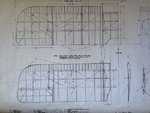
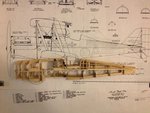
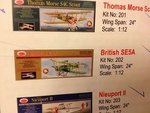
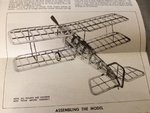
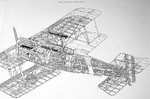
Just finished posting a series of build threads on Super Detailing the Wright Bros' Flyer and have been encouraged to also do one on the S.E.5 model that was completed two years ago. This model is from a Guillow's kit and represents many of the extra steps taken to achieve a realistic portrayal of the full sized aircraft. As with the previous build threads on the Flyer, all comments are welcomed by everyone on this build thread. The Guillow's kit is advertised as being 1/12th scale with a 27" wingspan, made of balsa wood with some plastic accessories such as wheels along with some wires for the axles. The actual model comes closer to 1/14th scale.
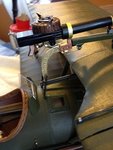
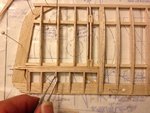
Disclaimer note: it wasn't until after the model was completed, that I discovered the wonders of Vape metal strips. Until that discovery, I used Evergreen Plasticstrut in form of thin plastic half-round strips of .060" thickness & up to 24" long for rigging the model. I was also later to discover that Evergreen produces the same half-round strips in .040" in thickness which would have been more realistic to the rigging in scale of my S.E.5 model.
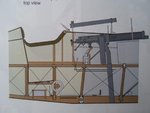
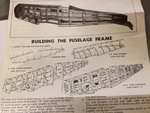
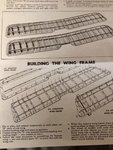
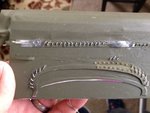
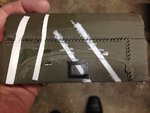
Many people in general, and many modelers in particular, forget that several biplanes in the First World War and thereafter employed the use of steel flat wire that were somewhat airfoil shaped in cross section for static rigging as opposed to using stranded wire. This was for the purpose of adding strength and rigidity to the rigging that otherwise would be whipping in the slipstream. I've read that its origin was from the Royal Aircraft Factory. Hence, the oft-used term to describe this particular static rigging as: "RAFer" wires. However, stranded wires are still used on flying controls due to its flexibility and strength in both biplanes and modern General Aviation aircraft.
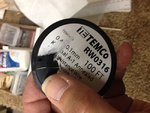
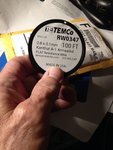
As usually the case in building models, it's only after the completion of the model, that a great accessory or product shows up later. So it was, with the Vape strip. I'm not a smoker & I do not advocate smoking in any shape or form, but as a modeler, I tend to use whatever is available to help achieve a desired effect in detail. This Vape strip is, in a word, fantastic! It's the cat's "meow" for rigging smaller scale models from plastic 1/32nd scale to some of the larger wooden (but still smaller scale) models of 1/5th scale. It's available through many different outlets and specialty Vape shops here in the U.S. & I'm sure elsewhere in different parts of the world. However, it's also available in 2 different sizes; .04mm and .08mm in thickness, through mail-order such as Amazon. I've written to an editor of a scale plastic model magazine and he is receptive to passing on "the word" in his publication.
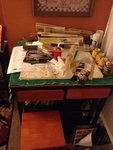
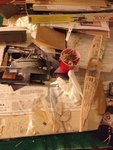
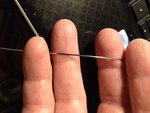
The best deal? It comes in 100-foot rolls. Enough static rigging for hundreds of models to last a lifetime all for just (in today's prices) around $7.00-$8.00 in US.currency. I'm enclosing a few photos of the Vape metal strips for you to view for yourselves. I hope this will help everyone in the modeling world. The last picture shows both sizes. I'm holding the .4mm size and the .8mm size is in the background.
Skye
Just finished posting a series of build threads on Super Detailing the Wright Bros' Flyer and have been encouraged to also do one on the S.E.5 model that was completed two years ago. This model is from a Guillow's kit and represents many of the extra steps taken to achieve a realistic portrayal of the full sized aircraft. As with the previous build threads on the Flyer, all comments are welcomed by everyone on this build thread. The Guillow's kit is advertised as being 1/12th scale with a 27" wingspan, made of balsa wood with some plastic accessories such as wheels along with some wires for the axles. The actual model comes closer to 1/14th scale.
Disclaimer note: it wasn't until after the model was completed, that I discovered the wonders of Vape metal strips. Until that discovery, I used Evergreen Plasticstrut in form of thin plastic half-round strips of .060" thickness & up to 24" long for rigging the model. I was also later to discover that Evergreen produces the same half-round strips in .040" in thickness which would have been more realistic to the rigging in scale of my S.E.5 model.
Many people in general, and many modelers in particular, forget that several biplanes in the First World War and thereafter employed the use of steel flat wire that were somewhat airfoil shaped in cross section for static rigging as opposed to using stranded wire. This was for the purpose of adding strength and rigidity to the rigging that otherwise would be whipping in the slipstream. I've read that its origin was from the Royal Aircraft Factory. Hence, the oft-used term to describe this particular static rigging as: "RAFer" wires. However, stranded wires are still used on flying controls due to its flexibility and strength in both biplanes and modern General Aviation aircraft.
As usually the case in building models, it's only after the completion of the model, that a great accessory or product shows up later. So it was, with the Vape strip. I'm not a smoker & I do not advocate smoking in any shape or form, but as a modeler, I tend to use whatever is available to help achieve a desired effect in detail. This Vape strip is, in a word, fantastic! It's the cat's "meow" for rigging smaller scale models from plastic 1/32nd scale to some of the larger wooden (but still smaller scale) models of 1/5th scale. It's available through many different outlets and specialty Vape shops here in the U.S. & I'm sure elsewhere in different parts of the world. However, it's also available in 2 different sizes; .04mm and .08mm in thickness, through mail-order such as Amazon. I've written to an editor of a scale plastic model magazine and he is receptive to passing on "the word" in his publication.
The best deal? It comes in 100-foot rolls. Enough static rigging for hundreds of models to last a lifetime all for just (in today's prices) around $7.00-$8.00 in US.currency. I'm enclosing a few photos of the Vape metal strips for you to view for yourselves. I hope this will help everyone in the modeling world. The last picture shows both sizes. I'm holding the .4mm size and the .8mm size is in the background.
Skye
Attachments
Last edited: